How to Fix Wmpnetwk.exe High CPU and Memory Usage in windows
Nhận đường liên kết
Facebook
X
Pinterest
Email
Ứng dụng khác
If you are still using Windows 7, you may have noticed that wmpnetwk.exe is using more system resources than any other service. In this article, Thewindowsfan.com will talk about how to fix wmpnetwk.exe high memory usage. Let's get started now!
Note: This issue will only occur on Windows 7, along with users who have not disabled Windows Media Sharing.
What is wmpnetwk.exe?
This is an internal system process that was disabled by default in older versions of Windows. This process is responsible for connecting the integrated media player to the external network. While this process shouldn't consume a lot of resources, some users have also reported incredible resource consumption of up to 70% coming from this service.
Unless you're streaming music or videos over the Internet using Windows Media Player, this service is actually completely unnecessary. Turning off wmpnetwk.exe won't affect the system in any way either.
In any case, if you notice that your system is running slower and slower, press CTRL + Shift + ESC and select the Processes tab.
If you've confirmed that wmpnetwk.exe is the cause of your resource allocation problems, it's time to take real action. If you do not use Windows Media Center, then the article recommends that you disable wmpnetwk.exe. However, if you occasionally use Windows Media Player to stream, it might make more sense to apply a more subtle fix that will allow you to continue streaming on Windows Media Player.
Stop wmpnetwk.exe from running automatically (at startup)
This fix basically involves stopping the service and changing the startup type to Manual. After rebooting, change the reboot mode to "automatic". This will prevent wmpnetwk.exe from running on its own. Instead, it will only be accessed as needed (when you stream something in Windows Media Player). Here's what you need to do:
- Press Win + R and type services.msc.Press Win + R and type services.msc
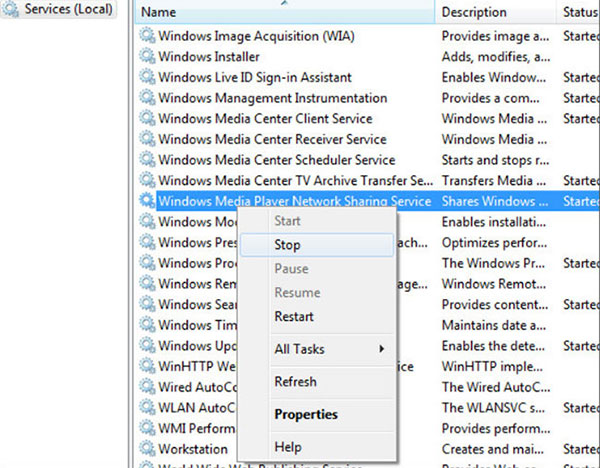
- Now, scroll down and then search for Windows Media Player Network Sharing Service. When you find this option, right-click on it and press Stop.
- It may take some time until the service stops. You will know that the process is terminated when the Stop item is grayed out. When that happens, right-click the service again and click Properties.
- Once you're in the Properties window, click the General tab and access the drop-down menu near the Startup type. Set it to Manual, then click Manual and reboot the system.
- When the computer restarts, you must return to the Properties window. Once you're there, select the General tab, and then change the boot type from Manual to Automatic (and not Automatic Delayed Start). Click Apply to confirm the selection.
Now the issue will actually be resolved. Now, Windows Media Player will only launch the wmpnetwk.exe process when it is required.
Permanently disable the wmpnetwk.exe service
If you are not using Window Media Player, then there is no reason why you would want the wmpnetwk.exe service to restart. In case you're doing a more drastic fix, disabling the wmpnetwk.exe service indefinitely is indeed the way to go. Let's see what you need to do:
- Press Win + R, type services.msc and press Enter.
- Now, scroll down, and then you have to search for Windows Media Player Network Sharing Service. When you find it, right-click on it and hit Stop.
- When the Stop item is grayed out, right-click the service again and select Properties.
- Access the drop-down menu near the Startup type by clicking the General tab. Now set it to Disabled and then click Apply.
Fix the wmpnetwk.exe memory issue
Note: You will need this service if you want to share media content or stream over the network through Windows Media Player.
- First, click Start, type services.msc in Start Search and press Enter.
- Now you have to search for Windows Media Player Network Sharing Service from the list, right-click on it, and select Stop.
Stop Windows Media Player Network Sharing Service
- It will take some time to stop the service. After that, right-click on this service again and then select Properties.
- Now, change the Startup type to Manual and then restart the computer.
- When the computer restarts, go back to the Properties section again and change the Startup Type to Automatic.
Important Note: This issue affects only a small number of users and is not something Microsoft is planning to address in an upcoming service pack. If you have never used Windows Media Player and are using a 3rd-party player, such as VLC, you can always disable this service to save system resources.
Reference:
One of the "worst" problems that users often encounter on Windows 10 is the black screen error.
The black screen error can occur in some situations on Windows 10, stemming from problems related to the graphics card, the connection error between the computer and your monitor, the error occurring during the installation of the operating system, updating to new versions, etc., or simply happening randomly at any time.
In the article below, the administrator will guide you with some solutions to fix the black Windows 10 screen error.
In addition, if you encounter a black screen error on Windows 7, 8, or 8.1 computers, readers can refer to the steps to fix the error here.
Steps to fix a basic black Windows 10 computer screen
1. Black screen error during installation
Once there, try turning off the computer by pressing and holding the power button for a few seconds. If using a laptop, you can unplug the charger and remove the battery.
Unplug all unnecessa...
Microsoft is currently A/B testing a native dark style for the ChatGPT-powered Bing.com, and it has finally begun distributing out Bing.com to Google Chrome and Safari. On Windows 10 and 11, we got a pop-up that allowed Bing AI access through Google Chrome. It appears that certain people can also access Bing AI through Safari.
One of the most cutting-edge and effective language models for users is Bing AI, which is powered on ChatGPT-4. Since late February, Bing.com AI support has been accessible to Microsoft Edge users. Now, Microsoft is beginning to expand its support to all browsers, including Google Chrome and Apple Safari.
Bing AI pop-up in Chrome | Image Courtesy: Thewindowsfan.com
Anyone may now test Bing AI in Chrome thanks to a new pop-up that has begun to show in the taskbar of Windows 10 or 11. In our experiments, Google Chrome's native dark mode support allowed us to access Bing AI. The screenshot below illustrates how the white background changes to a black...
Windows 11 is considered more beautiful and aesthetically pleasing than Windows 10. However, not everyone likes the new things that Windows 11 brings. If you have already upgraded to Windows 11 but do not like its interface and do not want to return to Windows 10, you can try the customizations below.
Customizing the interface, also known as a custom interface, is not as popular as before. However, it is still very useful in case you want to refresh your computer. In this article, the administrator will show you how to customize the Windows 11 interface to become macOS.
A video tutorial on customizing the Windows 11 interface to become macOS was made by YouTube channel Tech Rifle. To be successful, you will have to combine a variety of custom software, tools, and themes. This process requires you to perform meticulously and accurately. If only one step is wrong, the results will not be as expected, and the installation process will not be successful.
Things you need to p...




Nhận xét
Đăng nhận xét