One of the "worst" problems that users often encounter on Windows 10 is the black screen error.
The black screen error can occur in some situations on Windows 10, stemming from problems related to the graphics card, the connection error between the computer and your monitor, the error occurring during the installation of the operating system, updating to new versions, etc., or simply happening randomly at any time.
In the article below, the administrator will guide you with some solutions to fix the black Windows 10 screen error.
In addition, if you encounter a black screen error on Windows 7, 8, or 8.1 computers, readers can refer to the steps to fix the error here.
Steps to fix a basic black Windows 10 computer screen
1. Black screen error during installation
Once there, try turning off the computer by pressing and holding the power button for a few seconds. If using a laptop, you can unplug the charger and remove the battery.
Unplug all unnecessary devices that are connected to the computer, such as external hard drives, USB drives, printers, phones, game consoles, and secondary monitors.
If possible, you should also turn off WiFi and Bluetooth. Leave only the necessary connections to the computer, such as the keyboard, mouse, and monitor..
Wait for about 60 seconds, then insert the battery, plug in the power cord, and turn on the computer.
If it is just a small problem, a little glitch, the installation process will continue and be completed. Once the Windows 10 Desktop is displayed, you can reconnect external devices and other devices.
If the installation fails and reverts to the old state, proceed to disconnect all external devices and try to install the Windows 10 update again. Or you can use USB Boot to install the operating system.
2. Carefully check the connection cable
If your computer shows a black screen error before logging into Windows 10, the most likely cause is a connection problem between the computer and the monitor.
In this case, if you are using a Windows computer, double-check the cable connecting the monitor at both ends to see if it's plugged in correctly and firmly. Is the power supply cord for the monitor plugged in?
If there are multiple video output ports, you can try another one. Sometimes updating the driver can cause errors, such as sending the video signal to the wrong port (DVI, HDMI, DisplayPort, Thunderbolt, or VGA).
If your computer has both a discrete graphics card and an integrated graphics card, you can switch to the integrated card to check if the discrete graphics card is faulty. In many cases, after updating Windows 10 or the BIOS, the discrete card is disabled, and you have to re-enable it in the mainboard settings.
If your computer has both a discrete graphics card and an integrated graphics card, you can switch to the integrated card to check if the discrete graphics card is faulty. In many cases, after updating Windows 10 or the BIOS, the discrete card is disabled, and you have to re-enable it in the mainboard settings.
If you are connecting the computer to the TV, double check that the TV is turned on and make sure that you have set the correct Input to connect to the device.
3. Detect screen
In many cases, the black screen error is caused by Windows 10 not detecting the screen. You can use the Windows + Ctrl + Shift + B key combination to restart the video driver and refresh the monitor connection.
Attempt to "wake up" the screen.
On tablets (such as the Surface Pro), you can wake up the screen by briefly pressing the volume up and volume down buttons three times simultaneously.
When you perform this action, you will hear a beep and see activity on the screen, indicating that Windows 10 is able to respond to the command and that it is re-establishing the connection to the display.
Alternatively, assuming that Windows 10 is responsive, you can use the Win + P keyboard shortcut to bring up the "Project" menu. Then press the P key again and press the Enter key to switch between different display modes, and see if the black screen error disappears. (You'll need to repeat this 4 times to cycle through all possible modes.)
If you see nothing on the screen, press and hold the power button for about 10 seconds to turn off the device. Then press the power button again to reboot.
4. Unplug all unnecessary devices
Externally connected devices can be the cause of the black screen on the computer. In this case, try disconnecting all external devices and checking if the error persists.
If everything is back to normal and there are no more black screen errors, then you can try connecting the external devices one by one to your computer. If the computer crashes with the black screen again, then you can determine which device is causing the error.
Disconnect your device, then restart your computer, and if it continues to have a black screen error, contact the manufacturer for help.
Fix the black screen with desktop access on Windows 10
If you see a black screen after signing in to Windows 10 but can still use the mouse pointer, it could be a problem with the Windows Explorer process.
To resolve Windows Explorer progress issues, follow these steps:
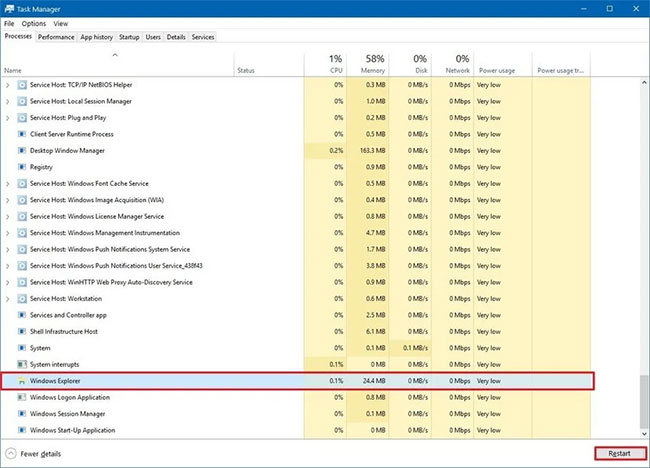
1. Use the keyboard shortcut Ctrl + Shift + Esc to open the Task Manager.
Quick Tip: You can also use the keyboard shortcut Ctrl + Alt + Del, then click the Task Manager button.
2. Click the More details button (if in collapsed mode).
3. Click Processes tab.
4. Select WindowsExplorer service.
5. Click the Restart button in the bottom right corner.
Click on Restart button
After completing the steps, you will be able to access the desktop again.
Restart explorer.exe
If the previous steps did not work, you can terminate and restart the process with the following steps:
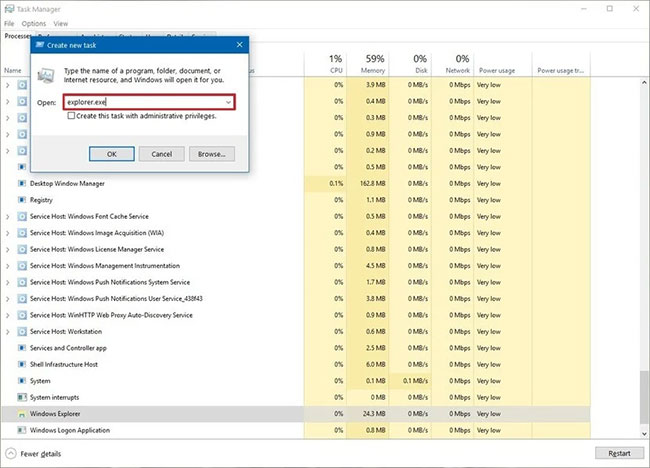
1. Use the keyboard shortcut Ctrl + Alt + Delete to open the Task Manager.
2. Click the More details button (if in collapsed mode).
3. Right-click the Windows Explorer service and select the End task option (if available).
4. Click on the File menu.
5. Select the Run new task option.
6. Enter the following command and click the OK button.
explorer.exe
Type explorer.exe command
7. After completing the steps, you should be able to use your device normally.
Start the computer in Safe Mode to fix the black screen error
If you apply the above solutions and the error persists, you can boot the computer into Safe Mode and try to fix it.
To boot the computer into Safe Mode, there are many ways. You can follow the steps below:
1. Start your computer.
2. Right on the sign-in screen, press and hold the Shift key, then click the Power button (Power button) in the bottom right corner of the screen, and select Restart.
If you don't see anything because the screen goes black, then you start your computer, see the blue Windows logo appear, press the Power button, and start the computer again. Repeat the same steps three times until Windows 10 Automatic repair is activated. Follow the on-screen instructions and open the Advanced options menu.
3. On the Advanced Startup Menu window, click Troubleshoot.
4. Click Advanced options.
5. Click Startup Settings.
6. Click Restart.
7. In the Startup settings window, press the F5 key or the 5 key to access Safe Mode with Networking.
After your computer has booted into Safe Mode, follow the steps below:
Perform Clean Boot Windows 10
Normally, when the device boots normally, Windows 10 loads a bunch of services, drivers, and apps that run in the background. If one of them is not working correctly, a black screen error may appear.
Clean Boot will instruct Windows 10 to start with only a minimal number of services, drivers, and applications, which can help you determine if something running in the background is causing the screen to go black. completely or not.
On Windows 10, Clean Boot is similar to Safe Mode, but it allows you to re-enable one service or piece of software at a time to pinpoint the problem more precisely.
Refer to the article: How to perform Clean Boot on Windows 10/8/7 for details on how to do it.
Fix black screen with Clean Boot
In this case, use these steps to reactivate the items (one by one) and restart the device to see which item is causing the black screen error:
1. Open Start.
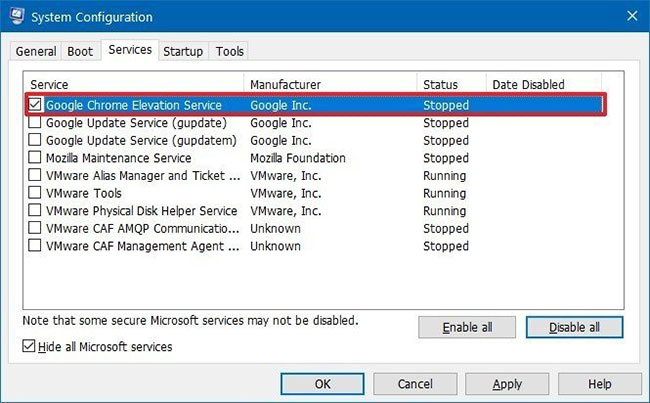
2. Search for msconfig, select the System Configuration item in the results.
3. Click Services tab.
4. Click Hide all Microsoft services option.
5. Select one of the services.
Select one of the services
6. Click Apply button.
7. Click OK button.
8. Restart the computer.
After you complete the steps, repeat the steps for every item until you can determine the cause of the problem.
Re-enable startup items
If no service is causing the problem, use these steps to re-enable startup items:
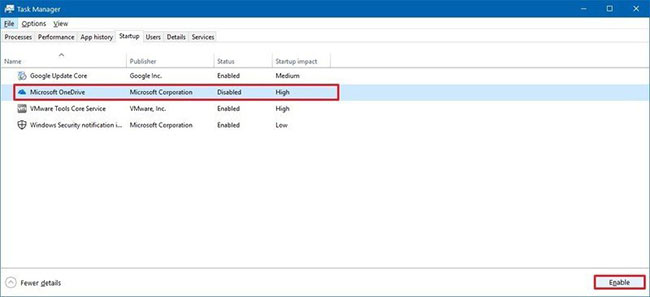
1. Open Start.
2. Search for Task Manager.
3. Click Startup tab.
4. Select an app and click the Enable button in the bottom right corner.
Select an app and click the Enable button
5. Close Task Manager.
6. Restart the computer.
After you complete the steps, repeat the instructions with every item until you find the app that is causing the black screen error.
If you want to revert the changes, you can use the same instructions outlined above to perform a Clean Boot.
Reinstall the video driver
Another cause of the black screen error is the error of updating the graphics card driver. During Windows 10 updates, the error of updating the graphics card driver occurs frequently.
In some other cases, the problem is not in the update error; the video driver can be the cause of the error and display a black screen.
If the video driver is not working properly, you can uninstall the video driver in Safe Mode and then allow the operating system to automatically reinstall the driver after it finishes booting.
1. To open the Power User menu, press the Windows + X key combination and select Device Manager.
2. Expands Display Adapters.
3. Right-click the network card and select Uninstall.
Tip: You can also select the Delete the driver software for this device option to remove the driver from the computer. In some cases, this option is recommended, but if the operating system cannot find the driver online, you will have to download the correct driver for the video card from the computer manufacturer's homepage.
4. Click OK to confirm.
5. Start your computer to confirm.
After your computer has finished booting, Windows 10 will automatically reinstall the video card driver, and the black screen error may not appear anymore.
Disable the Fast Startup
One of the causes of the black screen error is having Fast Startup enabled on your computer. When the computer boots into Safe Mode, follow the steps below to enable Fast Startup:
1. Open Control Panel.
2. On the Control Panel window, find and click System and Security.
3. Click Power options.
4. Click Choose what the power button does link in the left frame.
5. Select Change settings that are currently unavailable link.
6. Uncheck Turn on fast startup (recommended) option.
7. Select Save changes.
8. Restart your computer to complete the process.
It is important to note that, depending on your hardware configuration, your computer may not support Fast Startup.
Disable the High Contrast
If High Contrast is enabled on the computer, it can also be the cause of the black screen error.
While in Safe Mode, you can turn off High Contrast by following the steps below:
1. Open Settings.
2. On the Settings window, find and click Ease of Access.
3. Click High contrast.
4. Select None from the drop-down menu to turn off the High Contrast feature.
5. Restart your computer to complete the process.
Deactivate the Run Once process
The black screen error after logging into Windows 10 can also be caused by Process Run Once.
To turn off the Run Once process on Windows 10, follow the steps below:
1. Press Ctrl + Shift + Esc to open the Task Manager window.
2. Check the Processes tab and the Services tab, then look for any instances of RunOnce.exe and RunOnce32.exe.
3. If an instance is found in the Processes tab, select the instance and click End task. If you see an instance in the Services tab, right-click it and select Stop.
4. Click File.
5. Select Run new task.
6. Enter the command below to restart your computer:
shutdown -t00 –r
7. Click OK to execute the reboot command.
8. Restart your computer to complete the process.
Creating a new user account
A faulty user account (user) can also be the cause of your computer's black screen error.
If your user account is corrupted and this is the cause of the black screen error, then you can create a new account in Safe Mode.
To create a new user account in Safe Mode, follow the steps below:
1. Open Start.
2. Enter the keyword Command Prompt in the Search box and then press Enter.
3. On the list of search results, right-click Command Prompt and select Run as an Administrator.
4. Type the following command into the Command Prompt window and press Enter:
net user tempuser /add
Note: In the above command, remember to replace "tempuser" with the name of the user account you want to create.
5. Enter the command below to change the account type to the Admin account and then press Enter:
net localgroup administrators admin /add
Note:
Don't forget to replace "admin" in the above command with your account name.
6. Restart your computer to complete the process.
Note that:
You're using the Command Prompt to create an account instead of using the Settings app. This is because Windows 10 does not allow creating a new user account through Settings while in Safe Mode.
After your computer has finished booting, sign in with the new account you just created. If the black screen error no longer appears, it can be confirmed that the cause of the error may be a problem with the old user account.
How to fix a black screen with System Restore on Windows 10
Alternatively, you can also use the System Restore feature to undo system changes using one of the available restore points, which can fix the black screen problem on Windows 10. You won't lose your files, but depending on your current configuration, you may lose some settings, apps, and updates. (System Restore will only work if you have previously enabled and configured this feature.)
Open Advanced Startup using the boot method three times without success
When your device gets a black screen error, you won't be able to use System Restore normally, so you'll need to manually activate the recovery environment:
To access the Advanced startup environment, follow these steps:
1. Restart the computer.
2. As soon as the Windows logo appears on the screen, we can press the power button to interrupt the boot sequence.
Interrupt the boot process
3. Repeat steps 1 and 2 two more times.
After the third interruption, Windows 10 will open into the Advanced Startup environment, and after that, you can continue with the steps below to use System Restore.
Using bootable media, launch Advanced Startup
Alternatively, you can use a bootable USB to access Advanced startup settings by following these steps:
1. Boot the computer with a bootable USB.
Quick Tip: If your device won't boot from USB, you'll need to change your motherboard's BIOS settings to make sure it can boot from USB. Normally, you can access the BIOS by powering on the device and pressing one of the function keys, such as Delete or ESC. However, you may need to check the manufacturer's support website for more specifics.
2. Click Next button.
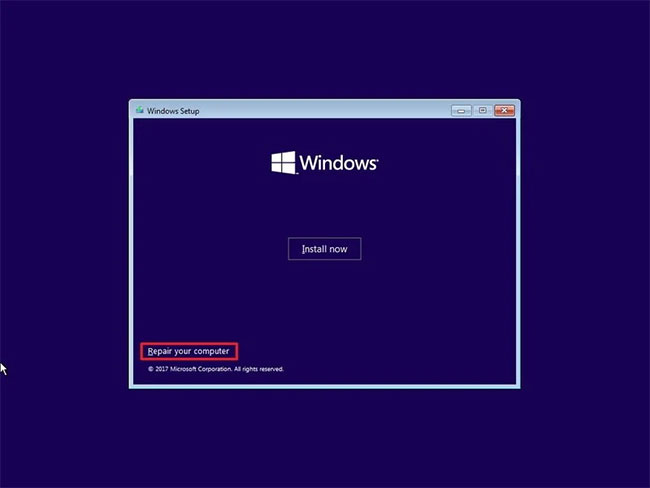
3. Click the Repair your computer link in the bottom left corner.
Click the Repair your computer link
After you complete the steps, continue with the System Restore instructions.
Undo changes using System Restore
To restore the computer to an earlier time to fix the black screen problem, follow these steps:
1. Click Advanced Startup option.
2. Click Troubleshoot option.
3. Click Advanced options button.
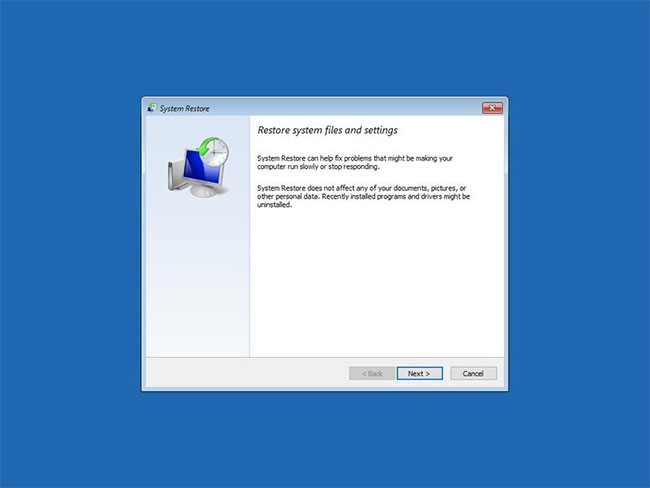
4. Click System Restore option.
Click System Restore option
5. Click Next button.
Click Next button
6. Select the last known active restore point that you think will solve the problem.
7. Click the Scan for affected programs button to determine which applications will be affected after the restore point is created.
8. Click Close button.
9. Click Next button.
10. Click Finish button.
After you complete the steps, System Restore will restore the device to an earlier time, erasing system changes from the date of the restore point, which can solve the black screen problem on Windows 10.
Revert to the previous version of Windows 10 to fix the black screen error
If the problem appears after upgrading to a new version of Windows 10, rolling back to the previous version can minimize the black screen problem until a new system or driver update is released to permanently resolve the issue. try.
Open Advanced Startup using the boot method three times without success
Whenever you see a black screen, you won't be able to use the recovery options through the Settings app or access Safe Mode from the desktop. This means you will have to activate the recovery environment manually.
To access the Windows recovery environment, follow these steps:
1. Restart the computer.
2. As soon as the Windows logo appears on the screen, press the power button to interrupt the boot sequence.
3. Repeat steps 1 and 2 two more times.
After the third interruption, Windows 10 will open into the recovery environment, and you can continue with the steps below to roll back to the previous version.
Using bootable media, launch Advanced Startup
You can also use a USB flash drive to access Advanced startup on Windows 10 with these steps:
1. Boot the computer using the bootable USB media.
Quick Tip: If the computer won't boot from USB, you'll have to change your motherboard's BIOS settings to make sure it can boot from USB. Normally, you can access the BIOS by powering on the device and pressing one of the function keys, such as Delete or Esc. However, you may need to check the manufacturer's support website for more specifics.
2. Click Next button.
3. Click the Repair your computer link in the bottom left corner.
Click the Repair your computer link
After you complete the steps, continue with the instructions to revert to an old version of Windows 10.
Uninstall the latest version of Windows 10
Once in the advanced options settings, you can roll back to an earlier version of Windows 10 by following these steps:
1. Click Troubleshoot option.
2. Click Advanced options button.
3. Click Uninstall Update option.
Click Uninstall Update option
4. Select Uninstall latest feature update option.
5. Sign in with your account credentials.
6. Click Uninstall feature update button.
Click Uninstall feature update button
If rolling back to a previous version solves the problem, you should avoid updating again until you know there is a system, software, or driver update that permanently fixes the problem.
Check out some more articles below:
After 30 days, Windows 10 will automatically free up free space
Summary of some ways to open the virtual keyboard on Windows XP, 7, 8, 8.1, and 10
How to enable the feature to automatically lock the computer when the user leaves—Dynamic Lock on Windows 10
Problems with certain programs may arise as a result of Windows 11's ability to automatically install drivers and replace newer drivers with outdated versions.
Emails, forum posts, and phone calls have all informed us that Reddit It appears that AMD drivers in Windows 11 are being replaced by accident when using Windows Update.
Because of this problem, users may see a message reading "Windows Update may have automatically replaced your AMD Graphics driver" and titled "AMD Software: Adrenalin Edition Warning." Therefore, the AMD Software you have launched is incompatible with the AMD Graphics driver you have installed.
" data-sizes="(max-width: 627px) 100vw, 627px" />
In a proof of concept Unfortunately, the Universal Windows Platform (UWP) driver for Radeon GPU hardware that was installed by Windows Update is incompatible with the version of AMD Software that was previously installed.
It's possible that the manufact...
Microsoft is preparing to launch Windows 12 in the fall of 2024, with a wider rollout in 2025, and it is internally experimenting with several new design ideas, including a new desktop experience with a ‘floating’ taskbar. Microsoft wants to create a floating effect for the taskbar by separating it from the desktop and rounding off the edges.
Microsoft has yet to confirm the existence of Windows 12, but we know it is coming soon; at least, this appears to be the company’s current plan. Microsoft sticks to this new engineering process, we might get Windows 13 in 2027 or later, but the tech giant’s plans are always subject to change as they have in the past.
At the Build 2023 developer conference, Microsoft announced several exciting updates for Windows 11, such as Windows Copilot and AI integration in the desktop operating system. During the event, Microsoft also dropped a hint that it is working on a “next-gen Windows”, which seems to imply Microsoft plans to launch a ne...


 4. Click Advanced options.
 5. Click Startup Settings.
 6. Click Restart.
 7. In the Startup settings window, press the F5 key or the 5 key to access Safe Mode with Networking.
 After your computer has booted into Safe Mode, follow the steps below:
 5. Start your computer to confirm.
After your computer has finished booting, Windows 10 will automatically reinstall the video card driver, and the black screen error may not appear anymore.
5. Start your computer to confirm.
After your computer has finished booting, Windows 10 will automatically reinstall the video card driver, and the black screen error may not appear anymore.
 6. Uncheck Turn on fast startup (recommended) option.
") 7. Select Save changes.
7. Select Save changes.
 8. Restart your computer to complete the process.
It is important to note that, depending on your hardware configuration, your computer may not support Fast Startup.
8. Restart your computer to complete the process.
It is important to note that, depending on your hardware configuration, your computer may not support Fast Startup.
 5. Restart your computer to complete the process.
 8. Restart your computer to complete the process.
 Note:
Don't forget to replace "admin" in the above command with your account name.
6. Restart your computer to complete the process.
Note that:
You're using the Command Prompt to create an account instead of using the Settings app. This is because Windows 10 does not allow creating a new user account through Settings while in Safe Mode.
After your computer has finished booting, sign in with the new account you just created. If the black screen error no longer appears, it can be confirmed that the cause of the error may be a problem with the old user account.
Note:
Don't forget to replace "admin" in the above command with your account name.
6. Restart your computer to complete the process.
Note that:
You're using the Command Prompt to create an account instead of using the Settings app. This is because Windows 10 does not allow creating a new user account through Settings while in Safe Mode.
After your computer has finished booting, sign in with the new account you just created. If the black screen error no longer appears, it can be confirmed that the cause of the error may be a problem with the old user account.


Nhận xét
Đăng nhận xét