Without a doubt, a VPN is a lifesaver when it comes to protecting online privacy. You can use them in many different environments, and they can solve many problems without any special configuration.
Besides keeping your online activities private, a VPN is also great at allowing you to access restricted content. How many times have you tried to access a service but found it unavailable in your area? Having a VPN in that situation will save you a lot of trouble.
But that's not all. If you sign up with an ISP that limits bandwidth for cost-cutting purposes, a VPN can easily improve packet loss and reduce in-game ping caused by this throttling. Besides, a VPN can prevent your ISP from snooping on your traffic and doing many other things.
13 Reasons You Should Use a VPN
All in all, VPNs are great, but for some users, how they work is still a mystery. Therefore, a variety of problems can occur whenever a user uses this type of service.
For example, you may encounter a situation where you cannot disconnect from your VPN. If you find yourself in this situation, here's how you can deal with it.
How to disconnect from the VPN?
1. Using the VPN client
Step 1: Download Private Internet Access.
Download Private Internet AccessStep 2: Install it in the computer.
Step 3: Launch it and log in to your account.
Step 4: Connect to the server (to protect privacy).
Step 5: Once you're done, click the big power button to disconnect.
Step 6: Right-click the application's icon in the system tray.
Step 7: Select Quit from the context menu.
That's it; you take control of the connection to your favorite VPN server to improve your privacy and disconnect from the VPN server when you don't need protection anymore. It sounds pretty easy, right?
2. Use built-in Windows features
Step 1: The connection icon can be found in the bottom right corner of the screen.
Step 2: Left-click on the connection icon.
Step 3: See if there are any other VPN connections other than the default one.
Step 4: If so, select it and click the Disconnect button.
You can also go ahead and delete it completely if you don't need it anymore. Some VPNs leave their connections on your PC even after you uninstall them. This can make it easier for them to re-establish a connection and restore configuration settings if you decide to reinstall the VPN.
Fix the error can't delete the VPN connection
3. Make sure the kill switch doesn't work
Some VPNs have a kill switch feature that will cut off your Internet connection if you're not connected to a secure VPN server. This will make it impossible to disconnect from the VPN if the default connection is no longer active.
For that reason, it would be a great idea to monitor this kill switch and make sure to disable it before you attempt to disconnect the VPN. Otherwise, you won't be able to access the Internet without a VPN until you do.
4. Make sure DHCP is enabled
Step 1: Click Start.Step 2: Select Settings.Step 3: Go to Network & Internet section.
Step 4: (Ethernet) Select Ethernet and click on the network you are connected to.
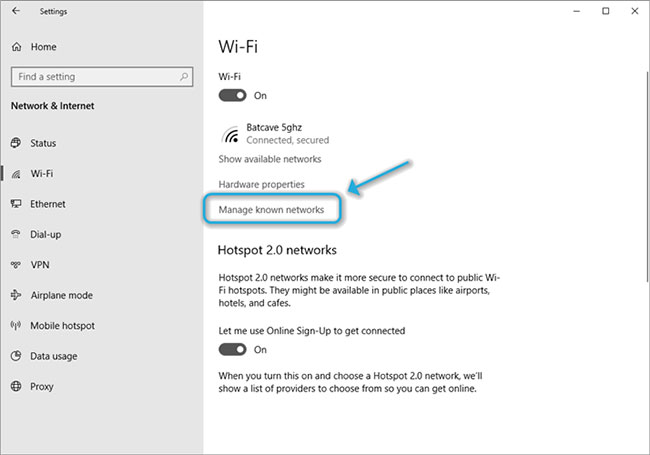
Select EthernetStep 5: (WiFi) Click WiFi, select Manage known networks.
Click WiFi, select Manage known networks
Select the network you're connected to, and then click the Properties button.
Click Properties buttonStep 6: Click the Edit button below the IP assignment.
Click the Edit button below the IP assignmentStep 7: Select Automatic (DHCP) in Edit IP settings.
Some VPNs will disable DHCP to prevent leaks. If you usually assign IPs manually, don't modify any settings. Leave it as it is!
However, if your router normally handles IP assignment, it means that the VPN probably has DHCP disabled, and it's safe to turn it back on.
Another thing worth mentioning is that you'll want to disable the VPN kill switch while modifying the DHCP settings.
One of the "worst" problems that users often encounter on Windows 10 is the black screen error.
The black screen error can occur in some situations on Windows 10, stemming from problems related to the graphics card, the connection error between the computer and your monitor, the error occurring during the installation of the operating system, updating to new versions, etc., or simply happening randomly at any time.
In the article below, the administrator will guide you with some solutions to fix the black Windows 10 screen error.
In addition, if you encounter a black screen error on Windows 7, 8, or 8.1 computers, readers can refer to the steps to fix the error here.
Steps to fix a basic black Windows 10 computer screen
1. Black screen error during installation
Once there, try turning off the computer by pressing and holding the power button for a few seconds. If using a laptop, you can unplug the charger and remove the battery.
Unplug all unnecessa...
Problems with certain programs may arise as a result of Windows 11's ability to automatically install drivers and replace newer drivers with outdated versions.
Emails, forum posts, and phone calls have all informed us that Reddit It appears that AMD drivers in Windows 11 are being replaced by accident when using Windows Update.
Because of this problem, users may see a message reading "Windows Update may have automatically replaced your AMD Graphics driver" and titled "AMD Software: Adrenalin Edition Warning." Therefore, the AMD Software you have launched is incompatible with the AMD Graphics driver you have installed.
" data-sizes="(max-width: 627px) 100vw, 627px" />
In a proof of concept Unfortunately, the Universal Windows Platform (UWP) driver for Radeon GPU hardware that was installed by Windows Update is incompatible with the version of AMD Software that was previously installed.
It's possible that the manufact...
Microsoft is preparing to launch Windows 12 in the fall of 2024, with a wider rollout in 2025, and it is internally experimenting with several new design ideas, including a new desktop experience with a ‘floating’ taskbar. Microsoft wants to create a floating effect for the taskbar by separating it from the desktop and rounding off the edges.
Microsoft has yet to confirm the existence of Windows 12, but we know it is coming soon; at least, this appears to be the company’s current plan. Microsoft sticks to this new engineering process, we might get Windows 13 in 2027 or later, but the tech giant’s plans are always subject to change as they have in the past.
At the Build 2023 developer conference, Microsoft announced several exciting updates for Windows 11, such as Windows Copilot and AI integration in the desktop operating system. During the event, Microsoft also dropped a hint that it is working on a “next-gen Windows”, which seems to imply Microsoft plans to launch a ne...


Nhận xét
Đăng nhận xét