Are you running out of space in the C drive (system partition), where the operating system is located? Do you know how to increase C drive space without losing data?
In this article, Thewindowsfan will introduce some solutions to safely increase system partition space without formatting or reinstalling the operating system in Windows 10/8/7.
Method 1: Increase C drive space in Disk Management
Windows Disk Management provides a volume expansion feature that can increase partition size by adding unallocated disk space, and this process does not cause data loss. But not all partitions can be extended in Disk Management; for example, unallocated space can only be added to contiguous partitions.
Step 1: Right-click the Windows Start button and select Disk Management. This will launch the Disk Management console.
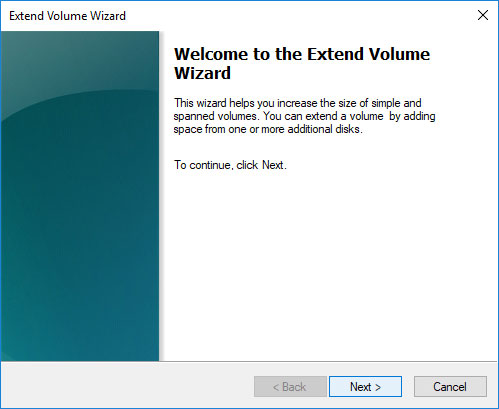
Step 2: Right-click the C drive in Disk Management and select the Extend Volume option. Then the Extend Volume Wizard will display.
Step 3: Click the Next button on the Welcome interface of the Extend Volume Wizard.
Click the Next button on the Welcome interfaceStep 4: Set the amount of disk space to be added to the C drive and click the Next button.
Set the amount of disk space to be added to the C driveNote: The drive space you enter here is in megabytes (MB), and you can follow the default settings if not otherwise required.
Step 5: Click the Finish button when the process is complete. You'll be returned to Disk Management, and the C drive will have been successfully extended.
Limitations of Disk Management in increasing C drive space:
- The Extend Volume option is available for NTFS and FAT32 partitions. ExFAT partitions are not supported.
- There must be unallocated drive space adjacent to the partition you want to extend, and unallocated space on the right side, in that order.
Therefore, if there is no free disk space next to the C drive (usually on the right side), the Extend Volume option will be grayed out. In that case, you can either delete the contiguous partition to get the unallocated space and then add it to the C drive, or you can move the drive space from the other partition to the C drive using our software. third-party.
Method 2: Extend your C drive with free software
If you see the Extend Volume option grayed out in Windows Disk Management, you will need to delete drive D, which is the partition to the right of drive C, to be able to create unallocated space and add it to drive C. You need to move the data on D drive to another partition or external hard drive before erasing. However, there is an ideal alternative to increasing C drive space without deleting any partitions.
DiskGenius Free provides partition extension functionality and can move free disk space from another partition to the C drive directly. Besides expanding partitions, it can resize volumes, create partitions, delete partitions, hide partitions, clone partition images, check for bad sectors, recover lost data, etc. The following steps will show you how to extend the C drive in Windows 10.
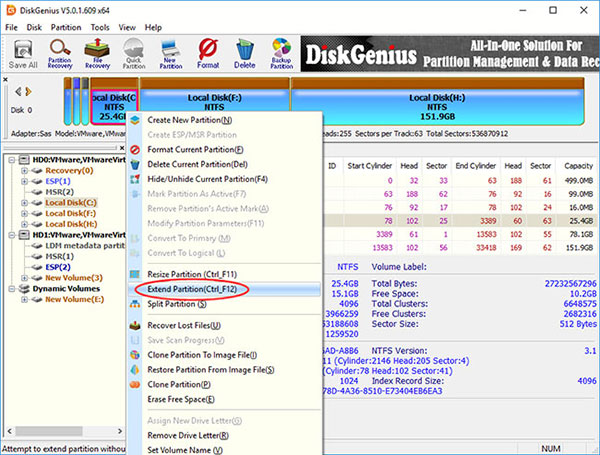
Step 1: Install and run DiskGenius Free Edition. Right-click on the C drive you want to increase space on and select Extend Partition.
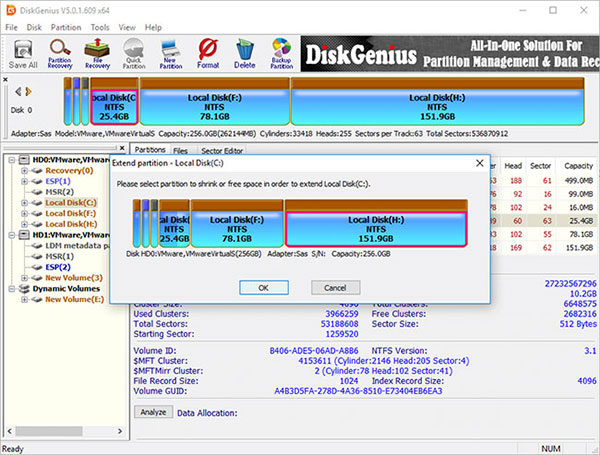
Select Extend PartitionStep 2: The Extend Partition window will appear. You need to select a partition with a large amount of free space and click the OK button.
The software will move the free space from the partition you chose in this stage to the C drive, so make sure it has adequate space.
Select a partition with a large amount of free spaceStep 3: Set the drive space to be transferred to the C drive and click the Start button. You can drag the partition bar to set the partition size or enter the exact amount in the column.
Click the Start button
DiskGenius lists the steps to take during the resizing process and what to keep in mind. Click the Yes button to continue.
Click the Yes button to continueNote:
Resizing a partition involves too many operations, such as modifying the partition's start and end locations, changing parameters in the MBR and DBR, moving data, etc. This process is not without risk, even if the partition management software works fine. Therefore, the following should be ensured for the expansion to finish successfully:
There are no bad sectors on the drive, especially in the related partitions.
Make sure the power source is working properly, and do not turn off the computer before the partition resizing process is finished.
Close any other programs that are attempting to access the space on the relocated partitions.
To prevent the computer from entering hibernation while the C drive is expanding, disable system hibernation.
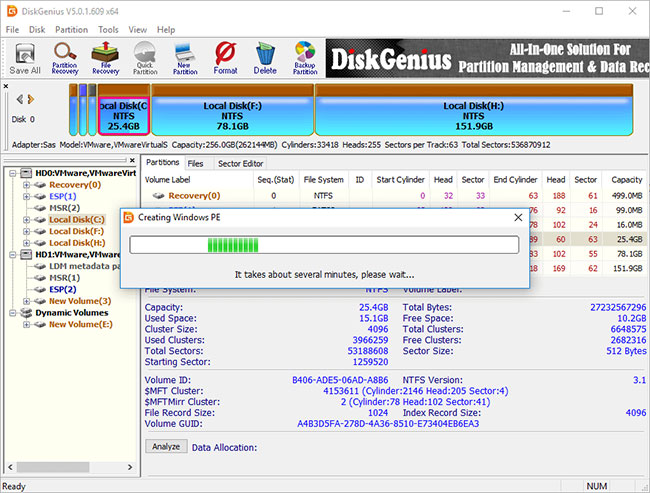
Since the extended partition is a system partition, DiskGenius will boot into its WinPE instance to complete the rest of the operations. Now, the WinPE environment will be prepared for the DiskGenius WinPE instance, and then the computer will automatically restart the WinPE instance.
The computer will restart the WinPE version automatically
Now the DiskGenius WinPE instance is launched automatically and continues to expand the C drive, as shown below. When the resizing process is complete, the computer will automatically restart Windows.
The computer will automatically restart Windows
Here's how to increase the amount of virtual memory on Windows
Method 3: Increase the size of the system partition with the diskpart command
Diskpart is a built-in Windows utility, and it includes the functionality of managing drives and partitions through commands.
Reference: How to extend a partition with the diskpart command has more details.
Method 4: Increase C drive space by adding unallocated space
What should you do if there is unallocated drive space that is not adjacent to the system partition? Do you know how to add unallocated space to the C drive to increase its space without losing data? The solution for this is as follows:
Step 1: Launch DiskGenius from the computer and locate the free space on the system drive.
Step 2: Right-click on the free disk space and select Allocate Free Space To, as follows: You can then select a destination partition to add unallocated space. In this example, we are trying to increase the size of the system partition, so we need to select drive C.
Select Allocate Free Space ToStep 3: The partition resize wizard will appear, and you can follow the prompts to complete the actions.
One of the "worst" problems that users often encounter on Windows 10 is the black screen error.
The black screen error can occur in some situations on Windows 10, stemming from problems related to the graphics card, the connection error between the computer and your monitor, the error occurring during the installation of the operating system, updating to new versions, etc., or simply happening randomly at any time.
In the article below, the administrator will guide you with some solutions to fix the black Windows 10 screen error.
In addition, if you encounter a black screen error on Windows 7, 8, or 8.1 computers, readers can refer to the steps to fix the error here.
Steps to fix a basic black Windows 10 computer screen
1. Black screen error during installation
Once there, try turning off the computer by pressing and holding the power button for a few seconds. If using a laptop, you can unplug the charger and remove the battery.
Unplug all unnecessa...
Microsoft is currently A/B testing a native dark style for the ChatGPT-powered Bing.com, and it has finally begun distributing out Bing.com to Google Chrome and Safari. On Windows 10 and 11, we got a pop-up that allowed Bing AI access through Google Chrome. It appears that certain people can also access Bing AI through Safari.
One of the most cutting-edge and effective language models for users is Bing AI, which is powered on ChatGPT-4. Since late February, Bing.com AI support has been accessible to Microsoft Edge users. Now, Microsoft is beginning to expand its support to all browsers, including Google Chrome and Apple Safari.
Bing AI pop-up in Chrome | Image Courtesy: Thewindowsfan.com
Anyone may now test Bing AI in Chrome thanks to a new pop-up that has begun to show in the taskbar of Windows 10 or 11. In our experiments, Google Chrome's native dark mode support allowed us to access Bing AI. The screenshot below illustrates how the white background changes to a black...
Windows 11 is considered more beautiful and aesthetically pleasing than Windows 10. However, not everyone likes the new things that Windows 11 brings. If you have already upgraded to Windows 11 but do not like its interface and do not want to return to Windows 10, you can try the customizations below.
Customizing the interface, also known as a custom interface, is not as popular as before. However, it is still very useful in case you want to refresh your computer. In this article, the administrator will show you how to customize the Windows 11 interface to become macOS.
A video tutorial on customizing the Windows 11 interface to become macOS was made by YouTube channel Tech Rifle. To be successful, you will have to combine a variety of custom software, tools, and themes. This process requires you to perform meticulously and accurately. If only one step is wrong, the results will not be as expected, and the installation process will not be successful.
Things you need to p...






Nhận xét
Đăng nhận xét