How to add a printer to Windows 11

Whether you own a wired printer that connects via a USB cable, a wireless printer on a WiFi network, or a Bluetooth printer, adding and setting up printing on Windows 11 is generally quite simple. This article will show you how to add a printer to a Windows 11 PC.
 On the next page, click “Printers & scanners”.
 On the Printers & scanners page, click the “Add device” button near the top right. It will take some time for Windows to try to detect your printer.
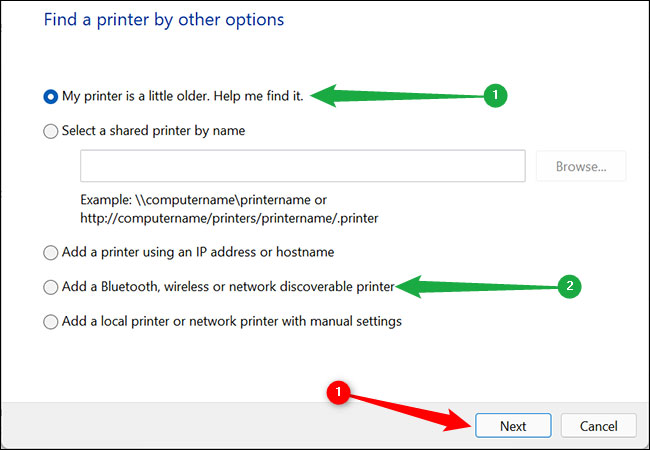
 If your printer does not appear, click “Add manually”. A pop-up window will pop up, showing you a few options.
Click on "My printer is a little older. Help me find it." if you plug the printer into your computer. In case it is a wireless printer, select "Add a Bluetooth, wireless or network discoverable printer".
Once you have made your selection, click “Next”.
If your printer does not appear, click “Add manually”. A pop-up window will pop up, showing you a few options.
Click on "My printer is a little older. Help me find it." if you plug the printer into your computer. In case it is a wireless printer, select "Add a Bluetooth, wireless or network discoverable printer".
Once you have made your selection, click “Next”.
 Simply follow the suggestions displayed on the screen to establish the connection if Windows 11 detects the printer.
Source: https://thewindowsfan.com/how-to-add-a-printer-to-windows-11/
Add a printer to Windows 11
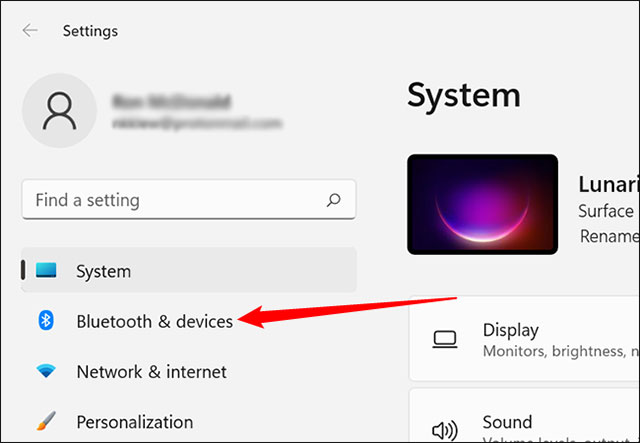
First, make sure your printer is powered on and plugged in if it's a traditional wired printer. For WiFi printers, make sure the device is connected to the same network as your computer. Windows 11 automatically downloads the software your printer needs to work. To add a printer to your Windows 11 system, first click on the Start button, enter the keyword "Settings" in the search bar, and press Enter. You can also open the Settings app by pressing Windows + I. On the left side of the Settings menu that opens, click on the "Bluetooth & devices" item.
On the next page, click “Printers & scanners”.
On the Printers & scanners page, click the “Add device” button near the top right. It will take some time for Windows to try to detect your printer.
If your printer does not appear, click “Add manually”. A pop-up window will pop up, showing you a few options.
Click on "My printer is a little older. Help me find it." if you plug the printer into your computer. In case it is a wireless printer, select "Add a Bluetooth, wireless or network discoverable printer".
Once you have made your selection, click “Next”.
Simply follow the suggestions displayed on the screen to establish the connection if Windows 11 detects the printer.


Nhận xét
Đăng nhận xét