6 Ways to Fix the SSD Not Recognized Error in Windows 10
Nhận đường liên kết
Facebook
X
Pinterest
Email
Ứng dụng khác
SSDs have huge benefits over traditional magnetic hard drives, which is why many people are upgrading to this superior storage solution.
Difference between SSD and HDD
SSDs have a common problem of not being recognized by the Windows operating system. If so, your SSD may not show up on This PC, File Explorer, or Disk Management, even though it's properly connected to the computer.
This problem can be especially troublesome when setting up an SSD. Read the following article to learn how to fix SSD detection problems in Windows 10.
1. Check that the BIOS detects the SSD
Before starting with possible fixes, you need to make sure your SSD is correctly connected and detected by the BIOS (Basic Input/Output System). BIOS is the program that starts the computer. It also controls the necessary tasks between the operating system and the many attached devices.
To open the BIOS menu on your computer, you usually need to press the correct function key as soon as the computer is starting up. The specific key required may vary from manufacturer to manufacturer.
For example, on a Dell PC, you need to press the F2 key as soon as the Dell logo appears. You can search the Internet to find the exact function key that accesses the BIOS menu for your PC.
Once in the BIOS menu, look for the Boot menu and check if the SSD is listed there. If the SSD is listed there, you can go ahead and try the solutions mentioned below. If the BIOS menu does not recognize your SSD, you may have a hardware problem or need to configure the SATA controller settings in the BIOS menu.
2. Setup SSD settings
If the BIOS menu doesn't list SSD, you may need to reconfigure your SSD settings. The SATA controller is a hardware interface that connects the motherboard to the hard drive. If the BIOS doesn't detect the SSD, you can try changing the SATA controller mode.
The BIOS menu will vary by manufacturer, so try to look for similar settings in your manufacturer-specific BIOS menu.
To configure the SATA controller settings:
Step 1: Restart the PC and enter the BIOS menu by pressing the appropriate function key.
Step 2: Navigate to Storage Options > Serial ATA > SATA Configuration or a similar setting.
Step 3: Select IDE Compatibility Mode.
Step 4: Save the changes and restart the PC.
Your BIOS should now recognize the SSD, and you can start using it after starting Windows 10.
3. SSD has not been initialized
To use a new SSD in Windows 10, you must first initialize it. An uninitialized SSD will not show up in File Explorer or the Disk Management utility.
Set up the SSD for Windows 10 recognition
If you haven't initialized your SSD yet, you can follow a few steps:
Step 1: Search for Disk Management in the Start menu search bar, right-click the best match, and select Run as administrator.
Step 2: Right-click the undetected SSD and select Initialize Disk.
Step 3: In the Initialize Disk dialog box, select the SSD you want to initialize and select the partition type.
Step 4: Click OK to begin the drive initialization process.
Step 5: After completing step 4, go back to Disk Management, right-click on the SSD volume, and select New Simple Volume.
Step 6: Follow the on-screen instructions to assign the SSD volume and drive letter.
After initializing the SSD, you should restart your PC for the changes to take effect correctly. After the reboot, Windows 10 should detect the SSD, and you can access it through File Explorer.
4. Memory device controller driver update
Before moving on to more in-depth fixes, you need to make sure that the memory device controller drivers are up-to-date. Outdated drivers can cause the device to work improperly and be the reason why Windows doesn't detect the SSD.
Memory device controller driver update
To update the memory device driver, follow these steps:
Step 1: Launch Device Manager from the Start menu.
Step 2: Search for Storage controllers and expand the group.
Step 3: Right-click on the memory device driver and select Update driver.
Step 4: Select Search automatically for updated driver software.
Windows will automatically install any available updates; you can then restart your PC and open File Explorer or the Disk Management tool to check if Windows 10 now detects the SSD drive.
8 effective ways to check the hard drive to help periodically check the hard drive's health
5. Troubleshooting memory for SSD detection
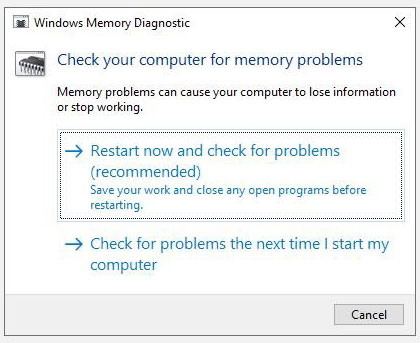
Usually, memory problems in Windows cause SSDs to be unrecognized. The Windows Memory Diagnostic tool can detect and fix faulty RAM and hard drive problems. You can run the Windows Memory Diagnostic tool as follows:
Step 1: Search for Windows Memory Diagnostic in the Start menu, right-click the best match, and select Run as administrator.
Step 2: Save any incomplete work and choose Restart now and check for problems (recommended).
Troubleshooting memory for SSD detection
The PC will now reboot, and the diagnostics will run automatically. The test will take a few minutes to complete; once completed, your PC will automatically reboot and display the test results.
You can then open Disk Management or File Explorer to check if the SSD is currently recognized by Windows 10. You can then initialize the SSD from Disk Management, as explained above.
6. Specify or change the drive letter
A common reason why Windows 10 doesn't recognize an SSD is a conflicting or missing drive letter. You can quickly solve this problem by changing or assigning a new drive letter to the SSD in the Disk Management utility.
To change the drive letter of an SSD:
Step 1: Search for Disk Management in the Start menu search bar, right-click the most appropriate option, and select Run as administrator.
Step 2: Right-click the SSD and select Change Drive Letter and Paths.
Step 3: Click Add if the drive letter does not exist or Change to modify the existing drive letter.
Step 4: Select a new drive letter from the drop-down menu, and then click OK for the changes to take place.
After following the steps above, you can restart your PC, and Windows 10 should recognize the SSD. You can then access the SSD through File Explorer.
Good luck fixing the error!
One of the "worst" problems that users often encounter on Windows 10 is the black screen error.
The black screen error can occur in some situations on Windows 10, stemming from problems related to the graphics card, the connection error between the computer and your monitor, the error occurring during the installation of the operating system, updating to new versions, etc., or simply happening randomly at any time.
In the article below, the administrator will guide you with some solutions to fix the black Windows 10 screen error.
In addition, if you encounter a black screen error on Windows 7, 8, or 8.1 computers, readers can refer to the steps to fix the error here.
Steps to fix a basic black Windows 10 computer screen
1. Black screen error during installation
Once there, try turning off the computer by pressing and holding the power button for a few seconds. If using a laptop, you can unplug the charger and remove the battery.
Unplug all unnecessa...
Problems with certain programs may arise as a result of Windows 11's ability to automatically install drivers and replace newer drivers with outdated versions.
Emails, forum posts, and phone calls have all informed us that Reddit It appears that AMD drivers in Windows 11 are being replaced by accident when using Windows Update.
Because of this problem, users may see a message reading "Windows Update may have automatically replaced your AMD Graphics driver" and titled "AMD Software: Adrenalin Edition Warning." Therefore, the AMD Software you have launched is incompatible with the AMD Graphics driver you have installed.
" data-sizes="(max-width: 627px) 100vw, 627px" />
In a proof of concept Unfortunately, the Universal Windows Platform (UWP) driver for Radeon GPU hardware that was installed by Windows Update is incompatible with the version of AMD Software that was previously installed.
It's possible that the manufact...
Microsoft is preparing to launch Windows 12 in the fall of 2024, with a wider rollout in 2025, and it is internally experimenting with several new design ideas, including a new desktop experience with a ‘floating’ taskbar. Microsoft wants to create a floating effect for the taskbar by separating it from the desktop and rounding off the edges.
Microsoft has yet to confirm the existence of Windows 12, but we know it is coming soon; at least, this appears to be the company’s current plan. Microsoft sticks to this new engineering process, we might get Windows 13 in 2027 or later, but the tech giant’s plans are always subject to change as they have in the past.
At the Build 2023 developer conference, Microsoft announced several exciting updates for Windows 11, such as Windows Copilot and AI integration in the desktop operating system. During the event, Microsoft also dropped a hint that it is working on a “next-gen Windows”, which seems to imply Microsoft plans to launch a ne...


Nhận xét
Đăng nhận xét