How To Repair Windows Updates That Are Stuck At 0% In Windows 7/8/10
Nhận đường liên kết
Facebook
X
Pinterest
Email
Ứng dụng khác
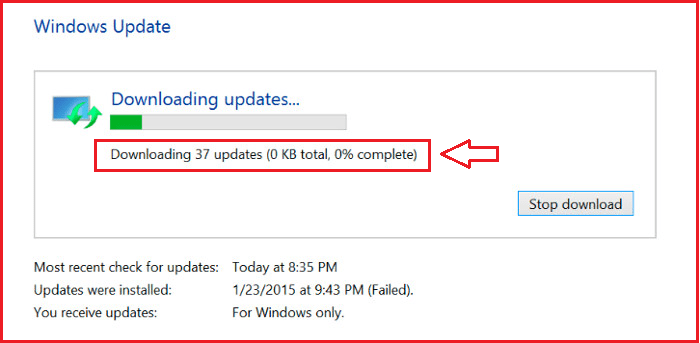
One of the difficulties that Windows users see most frequently is Windows update hangs. Apply the remedy in the article below about the Administrator to fix the error if you are using Windows 7/8/10 and you get an error message stating that the system cannot be updated or that it is updating but is suspended at 0%.
The steps listed below can be used to resolve the error "Windows Update Stuck at 0%":
Tips:
1. Reboot the system and try again. Sometimes the problem can be as simple as that. In a lot of cases, restarting the system will fix this type of problem.
2. Try disabling your anti-virus software and then try updating Windows. Sometimes anti-virus software may be blocking updates. Almost every anti-virus software has an option that allows you to disable the program.
3. Sometimes, the problem can be caused by malware. Try scanning the system with anti-virus software. Make sure you do a full scan instead of a quick scan.
4. Wait awhile. Sometimes your Internet connection may be slow or have problems during the update process, causing the system to not show the progress. So leave the system alone for a few hours while it is updating.
5. Using the Windows Update Troubleshooter can help solve the update problem.
6. If you have a lot of updates being downloaded, then try downloading a few. For example, if you have 20 updates, then select only 2 or 3 and download them.
Method 1: Turn off background service
Services running in the background can definitely cause problems and conflict with Windows updates. So the first thing that should be taken care of is disabling background services.
Follow these steps to disable unnecessary services:
1. Hold Win + R.
2. Type msconfig and press Enter.
3. This action will open System Configuration. Click Services tab in the window.
4. At the bottom of the list, select the Hide all Microsoft Services option.
Select the Hide all Microsoft Services option.
5. Then click Disable All button at the bottom right of the list and click OK.
6. Restart your PC by clicking the Restart button in the Start menu for the changes to take effect.
7. After the PC restarts, relaunch Windows Update by following the steps below:
Press the Windows key once.
Click Settings.
Select Update & Security.
Click Check for updates.
Wait for Windows to check for and download updates
After the system updates, you need to enable background services that have been disabled. To do so, do the following:
Repeat steps from 1 to 3 above.
Uncheck the Hide all Microsoft Services check box at the bottom of the list.
Then click the Enable All button at the bottom right of the list, and then click OK.
Click the Enable All button at the bottom right of the list
Once done, the problem will be resolved and other services will work normally.
Method 2: Temporarily Turn Off Windows Firewall
Sometimes Windows built-in features prevent updates, like the firewall. So you have to turn off the firewall to perform the updates and then turn it back on as soon as the updates are successfully downloaded and installed.
Method 3: Restart Windows Update
A lot of PC problems are fixed by simply restarting Windows Updates, so a Windows Update restart might be just what you need.
To restart Windows Update, follow these steps:
1. Open the Run dialog box by holding the Win + R key.
2. Type services.msc into the dialog box and press Enter.
3. This will open Services.
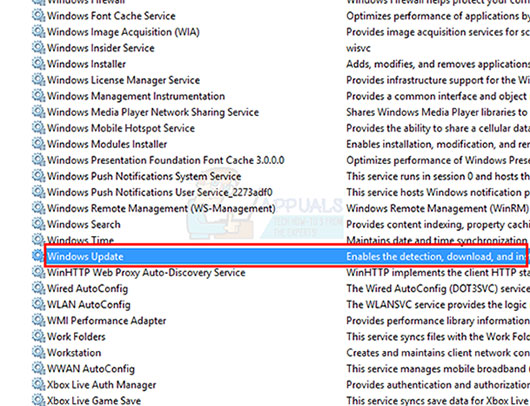
4. Scroll to the bottom of the service list and find the Windows Update service there.
Find the Windows Update service
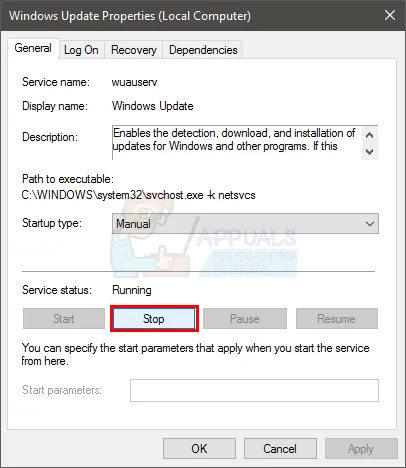
5. Right-click Windows Update and select Stop.
Select Stop
6. After stopping Windows Update, just press Win + E key to open Explorer.
7. Go to the folder: C:WindowsSoftwareDistribution. Just copy/paste the address into the address bar located at the top of Windows Explorer.
8. Hold CTRL key and press A to select all files
9. Press the Delete key or Right-click on any selected file and select Delete.
After deleting these files, restart the computer and re-enable the Windows Update service.
Method 4: Manually Download Windows Updates
You can manually download updates if Windows Update doesn't function and you don't want to wait if it does. Although it's uncommon, manually downloading updates is not insurmountable. However, it takes a lot of time.
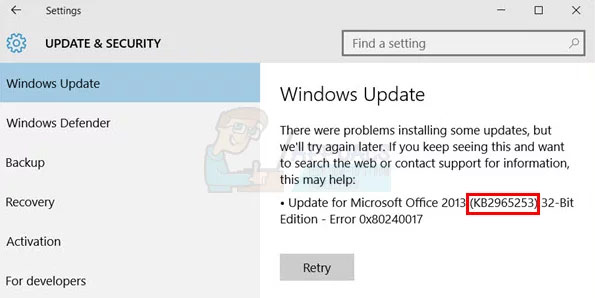
The first thing you must do is locate the article number of the failed update in the Microsoft Knowledge Base. Once you know the article number, you can use the Microsoft Update Catalog to find and download the appropriate update.
Press the Windows key once
2. Select Settings.
3. Click Update & security.
4. Select Update History.
5. You will be able to see the failed update in this window.
You will be able to see the failed update in this window.
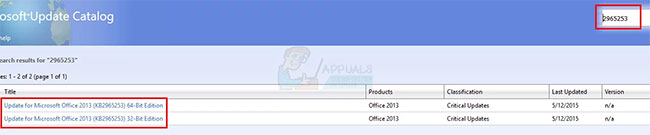
6. Once you have the article number, it's time to search for the update and download it.
7. Click here to go to the Microsoft Update Catalog.
8. Enter the article number in the search bar.
Enter the article number in the search bar.
9. Now just view the results and download the update you want
10. Once downloaded, open the downloaded file to install the update.
Method 5: Delete incorrect registry value
Deleting incorrect registry values and then trying to update Windows also solved the problem. So follow these steps to delete incorrect registry values.
Note: Clutching registry keys can cause serious problems. So you should make a backup of your registry keys in case something goes wrong.
Now, follow the steps below to solve the original problem.
1. Hold Win + R.
2. Type regedit.exe and press Enter.
3. Locate and double-click HKEY_LOCAL_MACHINE on the left.
4. Locate and select COMPONENTS.
5. Locate and right-click the PendingXmlIdentifier, then select Delete.
6. Confirm any additional prompts.
7. Locate and right-click NextQueueEntryIndex, then select Delete. Confirm any additional prompts.
8. Right-click AdvancedInstallersNeedResolving and select Delete. Confirm any additional prompts.
Once done, close the registry and restart the computer. This will fix the problem for you.
Check out some more articles below:
Here's how to customize and disable the Action Center on Windows 10
Instructions for setting up BIOS and UEFI passwords to protect data on your Windows 10 computer
Summary of some ways to fix USB Device Not Recognized errors on Windows 7, 8 and 10
One of the "worst" problems that users often encounter on Windows 10 is the black screen error.
The black screen error can occur in some situations on Windows 10, stemming from problems related to the graphics card, the connection error between the computer and your monitor, the error occurring during the installation of the operating system, updating to new versions, etc., or simply happening randomly at any time.
In the article below, the administrator will guide you with some solutions to fix the black Windows 10 screen error.
In addition, if you encounter a black screen error on Windows 7, 8, or 8.1 computers, readers can refer to the steps to fix the error here.
Steps to fix a basic black Windows 10 computer screen
1. Black screen error during installation
Once there, try turning off the computer by pressing and holding the power button for a few seconds. If using a laptop, you can unplug the charger and remove the battery.
Unplug all unnecessa...
Microsoft is currently A/B testing a native dark style for the ChatGPT-powered Bing.com, and it has finally begun distributing out Bing.com to Google Chrome and Safari. On Windows 10 and 11, we got a pop-up that allowed Bing AI access through Google Chrome. It appears that certain people can also access Bing AI through Safari.
One of the most cutting-edge and effective language models for users is Bing AI, which is powered on ChatGPT-4. Since late February, Bing.com AI support has been accessible to Microsoft Edge users. Now, Microsoft is beginning to expand its support to all browsers, including Google Chrome and Apple Safari.
Bing AI pop-up in Chrome | Image Courtesy: Thewindowsfan.com
Anyone may now test Bing AI in Chrome thanks to a new pop-up that has begun to show in the taskbar of Windows 10 or 11. In our experiments, Google Chrome's native dark mode support allowed us to access Bing AI. The screenshot below illustrates how the white background changes to a black...
Windows 11 is considered more beautiful and aesthetically pleasing than Windows 10. However, not everyone likes the new things that Windows 11 brings. If you have already upgraded to Windows 11 but do not like its interface and do not want to return to Windows 10, you can try the customizations below.
Customizing the interface, also known as a custom interface, is not as popular as before. However, it is still very useful in case you want to refresh your computer. In this article, the administrator will show you how to customize the Windows 11 interface to become macOS.
A video tutorial on customizing the Windows 11 interface to become macOS was made by YouTube channel Tech Rifle. To be successful, you will have to combine a variety of custom software, tools, and themes. This process requires you to perform meticulously and accurately. If only one step is wrong, the results will not be as expected, and the installation process will not be successful.
Things you need to p...
 The steps listed below can be used to resolve the error "Windows Update Stuck at 0%":
Tips:
1. Reboot the system and try again. Sometimes the problem can be as simple as that. In a lot of cases, restarting the system will fix this type of problem.
2. Try disabling your anti-virus software and then try updating Windows. Sometimes anti-virus software may be blocking updates. Almost every anti-virus software has an option that allows you to disable the program.
3. Sometimes, the problem can be caused by malware. Try scanning the system with anti-virus software. Make sure you do a full scan instead of a quick scan.
4. Wait awhile. Sometimes your Internet connection may be slow or have problems during the update process, causing the system to not show the progress. So leave the system alone for a few hours while it is updating.
5. Using the Windows Update Troubleshooter can help solve the update problem.
6. If you have a lot of updates being downloaded, then try downloading a few. For example, if you have 20 updates, then select only 2 or 3 and download them.
The steps listed below can be used to resolve the error "Windows Update Stuck at 0%":
Tips:
1. Reboot the system and try again. Sometimes the problem can be as simple as that. In a lot of cases, restarting the system will fix this type of problem.
2. Try disabling your anti-virus software and then try updating Windows. Sometimes anti-virus software may be blocking updates. Almost every anti-virus software has an option that allows you to disable the program.
3. Sometimes, the problem can be caused by malware. Try scanning the system with anti-virus software. Make sure you do a full scan instead of a quick scan.
4. Wait awhile. Sometimes your Internet connection may be slow or have problems during the update process, causing the system to not show the progress. So leave the system alone for a few hours while it is updating.
5. Using the Windows Update Troubleshooter can help solve the update problem.
6. If you have a lot of updates being downloaded, then try downloading a few. For example, if you have 20 updates, then select only 2 or 3 and download them.




Nhận xét
Đăng nhận xét