How to install the Google Play Store on Windows 11
Nhận đường liên kết
Facebook
X
Pinterest
Email
Ứng dụng khác
By using the Windows Subsystem for Android, you can run orginal Android applications on Windows 11. (WSA). This choice, though, has limitations. The Amazon Appstore, not the Google Play Store, is supported by the new operating system. Additionally, while sideloading Android apps is a possibility, anything that depends on the Google Play Service won't function.
However, you can work around this restriction by installing the Google Play Store on Windows 11. This is how you do it.
How to install Google Play Store on Windows 11 (new method)
As previously mentioned, Windows 11 supports sideloading and running Android applications. Finding APK files and installing them via Command Prompt are challenging, though. To install Android applications, ADB must also be configured.
To solve that problem, install the fully working Google Play Store. You can also use this to launch programs that rely on Google Play Service. AdeltaX Internal, which offers this technique, has posted a YouTube video describing how to use it (details are available later in the article).
The procedure is challenging, requiring the downloading and shifting of several little items. Fortunately, a developer (Yujinchang08) on GitHub has created a unique WSA installer to make this process simpler.
The WSA installer includes a modified WSA package with Magisk and Open GApps integration. Magisk is a root access utility, while Open GApps provides up-to-date Google Apps packages.
Please be aware that this procedure carries a risk and necessitates the installation of changed third-party packages and files. Make a recovery drive or a restore point in Windows 11 before continuing on. If something goes wrong, these recovery solutions can assist you in undoing modifications or fixing the system.
Step 1: Uninstall Windows Subsystem for Android
Uninstall Windows Subsystem for Android
If you have Windows Subsystem for Android installed, you can uninstall it from the Apps & features section.
To uninstall WSA:
1. Press Win + I to open Settings.
2. On the left, click the Apps tab.
3. Next, click Apps & Features.
4. Locate and click Windows Subsystem for Android in the App list.
5. Click the three dots and select Uninstall. Click Uninstall again to confirm the action.
Step 2: Enable Developer Mode in Windows 11
Enable Developer Mode in Windows 11
Developer Mode allows you to sideload applications and access other developer features, including remotely installed applications via SSH services.
Step 3: Enable virtual machines to run Android apps
Enable virtual machines to run Android apps
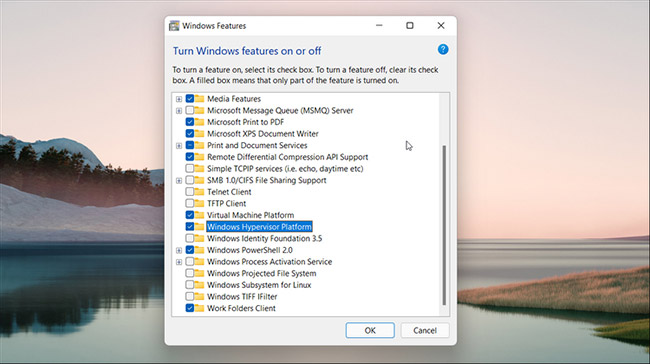
You need to configure the Virtual Machine Platform and Windows Hypervisor Platform to run Windows Subsystem for Android on Windows 11. Skip this step if you have installed WSA before.
To configure the VM:
1. Press Win + S to open the search bar.
2. Type Windows Features, and then click Turn Windows features on or off from the search results.
3. In the Windows Features window, select Virtual Machine Platform and Windows Hypervisor Platform.
4. Click OK to save the changes, and Windows will install the selected features. Restart the PC to apply the changes.
If the update is successful, you'll see an update status message during the reboot.
Step 4: Download the Windows Subsystem for Android package
Download the Windows Subsystem for Android package
A modified version of the WSA installer is available for download from the GitHub source. This is the procedure.
1. Go to the MagiskOnWSA repository and sign in with your GitHub account. Create a new account if you haven't already.
2. Next, click Fork in the upper right corner of the GitHub page. This may take a few seconds, so wait until you see the Forked from menu.
3. Click Actions tab.
Click Actions tab.
4. If you see the prompt Workflows aren't being run on this forked repository, then click I understand my workflows, go ahead and enable them.
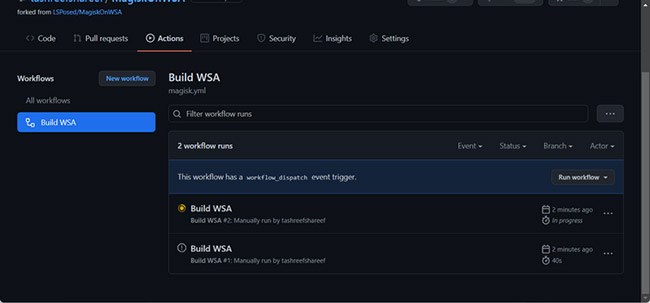
5. In the Actions tab, click Build WSA or Magisk under All workflow.
6. On the right, click Run workflow.
7. In the window that appears, a link to download the Magisk APK will appear.
8. Then, in Variants of GApps, enter the PICO. You can also choose other variations if you know what you're doing.
In Variants of GApps, enter the PICO
9. Click the Run workflow button. You will see a message Workflow run was successfully requested.
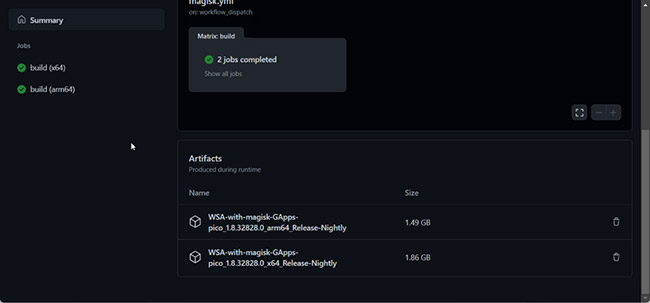
10. This process may take a while to complete, usually a few minutes. Once done, you'll see a green check mark indicating the task is complete.
The task is complete
11. Click the Finished Build WSA or Magisk label.
12. Scroll down to the Artifacts section. Here, you will see the ARM and X64 versions.
Choose 1 of 2 versions ARM and X64
13. Depending on your CPU version, click the WSA link with the appropriate Magisk GApps (ARM or X64). Depending on the Internet speed, it may take a while to download the package.
Step 5: Install Google Play Store on Windows 11
Install Google Play Store on Windows 11
Once the download is complete, follow these steps to install Windows Subsystem for Android and the Google Play Store:
1. Right click on the downloaded zip folder (WSA-with-magisk-GApps-pico_1.8.32828.0_x64_Release-Nightly) and select Extract. Select a location and extract the content.
2. Open WSA with Magic GApps folder.
3. Inside the folder, locate the Install.ps1 file.
4. Right-click the file and select Run with PowerShell.
Right-click the file and select Run with PowerShell
5. Click Open to confirm your action. The PowerShell script will execute and display the operation completed successfully.
6. You may see a few new installation messages. The script will install the Windows Subsystem for Android and Google Play Store, then close the PowerShell window.
7. Click Allow access for Windows Security Alert to allow the Windows Subsystem for Android package to connect to the network.
8. Once done, press Win + S to open the Windows search bar.
9. Type Windows Subsystem for Android and open it from the search results.
10. Make sure Developer Mode is On.
11. Then, click Manage Developer Settings in Developer Mode to reboot the subsystem.
12. If prompted by Windows Firewall, click "Allow" or "Yes".
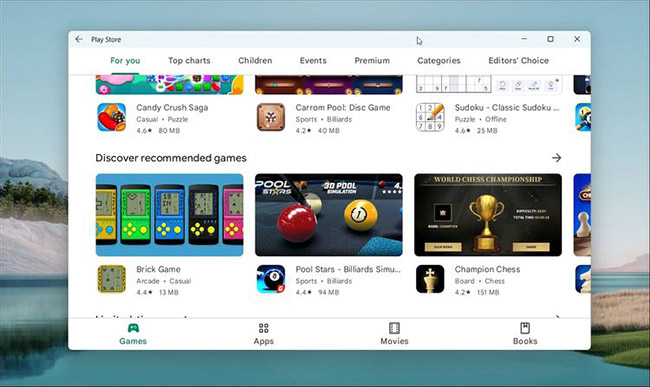
13. Click Start and you will see the Play Store app icon.
14. Open the Play Store and sign in with your Google account. When you're signed in, Google Play Services can perform regular contact syncing and more.
From the Google Play Store, Android apps can now be installed on Windows 11. Due to regional and licensing limitations, certain apps may still not work properly.
Install Google Play Store on Windows 11 (ADeltaX method)
Recently, Microsoft allowed a small number of users to test Windows Subsystem for Android (WSA) on Windows 11. At the beginning, users participating in the test will only be able to access about 50 applications via the Amazon Appstore.
Although WSA allows users to install applications using APK files, applications using Google services will not be able to work due to the lack of Google Play Services. Naturally, WSA is also blocked from accessing the Google Play Store.
But on Windows, almost anything can be hacked. A developer with the moniker AdeltaX has found a way to install both Google Play Services and the Google Play Store on Windows 11.
Successfully installed Google Play Store on Windows 11
The files needed for the installation and instructions have been shared by AdeltaX on GitHub but it seems that only experts can read and follow.
You can access AdeltaX's instructions here:
Instructions to install the Google Play Store on Windows 11
Detailed instructions are as follows:
Download MSIXBUNDLE (from the rg-adguard store, bundle id: 9P3395VX91NR).
Install WSL2 (Ubuntu, Debian, or any stable working distro)
Intall unzip lzip
Download GAPPS PICO from OPENGAPPS (x86_64, 11, PICO)
MSIXBUNDLE and MSIX (your ARCH) should be extracted to a folder before deleting (APPXMETADATA, APPXBLOCKMAP, APPXSIGNATURE, [CONTENT_TYPES]).
Copy the IMAGES files (SYSTEM.IMG, SYSTEM_EXT.IMG, PRODUCT.IMG, VENDOR.IMG) to #IMAGES
Copy (GAPPS PICO ZIP) to #GAPPS
Edit (VARIABLES.sh) and install it in the ROOT folder.
Execute:
extract_gapps_pico.sh
extend_and_mount_imgaes.sh
apply.sh
unmount_images.sh
Copy IMAGES from the #IMAGES folder to the folder that you already extracted before (MSIX)
Open POWERSHELL under ADMIN, execute Add-AppxPackage-Register PATH_TO_EXTRACTED_MSIXAppxManifest.xml
Run WSA with GAPPS
How to fix login problems
(ADB SHELL ROOT WITH su)
Copy kernel file from misc folder to Tools folder in your extracted MSIX folder
Bây giờ bạn có thể dùng su trong ABD SHELL truy cập ADB SHELL, nhập su sau đó nhập setenforce 0, giờ bạn có thể đăng nhập tài khoản bình thường.
You can see that the instructions in AdeltaX are not very clear. You should not follow this without other knowledge of computers and operating systems. AdeltaX promises that in the near future he will rewrite the tutorial to make it easier to understand and implement.
You can see AdeltaX's process of bringing the Google Play Store to Windows 11 in the video below:
One of the "worst" problems that users often encounter on Windows 10 is the black screen error.
The black screen error can occur in some situations on Windows 10, stemming from problems related to the graphics card, the connection error between the computer and your monitor, the error occurring during the installation of the operating system, updating to new versions, etc., or simply happening randomly at any time.
In the article below, the administrator will guide you with some solutions to fix the black Windows 10 screen error.
In addition, if you encounter a black screen error on Windows 7, 8, or 8.1 computers, readers can refer to the steps to fix the error here.
Steps to fix a basic black Windows 10 computer screen
1. Black screen error during installation
Once there, try turning off the computer by pressing and holding the power button for a few seconds. If using a laptop, you can unplug the charger and remove the battery.
Unplug all unnecessa...
Problems with certain programs may arise as a result of Windows 11's ability to automatically install drivers and replace newer drivers with outdated versions.
Emails, forum posts, and phone calls have all informed us that Reddit It appears that AMD drivers in Windows 11 are being replaced by accident when using Windows Update.
Because of this problem, users may see a message reading "Windows Update may have automatically replaced your AMD Graphics driver" and titled "AMD Software: Adrenalin Edition Warning." Therefore, the AMD Software you have launched is incompatible with the AMD Graphics driver you have installed.
" data-sizes="(max-width: 627px) 100vw, 627px" />
In a proof of concept Unfortunately, the Universal Windows Platform (UWP) driver for Radeon GPU hardware that was installed by Windows Update is incompatible with the version of AMD Software that was previously installed.
It's possible that the manufact...
Microsoft is preparing to launch Windows 12 in the fall of 2024, with a wider rollout in 2025, and it is internally experimenting with several new design ideas, including a new desktop experience with a ‘floating’ taskbar. Microsoft wants to create a floating effect for the taskbar by separating it from the desktop and rounding off the edges.
Microsoft has yet to confirm the existence of Windows 12, but we know it is coming soon; at least, this appears to be the company’s current plan. Microsoft sticks to this new engineering process, we might get Windows 13 in 2027 or later, but the tech giant’s plans are always subject to change as they have in the past.
At the Build 2023 developer conference, Microsoft announced several exciting updates for Windows 11, such as Windows Copilot and AI integration in the desktop operating system. During the event, Microsoft also dropped a hint that it is working on a “next-gen Windows”, which seems to imply Microsoft plans to launch a ne...


Nhận xét
Đăng nhận xét