How to install and add FFmpeg to the path in Windows 10/8/7
Nhận đường liên kết
Facebook
X
Pinterest
Email
Ứng dụng khác
Here is a step-by-step guide for installing FFmpeg in Windows, including adding FFmpeg to the Windows path and verifying FFmpeg installation.
FFmpeg là một trong những phần mềm mã nguồn mở, miễn phí và phổ biến nhất để mã hóa và giải mã đa phương tiện. Bạn có thể sử dụng FFmpeg để chuyển đổi file video và âm thanh, tách file âm thanh, tải xuống video phát trực tuyến HLS, v.v... Điểm tốt nhất ở FFmpeg là bạn có thể thực hiện hầu hết những điều này bằng các lệnh đơn giản. FFmpeg is one of the most popular free and open-source programs for encoding and decoding multimedia. You can use FFmpeg to convert video and audio files, split audio files, download HLS streaming videos, and more. The best part about FFmpeg is that you can do most of this with simple commands.
In short, FFmpeg is fantastic, and every Windows user should install it.
TheWindowsFan.com demonstrates how to properly download and install FFmpeg in Windows 10, 8, and 7.
Install FFmpeg for Windows 10
In theory, since it's portable, you don't need to install FFmpeg to use it. However, you must manually navigate to the FFmpeg folder in the Command Prompt to access the ffmpeg.exe file and execute the relevant commands.
This isn't a big deal, but it's not very user-friendly either. To get around that, you have to add FFmpeg to the Windows 10 path using an environment variable. Once added, you can access FFmpeg through the Command Prompt or PowerShell from any folder.
Here's how to do it:
Download FFmpeg for Windows 10
1. To get started, visit the official website and download the current stable build of FFmpeg.
2. After downloading, extract the contents of the ZIP file to a folder of your choice. In the example case, the author extracted it to the root directory of the C drive.
3. Rename the extracted folder to "ffmpeg". Renaming is optional but will make things easier when you add it to the Windows path.
Rename the extracted folder to "ffmpeg"
Adding FFmpeg to the Windows 10 path
4. To add FFmpeg to the Windows 10 path, search for "Edit the system environment variables" in the Start menu and click on the result. The System Properties window will open.
5. Go to the Advanced tab and click the Environment Variables button.
Click the Environment Variables button
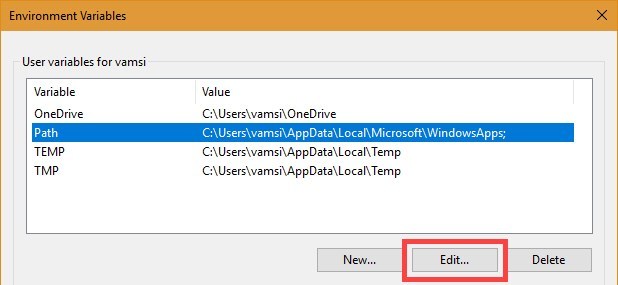
6. Select the Path variable and click Edit.
Select the Path variable and click Edit
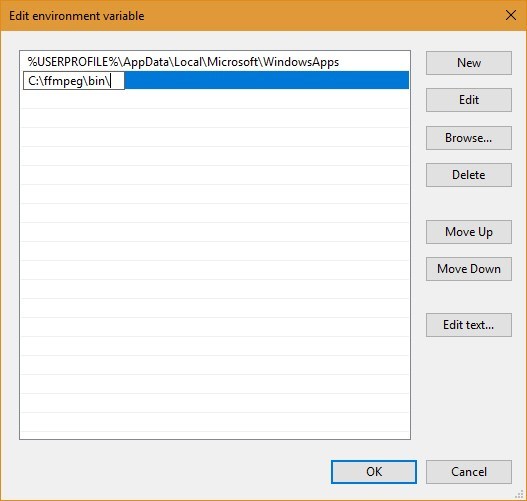
7. Click New.Click New
8. In the empty field, enter C:ffmpegbin and click the OK button.
Note: If you have placed the FFmpeg folder in another folder or drive, change the folder path accordingly.
Type C:ffmpegbin
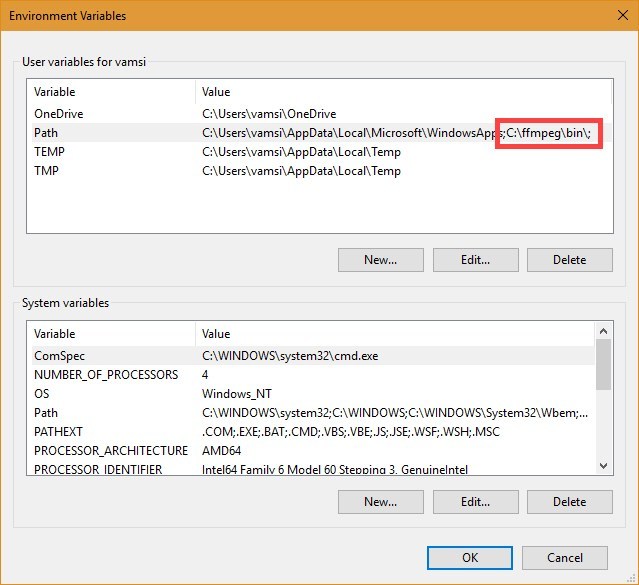
9. This is what it looks like in the main Environment Variables window. Click the OK button to save the changes.
The main Environment Variables window
10. Close the main window.
Add FFmpeg to the Windows 7 or Windows 8 path
The procedure for adding FFmpeg to the Windows 7 path is similar to that of Windows 10, but the user interface is a bit different.
1. Open the Start menu, search for "Edit System Environment Variables" and click on the result.
2. Next, go to the Advanced tab and click the Environment Variables button.
3. In the System Variables section, find the Path variable, select it, and click the Edit button.
In the System Variables section, find the Path variable
4. Go to the end of the line in the Variable Value field and add ;C:ffmpegbin. Click the OK button to save the changes. Each path that you add to the value field should be separated by a ;.
Note: If you saved FFmpeg in another folder, then change the path accordingly.
Verify the FFmpeg path
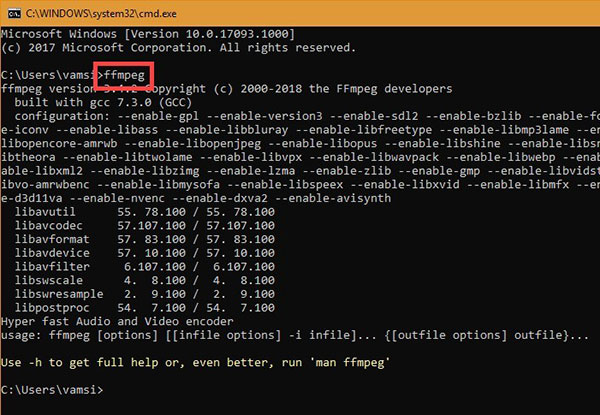
To check if FFmpeg is properly added to the Windows path, open a Command Prompt or PowerShell window, type ffmpeg, and press Enter. If all goes well, you should see FFmpeg details like the version number, default configuration, etc.
Verify the FFmpeg path
One of the "worst" problems that users often encounter on Windows 10 is the black screen error.
The black screen error can occur in some situations on Windows 10, stemming from problems related to the graphics card, the connection error between the computer and your monitor, the error occurring during the installation of the operating system, updating to new versions, etc., or simply happening randomly at any time.
In the article below, the administrator will guide you with some solutions to fix the black Windows 10 screen error.
In addition, if you encounter a black screen error on Windows 7, 8, or 8.1 computers, readers can refer to the steps to fix the error here.
Steps to fix a basic black Windows 10 computer screen
1. Black screen error during installation
Once there, try turning off the computer by pressing and holding the power button for a few seconds. If using a laptop, you can unplug the charger and remove the battery.
Unplug all unnecessa...
Problems with certain programs may arise as a result of Windows 11's ability to automatically install drivers and replace newer drivers with outdated versions.
Emails, forum posts, and phone calls have all informed us that Reddit It appears that AMD drivers in Windows 11 are being replaced by accident when using Windows Update.
Because of this problem, users may see a message reading "Windows Update may have automatically replaced your AMD Graphics driver" and titled "AMD Software: Adrenalin Edition Warning." Therefore, the AMD Software you have launched is incompatible with the AMD Graphics driver you have installed.
" data-sizes="(max-width: 627px) 100vw, 627px" />
In a proof of concept Unfortunately, the Universal Windows Platform (UWP) driver for Radeon GPU hardware that was installed by Windows Update is incompatible with the version of AMD Software that was previously installed.
It's possible that the manufact...
Microsoft is preparing to launch Windows 12 in the fall of 2024, with a wider rollout in 2025, and it is internally experimenting with several new design ideas, including a new desktop experience with a ‘floating’ taskbar. Microsoft wants to create a floating effect for the taskbar by separating it from the desktop and rounding off the edges.
Microsoft has yet to confirm the existence of Windows 12, but we know it is coming soon; at least, this appears to be the company’s current plan. Microsoft sticks to this new engineering process, we might get Windows 13 in 2027 or later, but the tech giant’s plans are always subject to change as they have in the past.
At the Build 2023 developer conference, Microsoft announced several exciting updates for Windows 11, such as Windows Copilot and AI integration in the desktop operating system. During the event, Microsoft also dropped a hint that it is working on a “next-gen Windows”, which seems to imply Microsoft plans to launch a ne...


Nhận xét
Đăng nhận xét