How to fix "Operating system not found" error on Windows
Nhận đường liên kết
Facebook
X
Pinterest
Email
Ứng dụng khác
Out of all the errors, glitches, and problems you may encounter while using Windows 10, a few messages can really scare you, such as the "Operating system not found" screen.
The prospect of losing your entire media collection, important school essays, or a project you're working on at work makes you feel like "crazy". Keep calm! Your data is still there. You can fix this problem and get everything back.
Let's see how to fix the "Operating system not found" error on Windows 10 through the following article!.
The causes of the "Operating system not found" error
There are a number of simple reasons why this error could occur, and it is less likely that your important data has been deleted. Here are some causes of this error:
The BIOS has been incorrectly configured
The Boot Record is corrupted
The Hard drive is damaged or inaccessible
Note: This error can be encountered on any computer running Windows 11, Windows 10, Windows 8, Windows 7, Windows Vista, or Windows XP.
How to fix "Operating system not found" error on Windows
Some basic troubleshooting measures
Before applying the in-depth fixes for the "Operating system not found" error, you can try some simple solutions below. Sometimes the error simply appears due to a temporary glitch, so these methods will quickly help you eliminate the problem without losing much time or effort.
Restart the computer. The error could be a temporary glitch that a reboot should fix.
Disconnect unnecessary flash drives, remove the disc if you're putting it in a drive, and remove any floppy disks. Your computer may be trying to find a suitable operating system for one of those devices, and if it can't, it may display an "Operating system not found" error.
Reattach the power and data cables of the hard drive. An unplugged or loose cable could be the cause of the error.
1. Check BIOS
You need to check two things in the BIOS. First, you need to make sure that the computer recognizes the hard drive. Second, you need to make sure the drive where you installed Windows is listed as the preferred boot drive.
The method to enter the BIOS varies by manufacturer. Usually, you'll need to press Escape, Delete, or one of the Fn keys. During the boot process, a message will appear on the screen indicating which key is correct.
The BIOS menu itself also differs from device to device. Broadly speaking, you need to locate the Boot tab along the top of the screen. (You can just use your keyboard to navigate the BIOS menu.)
In the Boot tab, go to the Hard Drive option and press Enter. Make sure Hard Drive is listed above USB Storage, CDDVDBD-ROM, Removable Devices and Network Boot. The + and - keys can be used to change the order.
If everything in your BIOS menu looks fine, go to step three. If you don't see the hard drive listed, go to step two.
2. Reset BIOS
If your computer does not recognize the hard drive, there are many possible causes. For non-tech savvy users, the only easy solution is to try resetting the entire BIOS menu to its default values.
Details are in the article: 3 simple ways to reset BIOS settings.
If the operating system is still not found, you can stop reading this article. Unless you know a lot about building computers, you'll need to take it to a computer repair shop.
3. Fix Boot Records
Windows mainly relies on three records to boot the computer. They are the Master Boot Record (MBR), the DOS Boot Record (DBR), and the Boot Configuration Database (BCD).
If any of these three records are corrupted, there is a high chance that you will encounter an "Operating system not found" message.
Thankfully, fixing these records isn't as complicated as you might think. You just need a portable Windows installation drive. Use Microsoft's Media Creation Tool to create Windows 10 installation media.
When the tool is ready, you need to use it to boot the computer. Depending on the device, you may only need to press a single key during the boot process, or you may have to change the boot order in the BIOS menu.
Finally, you will see the Windows Setup screen. Enter your preferred language, keyboard, and time format, and then click Next. On the next screen, select Repair your computer.
Next, navigate to Troubleshoot > Advanced Options > Command Prompt. When the Command Prompt loads, enter the following three commands and press Enter after each command:
Each command may take several minutes to complete. After all the processes are finished, restart the PC and see if it boots successfully.
4. Enable or disable UEFI Secure Boot
Enable or disable UEFI Secure Boot
Almost every Windows machine ships with UEFI firmware and Secure Boot. However, in some cases, it may not work. For example, if Windows is installed on a GUID Partition Table, it can only boot in UEFI mode. Conversely, if Windows 10 is running on an MBR drive, it cannot boot in UEFI mode.
Therefore, it is prudent to enable or disable UEFI Secure Boot and see if it makes a difference. You will make the adjustments in the BIOS menu. Normally, the option is called Secure Boot and can be found under the Security tab.
5. Activate the Windows partition
Activate the Windows partition
It is possible that the Windows installation partition has been disabled. You can fix it with Windows' native diskpart tool. To perform the following steps, you will need a Windows installation USB.
Turn on the machine and boot it from the tool. As in step three, you'll need to enter your language preferences and so on, then click Next, select Repair your computer, and go to Troubleshoot > Advanced Options > Command Prompt.
In the Command Prompt, type diskpart and press Enter, then type list disk and press Enter. You will see a list of all the drives attached to the machine. Note down the number of drives you need. Usually, it's the biggest one.
Use DiskPart to format and clean up removable hard drives on Windows 10
Next, type select disk [number], replacing [number] with the aforementioned number. Press the Enter button.
Now, type list volume and press Enter. It will show you all the partitions on the drive you selected. Set up the partition Windows is installed on and note down the number, then enter select volume [number], again replacing [number] with the number you just wrote down.
Finally, type active and press Enter. To see if the process was successful, reboot the machine.
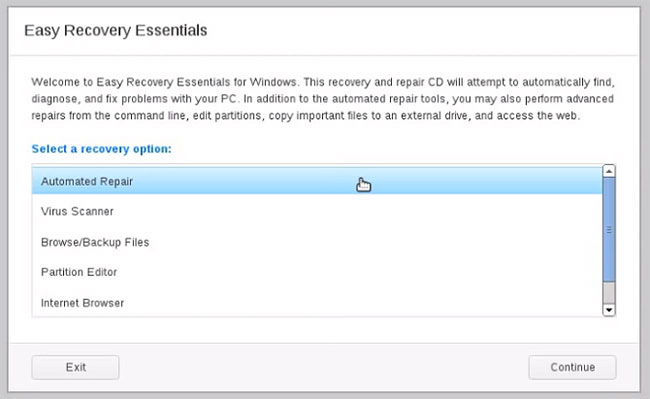
6. Using Easy Recovery Essentials
Using Easy Recovery Essentials
Easy Recovery Essentials is a third-party application that specializes in troubleshooting boot problems. If none of the previous 5 steps worked, then you should give this tool a try.
In addition to fixing the "Operating system not found" error, Easy Recovery Essentials can also resolve other common boot error messages, including INACCESSIBLE_BOOT_DEVICE, INACCESSIBLE_BOOT_VOLUME, UNMOUNTABLE_BOOT_VOLUME, BOOTMGR is missing, The Boot Configuration Data for your PC is missing or contains errors, An error occurred while attempting to read the boot configuration data, boot.ini not found, etc...
Just download the app, burn the ISO to a CD, and use the CD to boot. The application wizard will help you through the repair process.
Good luck!
Check out some more articles below:
4 ways to fix the USB error "Windows was unable to complete the format"
Summary of some ways to fix Windows 10 crashes, BSOD errors, and reboot errors
On Windows 10/8.1/8, resolve an abnormally high CPU error caused by TiWorker.exe.
One of the "worst" problems that users often encounter on Windows 10 is the black screen error.
The black screen error can occur in some situations on Windows 10, stemming from problems related to the graphics card, the connection error between the computer and your monitor, the error occurring during the installation of the operating system, updating to new versions, etc., or simply happening randomly at any time.
In the article below, the administrator will guide you with some solutions to fix the black Windows 10 screen error.
In addition, if you encounter a black screen error on Windows 7, 8, or 8.1 computers, readers can refer to the steps to fix the error here.
Steps to fix a basic black Windows 10 computer screen
1. Black screen error during installation
Once there, try turning off the computer by pressing and holding the power button for a few seconds. If using a laptop, you can unplug the charger and remove the battery.
Unplug all unnecessa...
Problems with certain programs may arise as a result of Windows 11's ability to automatically install drivers and replace newer drivers with outdated versions.
Emails, forum posts, and phone calls have all informed us that Reddit It appears that AMD drivers in Windows 11 are being replaced by accident when using Windows Update.
Because of this problem, users may see a message reading "Windows Update may have automatically replaced your AMD Graphics driver" and titled "AMD Software: Adrenalin Edition Warning." Therefore, the AMD Software you have launched is incompatible with the AMD Graphics driver you have installed.
" data-sizes="(max-width: 627px) 100vw, 627px" />
In a proof of concept Unfortunately, the Universal Windows Platform (UWP) driver for Radeon GPU hardware that was installed by Windows Update is incompatible with the version of AMD Software that was previously installed.
It's possible that the manufact...
Microsoft is preparing to launch Windows 12 in the fall of 2024, with a wider rollout in 2025, and it is internally experimenting with several new design ideas, including a new desktop experience with a ‘floating’ taskbar. Microsoft wants to create a floating effect for the taskbar by separating it from the desktop and rounding off the edges.
Microsoft has yet to confirm the existence of Windows 12, but we know it is coming soon; at least, this appears to be the company’s current plan. Microsoft sticks to this new engineering process, we might get Windows 13 in 2027 or later, but the tech giant’s plans are always subject to change as they have in the past.
At the Build 2023 developer conference, Microsoft announced several exciting updates for Windows 11, such as Windows Copilot and AI integration in the desktop operating system. During the event, Microsoft also dropped a hint that it is working on a “next-gen Windows”, which seems to imply Microsoft plans to launch a ne...


Nhận xét
Đăng nhận xét