If you are a Windows 10 or Windows 11 user, you may have seen error code 0x8007139f. You can now see this error code for Windows Update, a Mail app, a Microsoft account, and Windows Defender when activating Windows, playing Xbox games, or using a PIN. Let's consider each situation and find a solution in the following article!
Windows Update error 0x8007139f
You may receive Windows Update error code 0x8007139f while trying to install updates on your device. This post provides the most suitable solutions to successfully solve this problem. You may experience this error for one or more of the following known causes:
Corrupt system files
Windows Update is malfunctioning
Interference from third-party security software
If you are facing the 0x8007139f version of this Windows Update error, you can try the suggested solutions in the order shown below to resolve the issue.
1. Run Windows Update Troubleshooter
As with most Windows update errors you may encounter on your Windows 10/11 device, you should first run the available Windows Update Troubleshooter tool and see if that helps resolve the 0x8007139f problem with Windows Update or not.
2. Run DISM scan
Vì đây có thể là trường hợp file hệ thống bị hỏng, nên bạn hãy sử dụng công cụ DISM, có nguồn gốc từ hệ điều hành Windows, để sửa các file gặp sự cố. Hãy thử giải pháp tiếp theo nếu cách này không hiệu quả với bạn.
Firewalls and anti-virus software are important for system safety, but sometimes these programs can interfere with the normal operation of a Windows PC.
This solution requires that you turn off your AV software and try running Windows Update again. If the error persists, you can remove third-party antivirus programs from your PC by using a dedicated removal tool, which will remove all files associated with your antivirus.
If removing the antivirus software fixes the problem, you can now reinstall the antivirus software, switch to an alternate AV software, or better yet, use the original Windows AV program, Windows Defender.
4. Reset the Windows Update component
In this solution, you can use the Reset Windows Update Agent Tool and see if it helps. You can reset the Windows Update Client using a PowerShell script. Besides these two automatic tools, if you want, you can manually reset each Windows Update component to its default.
5. Install updates manually
This solution requires you to download it manually from the Microsoft Update catalog; otherwise, the update fails to install and thus causes the mentioned error. Then install the update on your Windows 10/11 PC.
Additionally, Windows updates can be installed through a number of other methods, such as using the Update Assistant or the Media Creation Tool. For major updates, like feature updates, you can update them manually using the two mentioned tools.
Error code 0x8007139f in the Windows Mail app
This section will help you fix the Windows Mail application error code 0x8007139f.
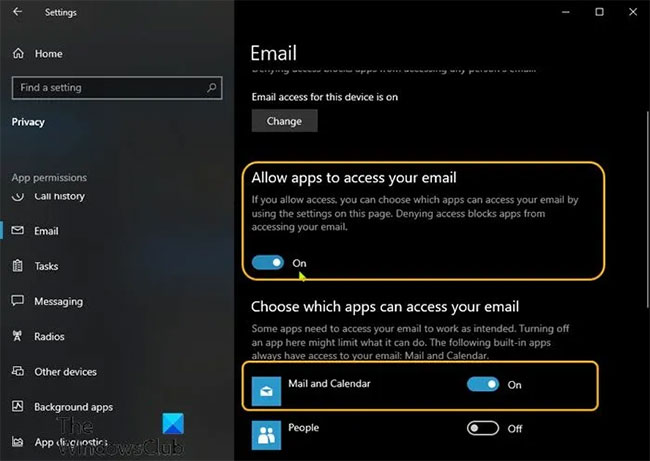
1. Check the Mail and Calendar apps' privacy settings
Check the Mail and Calendar apps' privacy settings
This solution requires you to check your Mail app permissions. Here's how to do it:
To open Settings, press the Windows key + I.
Click Privacy.
Go to the left panel and click the Email button.
On the right pane, enable the Allow apps to access your email button.
Still in the right pane, under Choose which apps can access your email, turn on the Mail and Calendar buttons.
You may also need to turn on the People button.
Close Settings app.
Now, try to add an email account and see if the Mail app error code 0x8007139f reappears. If so, try the next solution.
2. Reset Mail app
This solution requires you to reset the Mail app and see if that helps.
3. Uninstall and reinstall the Mail app
This solution requires you to uninstall the Mail app and then reinstall it, set up the app, and finally add an email account. Do the following:
To access the Power User menu, press Windows key + X.
Press A on your keyboard to launch PowerShell with administrator rights.
In the PowerShell console, copy and paste the command below, and then press Enter to uninstall the Mail app.
After the command executes successfully, you can reinstall the Mail and Calendar apps from the Microsoft Store. Finally, set up and add your email account.
However, if the problem persists, try the next solution.
4. Sign in to Windows with a local account
This is more of a temporary workaround than a solution; it requires you to sign in to your Windows PC with a local account instead of a Microsoft account.
Learn about error code 0xc000000e and how to fix it
Microsoft account error code 0x8007139f
Microsoft account error code 0x8007139f
To fix this error code with a Microsoft account on a Windows PC:
1. Sign out of your Windows account.
2. Sign in with a local account.
3. Sign in again with your Microsoft account to your PC.
This will fix the problem.
Windows Defender Error Code 0x8007139f
To fix error code 0x8007139f in Windows Defender, follow these suggestions:
1. Restart Windows Defender Services.
2. Reset Windows Defender to its default settings.
3. Run the System File Checker tool.
4. Run DISM to repair the system image.
To check Windows Defender Services, open Windows Services Manager and find the following 4 services:
Windows Defender Antivirus Service
Windows Defender Antivirus Network Inspection Service
Windows Defender Advanced Threat Protection Service
Windows Defender Firewall
You can stop and start them or just use the Restart option, available in the right-click context menu.
Windows activation error code 0x8007139f
To fix Windows activation error code 0x8007139f:
Run the Windows Activation Troubleshooter and see if it helps you.
Advanced users can see more ways to troubleshoot the Windows activation status.
One of the "worst" problems that users often encounter on Windows 10 is the black screen error.
The black screen error can occur in some situations on Windows 10, stemming from problems related to the graphics card, the connection error between the computer and your monitor, the error occurring during the installation of the operating system, updating to new versions, etc., or simply happening randomly at any time.
In the article below, the administrator will guide you with some solutions to fix the black Windows 10 screen error.
In addition, if you encounter a black screen error on Windows 7, 8, or 8.1 computers, readers can refer to the steps to fix the error here.
Steps to fix a basic black Windows 10 computer screen
1. Black screen error during installation
Once there, try turning off the computer by pressing and holding the power button for a few seconds. If using a laptop, you can unplug the charger and remove the battery.
Unplug all unnecessa...
Problems with certain programs may arise as a result of Windows 11's ability to automatically install drivers and replace newer drivers with outdated versions.
Emails, forum posts, and phone calls have all informed us that Reddit It appears that AMD drivers in Windows 11 are being replaced by accident when using Windows Update.
Because of this problem, users may see a message reading "Windows Update may have automatically replaced your AMD Graphics driver" and titled "AMD Software: Adrenalin Edition Warning." Therefore, the AMD Software you have launched is incompatible with the AMD Graphics driver you have installed.
" data-sizes="(max-width: 627px) 100vw, 627px" />
In a proof of concept Unfortunately, the Universal Windows Platform (UWP) driver for Radeon GPU hardware that was installed by Windows Update is incompatible with the version of AMD Software that was previously installed.
It's possible that the manufact...
Microsoft is preparing to launch Windows 12 in the fall of 2024, with a wider rollout in 2025, and it is internally experimenting with several new design ideas, including a new desktop experience with a ‘floating’ taskbar. Microsoft wants to create a floating effect for the taskbar by separating it from the desktop and rounding off the edges.
Microsoft has yet to confirm the existence of Windows 12, but we know it is coming soon; at least, this appears to be the company’s current plan. Microsoft sticks to this new engineering process, we might get Windows 13 in 2027 or later, but the tech giant’s plans are always subject to change as they have in the past.
At the Build 2023 developer conference, Microsoft announced several exciting updates for Windows 11, such as Windows Copilot and AI integration in the desktop operating system. During the event, Microsoft also dropped a hint that it is working on a “next-gen Windows”, which seems to imply Microsoft plans to launch a ne...


Nhận xét
Đăng nhận xét