6 Ways to Fix the Media Creation Tool When It's Not Working
Nhận đường liên kết
Facebook
X
Pinterest
Email
Ứng dụng khác
The Media Creation Tool allows you to reinstall Windows using a USB or DVD. It is basically a hard copy of Windows that can be used when your current installation of Windows is corrupted and the operating system is not working properly. However, this tool is also prone to annoying errors, especially if they happen right before the installation process.
If you find yourself in a situation like this, the following article lists some effective fixes that you can try to get the Media Creation Tool working as before.
1. Run the Media Creation Tool with admin rights
One of the most common problems preventing the Media Creation Tool from working correctly is a lack of permissions. In some cases, applications require admin rights to run, and when that access is missing, they generate errors.
The fix in this case is very simple, because all you need to do is run the Media Creation Tool with admin rights. Here's how to do it:
Step 1: Plug in the bootable USB and right-click the Media Creation Tool icon on the desktop.
Step 2: Select Run as administrator from the context menu.
Select Run as administratorStep 3: Click Yes in the User Account Control prompt to continue.
Click Yes
If you are unable to use the Media Creation Tool due to insufficient permissions, running it with admin rights should help you fix the problem.
2. Modify the Windows Registry
You may also need to tweak the Registry Editor slightly to run the Media Creation Tool successfully.
The Windows Registry is an administrative tool that stores information about programs and processes in Windows. Most, if not all, of the changes (like installing an application or granting additional permissions to a program) that you make in Windows are logged in the Registry.
Since the Registry is an important utility that is normally only used by administrators, make sure that you make a backup of the Registry before making any kind of edits in it. Also, keep in mind that you need to be logged into Windows with admin rights to perform the steps below:
Step 1: Press Win + R to open Run.
Step 2: Type regedit into Run and click Enter.Step 3: Click Yes in the confirmation prompt.
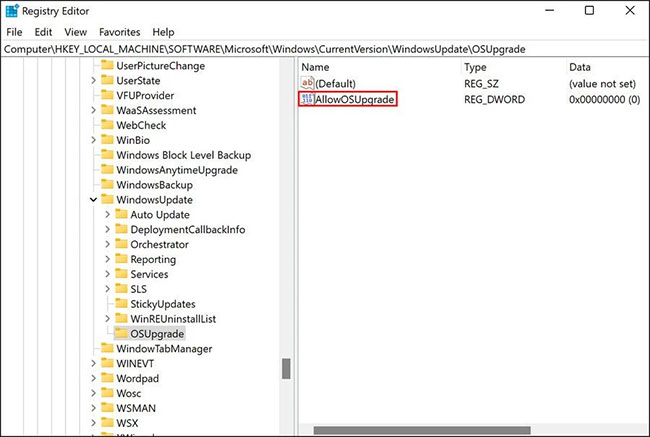
Click Yes in the confirmation promptStep 4: Inside Registry Editor, go to the location mentioned below:
Step 5: Right-click the OSUpgrade key and select the New > DWORD (32-bit) Value option.
Right-click the OSUpgrade keyStep 6: Name this value AllowOSUpgrade.
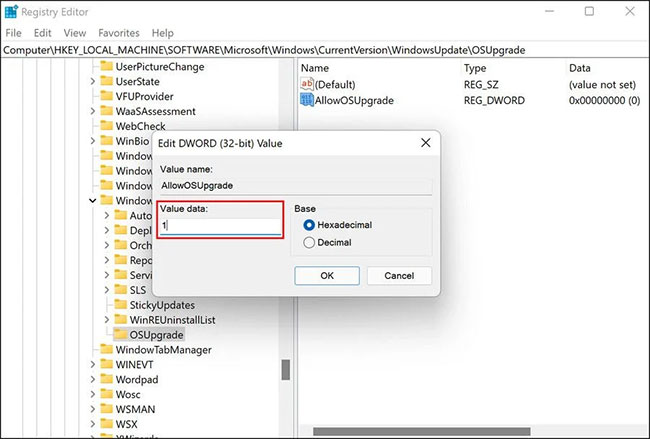
Name this value AllowOSUpgradeStep 7: Double-click AllowOSUpgrade and enter 1 in the Value data field.
Set Value data is 1Step 8: Click OK and close Registry Editor.
Now you can restart your computer and check if you can use the Media Creation Tool now.
3. Enable relevant services
Some programs on Windows need related services to work properly. In order for the Media Creation Tool to run without any problems, the following services must be enabled:
Background Intelligent Transfer Service (BITS)
Server
TCP/IP NetBIOS Helper
Workstation
IKE and AuthIP IPsec Keying Modules
Windows Update or Automatic Updates
If one or more of these services are disabled, you may have problems using the Media Creation Tool. Follow the steps below to enable these services:
Step 1: Press Win + R to open Run.Step 2: Type services.msc into Run and click Enter.Step 3: In the following window, find Background Intelligent Transfer Service (BITS) and right-click on it.
Step 4: Select Properties from the context menu.
Select PropertiesStep 5: In the Properties dialog box, click the Start button. If the service is already running, you can restart it by first stopping it and then restarting it.
Click the Start buttonStep 6: Set Startup type to Automatic.Set Startup type to AutomaticStep 7: Perform the same steps with the other services that the article mentions above.
Step 8: Once done, close the Services window and check if you can use the Media Creation Tool without any problems now.
4. Make sure you are running the latest version of Windows
It is critical to keep your Windows up to date. The latest updates provide many new features and ensure that your system and its applications are always compatible with each other. Most updates also come with security patches and bug fixes that can help you solve many problems in Windows without much input.
Update Windows
You may have problems with the Media Creation tool if your version of Windows is out of date. If that's the case, install the latest updates to fix the problem.
5. Check system memory
You should have at least 8 GB of free space on your computer's hard drive to use the Media Creation Tool. Also, your USB should have the same amount of free space to avoid any storage problems in the process.
If the storage space is less than the recommended free space, you can delete some unimportant Windows files and folders to free up computer space.
6. Reinstall the Media Creation Tool
Finally, if the troubleshooting methods mentioned above don't help, then it's likely that the problem is with the Media Creation Tool itself and not with the system.
In this case, the only possible solution is to uninstall the Media Creation Tool and reinstall it from scratch. You can uninstall the current version from the USB and then reinstall it from the official Microsoft website.
Installing Windows on a USB drive or disk can be quite useful in cases of errors that the operating system cannot fix on its own. However, a faulty Media Creation Tool itself can lead to a slightly more complicated situation.
The methods mentioned above will hopefully be of help to you if you face any such problem along the way. If you are still having problems even after trying the above troubleshooting techniques, the article recommends that you contact Microsoft support and report the problem to them.
One of the "worst" problems that users often encounter on Windows 10 is the black screen error.
The black screen error can occur in some situations on Windows 10, stemming from problems related to the graphics card, the connection error between the computer and your monitor, the error occurring during the installation of the operating system, updating to new versions, etc., or simply happening randomly at any time.
In the article below, the administrator will guide you with some solutions to fix the black Windows 10 screen error.
In addition, if you encounter a black screen error on Windows 7, 8, or 8.1 computers, readers can refer to the steps to fix the error here.
Steps to fix a basic black Windows 10 computer screen
1. Black screen error during installation
Once there, try turning off the computer by pressing and holding the power button for a few seconds. If using a laptop, you can unplug the charger and remove the battery.
Unplug all unnecessa...
Problems with certain programs may arise as a result of Windows 11's ability to automatically install drivers and replace newer drivers with outdated versions.
Emails, forum posts, and phone calls have all informed us that Reddit It appears that AMD drivers in Windows 11 are being replaced by accident when using Windows Update.
Because of this problem, users may see a message reading "Windows Update may have automatically replaced your AMD Graphics driver" and titled "AMD Software: Adrenalin Edition Warning." Therefore, the AMD Software you have launched is incompatible with the AMD Graphics driver you have installed.
" data-sizes="(max-width: 627px) 100vw, 627px" />
In a proof of concept Unfortunately, the Universal Windows Platform (UWP) driver for Radeon GPU hardware that was installed by Windows Update is incompatible with the version of AMD Software that was previously installed.
It's possible that the manufact...
Microsoft is preparing to launch Windows 12 in the fall of 2024, with a wider rollout in 2025, and it is internally experimenting with several new design ideas, including a new desktop experience with a ‘floating’ taskbar. Microsoft wants to create a floating effect for the taskbar by separating it from the desktop and rounding off the edges.
Microsoft has yet to confirm the existence of Windows 12, but we know it is coming soon; at least, this appears to be the company’s current plan. Microsoft sticks to this new engineering process, we might get Windows 13 in 2027 or later, but the tech giant’s plans are always subject to change as they have in the past.
At the Build 2023 developer conference, Microsoft announced several exciting updates for Windows 11, such as Windows Copilot and AI integration in the desktop operating system. During the event, Microsoft also dropped a hint that it is working on a “next-gen Windows”, which seems to imply Microsoft plans to launch a ne...


Nhận xét
Đăng nhận xét