What should I do if BIOS cannot detect an ATA/SATA hard drive in Windows?
Nhận đường liên kết
Facebook
X
Pinterest
Email
Ứng dụng khác
It can be worrisome when the BIOS doesn't detect or recognize the ATA/SATA hard drive. Worse still, there are many causes of this problem, so it can be difficult to find the exact culprit that is keeping the computer from detecting the hard drive.
Fortunately, there are tricks you can use to narrow down what's causing this problem. To learn how to resolve an unrecognized hard drive in Windows 10, read the following article by TheWindowsFan.com.
1. Check if the hard drive is disabled in the BIOS
Check if the hard drive is disabled in the BIOS
Some motherboard manufacturers disable unused SATA ports in the BIOS by default. If you are using a PC, make sure the hard drive is enabled in the BIOS.
For example, if using an Asus motherboard, you may want to enable CSM (Compatibility Support Module) in the BIOS settings. This allows you to show both UEFI and non-UEFI devices in boot priority mode.
To enable CSM on Asus motherboards:
Step 1: Turn off the computer if it is powered on.
Step 2: Press the power button to enable the feature, and as soon as you see the Asus logo appear, start pressing the Delete key on your keyboard. This will allow you to use UEFI BIOS Utility—EZ Mode.
Step 3: In EZ Mode, press the F7 key to switch to Advanced Mode.
Step 4: Open the Boot tab in Advanced Mode.
Step 5: Next, expand the CSM (Compatibility Support Module) section.
Step 6: Click the Launch CSM drop-down menu and select Enabled.
Step 7: Press the F10 key and then OK to save the changes.
2. Update your BIOS to the latest version
Updating the BIOS (Basic Input Output System) to the latest version available can help fix compatibility issues and improve performance.
Depending on whether you are using UEFI or Legacy BIOS, there are many ways to update it. You can refer to Thewindowsfan.com's detailed instructions on how to update the UEFI BIOS in Windows or the motherboard/laptop manufacturer's documentation for specific details.
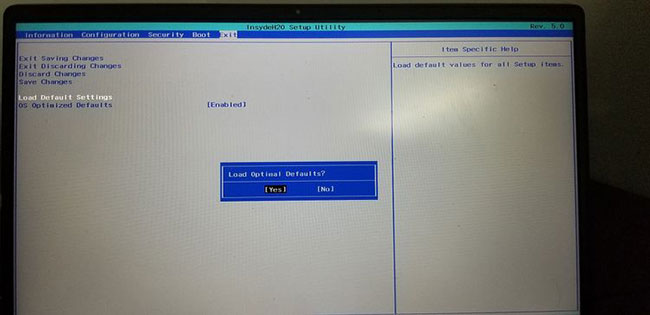
3. Load the default BIOS settings
Load the default BIOS settings
If you have made changes to the BIOS, including overclocking the CPU or the memory, the storage drive may not be detected by the system due to instability.
Luckily, you can go into the BIOS and revert it to the default configuration to undo any changes. The steps involved in loading the default settings may vary depending on the laptop or motherboard manufacturer.
To load default BIOS settings:
Step 1: Turn off the PC and wait for it to shut down completely.
Step 2: Next, press the Power button and press the F2/F8/Del key to enter the BIOS Setup Utility. Depending on the laptop and motherboard manufacturer, you may have a different key to enter the BIOS.
Step 3: Once in the BIOS, use the arrow keys to open the Exit tab.
Step 4: Use the down arrow keys and highlight Load Default Settings.
Step 5: Press Enter, and then select Yes to load the BIOS default settings.
Step 6: Press F10 and Enter to exit and save the changes.
Loading the default settings will reset all the changes you made to the BIOS.
4. Remove and reconnect the hard drive
The computer may not be able to detect the hard drive if there is a problem with the drive, the drive is damaged, or the connection is loose. Remove the hard drive and check it for physical damage after carefully disconnecting the wires to confirm the drive's condition.
For the old hard drive, wipe off the dust and connect it to the PC. If the problem persists, try connecting it to another computer if available. This will help you determine if the problem is with the motherboard or the hard drive.
5. Check if the SATA cable is faulty or not plugged in correctly
The BIOS will not detect the hard drive if the data cable is faulty. Make sure that the SATA cables are in good condition and that you have them connected correctly. Also, check the motherboard for bent or misaligned pins.
Check the hard drive manufacturer's documentation for the right cable. For example, some manufacturers recommend using UDMA cabling for ATA drives. These color-coded cables require proper orientation to establish a proper connection. You can find support documentation for your drive on the manufacturer's website.
Furthermore, try connecting the old DVD drive with a SATA cable to the motherboard and see if it works. If not, the data cable is most likely faulty. Try replacing the cable and see if that helps.
6. Check if the drive is spinning
Check if the drive is spinning
If the hard drive is not supplied with enough power or has no power, it will not work. You can do a quick check to see if the drive is spinning, and if not, you've identified the cause of your mysterious failure. Just remember that this trick won't work with SSDs, as they don't have spinning disks.
Try these troubleshooting procedures to see whether power problems are keeping the drive from being detected by the BIOS.
Step 1: Turn off the PC and make sure it is completely powered off.
Step 2: Next, open the computer case and disconnect the data cable from the hard drive.
Step 3: Power on the computer and check if the drive spins. A slight vibration to the touch indicates that it is spinning.
7. Use the boot diagnostic tool to check the hard drive's health
You can use the proprietary hard drive diagnostic tools provided by the manufacturer to check its health. Seagate provides SeaTools for DOS, while Western Digital has Data LifeGuard Diagnostics.
Download the tools and create a bootable drive. Boot from this drive and check if it detects the hard drive. If the diagnostics cannot detect anything, the hard drive is probably faulty and needs to be replaced.
Above are some ways to fix the BIOS not detecting the ATA/SATA hard drive in Windows. I hope they help you!
One of the "worst" problems that users often encounter on Windows 10 is the black screen error.
The black screen error can occur in some situations on Windows 10, stemming from problems related to the graphics card, the connection error between the computer and your monitor, the error occurring during the installation of the operating system, updating to new versions, etc., or simply happening randomly at any time.
In the article below, the administrator will guide you with some solutions to fix the black Windows 10 screen error.
In addition, if you encounter a black screen error on Windows 7, 8, or 8.1 computers, readers can refer to the steps to fix the error here.
Steps to fix a basic black Windows 10 computer screen
1. Black screen error during installation
Once there, try turning off the computer by pressing and holding the power button for a few seconds. If using a laptop, you can unplug the charger and remove the battery.
Unplug all unnecessa...
Problems with certain programs may arise as a result of Windows 11's ability to automatically install drivers and replace newer drivers with outdated versions.
Emails, forum posts, and phone calls have all informed us that Reddit It appears that AMD drivers in Windows 11 are being replaced by accident when using Windows Update.
Because of this problem, users may see a message reading "Windows Update may have automatically replaced your AMD Graphics driver" and titled "AMD Software: Adrenalin Edition Warning." Therefore, the AMD Software you have launched is incompatible with the AMD Graphics driver you have installed.
" data-sizes="(max-width: 627px) 100vw, 627px" />
In a proof of concept Unfortunately, the Universal Windows Platform (UWP) driver for Radeon GPU hardware that was installed by Windows Update is incompatible with the version of AMD Software that was previously installed.
It's possible that the manufact...
Microsoft is preparing to launch Windows 12 in the fall of 2024, with a wider rollout in 2025, and it is internally experimenting with several new design ideas, including a new desktop experience with a ‘floating’ taskbar. Microsoft wants to create a floating effect for the taskbar by separating it from the desktop and rounding off the edges.
Microsoft has yet to confirm the existence of Windows 12, but we know it is coming soon; at least, this appears to be the company’s current plan. Microsoft sticks to this new engineering process, we might get Windows 13 in 2027 or later, but the tech giant’s plans are always subject to change as they have in the past.
At the Build 2023 developer conference, Microsoft announced several exciting updates for Windows 11, such as Windows Copilot and AI integration in the desktop operating system. During the event, Microsoft also dropped a hint that it is working on a “next-gen Windows”, which seems to imply Microsoft plans to launch a ne...


Nhận xét
Đăng nhận xét