How to fix "Windows Has Detected an IP Address Conflict" error
Nhận đường liên kết
Facebook
X
Pinterest
Email
Ứng dụng khác
An IP address is a set of numbers that identifies a particular device when it is connected to a network. Different devices have unique IP addresses, and computers use them to interact with each other over the Internet.
However, when the IP addresses of two or more devices are the same, the network will not be able to distinguish between them. When using the Internet, this causes the "Windows has detected an IP address conflict" error.
Here is how to resolve IP address conflict errors on Windows 10 and 11 with some simple steps.
1.Refresh network settings using CMD
If you do not set up your PC's network settings correctly, IP conflicts may occur. IP conflicts often cause your Internet connection to randomly stop working.
To resolve this problem, perform the following steps on your computer to update the network settings:
Step 1: Run Command Prompt with administrative privileges.
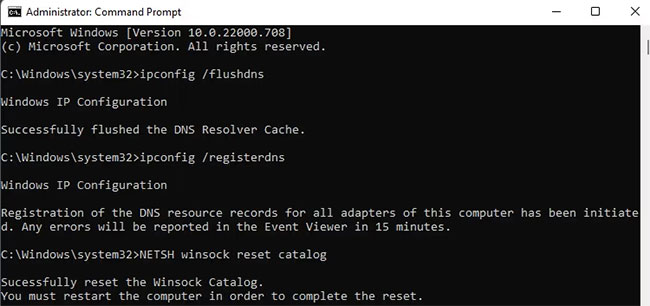
Step 2: Copy and paste the following commands into the Command Prompt:
ipconfig /flushdns
ipconfig /registerdns
NETSH winsock reset catalog
NETSH int ipv4 reset reset.log
NETSH int ipv6 reset reset.log
exit
Network Refresh Commands in CMDStep 3: The Command Prompt will then close by itself. Now, restart your PC to make sure the changes take effect correctly.
If the problem is still not fixed, move on to the next steps for more advanced ways to resolve IP conflict errors.
2. Change DNS server
A DNS (Domain Name System) server is an Internet directory that helps web browsers connect to different websites.
If you have configured your DNS server settings incorrectly or if your current server is experiencing problems, it could lead to an IP conflict error. Thankfully, you can work around this by changing the DNS server address.
To change the default DNS server in Windows, follow the steps below:
Step 1: Open the Settings application by pressing the Win + I key combination.
Step 2: Navigate to Network & internet > Advanced network settings > More network adapter options.
Advanced Network Settings in Windows 11Step 3: Right-click your Internet connection and select Properties from the context menu.
Networking in WindowsStep 4: Select Internet Protocol Version 4 (TCP/IPv4) and double-click on it.
Step 5: Click "Use the following DNS server address" option.
Step 6: Enter 8.8.8.8 in the Preferred DNS server field and 8.8.4.4 in the Alternate DNS server field.
IPv4 Properties in WindowsStep 7: Finally, click the OK button to save the changes.
The article used Google Public DNS as the DNS server for this tutorial. To improve your online security, you can also use any of the best DNS servers available.
3. IP address extension
Usually, a device can continue to use the same IP address forever. However, technical failures can lead to IP conflicts and other problems that prevent the network from functioning properly. When this happens, you may want to consider renewing your PC's IP address.
When you renew the IP address of a Windows computer, the underlying IP connection is also reset. This usually fixes some common problems with IP addresses.
Here's how to use Command Prompt to renew an IP address:
Step 1: Open Command Prompt window with administrative privileges.
Step 2: Type the command below once and press Enter:
ipconfig /release
Step 3: Now, type the following command and press Enter to get a new address:
ipconfig /renew
Renew the IP address command
All operations are completed. When you press the Enter key, you will be disconnected from the Internet for a few seconds. When the command is complete, you will be back online and a new line with the IP address will show up on the Command Prompt screen.
Besides, if you get an error code instead of a newly assigned IP address, you need to use the Windows troubleshooter.
4. Change the IPv6 connection
If you cannot use any service that requires the Internet, modifying the IPv6 connection settings may fix the problem. Before moving on to the steps, you should check if your Internet service provider supports IPV6. You can verify that by running a quick test on the Test IPv6 website.
Once confirmed, take the following steps to disable IPv6 on your network:
Step 1: Right-click on the Start menu icon and go to Network Connections.
Step 2: Then, click Advanced network settings > More network adapter options.
Network and Internet SettingsStep 3: Right-click on your network connection and select the Properties option.
Step 4: Then, uncheck Internet Protocol Version 6 (TCP/IPv6).
Ethernet Properties in WindowsStep 5: Finally, click OK to save the changes.
5. Perform a Winsock reset
If you cannot connect to the Internet, you can use the Command Prompt utility to reset Winsock. In a word, Winsock makes it possible for Windows programs and applications to connect to the Internet.
By resetting Winsock, any network-related settings made by other network programs such as VPN clients, third-party browsers or anti-virus software will be lost.
To reset Winsock using a Command Prompt, follow the instructions below:
Step 1: Log in as an admin and open the Command Prompt. You can use one of many ways to open the Command Prompt on Windows.
Step 2: Type the command below, then press the Enter key:
netsh winsock reset
Perform a Winsock resetStep 3: Restart the computer now, then verify if the Internet problem persists.
6. Restart the router
Your router gives your computer a unique IP address when you connect to it via an Ethernet cable or WiFi.
However, sometimes that might not be possible, and then you'll get the error "Windows has detected an IP address conflict" or "Windows was unable to retrieve an IP address". Restarting the router can be helpful in such cases.
Here's how to quickly reboot your router. This will update the DHCP server on the router. All devices connected to the router must receive fresh IP addresses from the DHCP server, which is in charge of controlling the network.
You must reset the router if restarting it does not solve the problem. Please be aware that all specified network settings will also be erased after the router is reset. Thewindowsfan.com gives some tips on how to reset the router if you are prepared to move further.
How to reset VNPT WiFi router
How to reset TP-Link WiFi router
How to reset Linksys router to factory default settings
In short, you can fix the "Windows has detected an IP address conflict" error by changing the IP address, restarting the router, or updating your PC's network configuration.
Minor network configuration difficulties on the PC are frequently to blame for conflicting IP address errors. It's also possible that your router malfunctioned or made a technical error and gave the same IP address to two or more devices.
However, beginners should not manually configure the router's settings. Not only does it disrupt network connections, but it can also cause major home network problems.
One of the "worst" problems that users often encounter on Windows 10 is the black screen error.
The black screen error can occur in some situations on Windows 10, stemming from problems related to the graphics card, the connection error between the computer and your monitor, the error occurring during the installation of the operating system, updating to new versions, etc., or simply happening randomly at any time.
In the article below, the administrator will guide you with some solutions to fix the black Windows 10 screen error.
In addition, if you encounter a black screen error on Windows 7, 8, or 8.1 computers, readers can refer to the steps to fix the error here.
Steps to fix a basic black Windows 10 computer screen
1. Black screen error during installation
Once there, try turning off the computer by pressing and holding the power button for a few seconds. If using a laptop, you can unplug the charger and remove the battery.
Unplug all unnecessa...
Problems with certain programs may arise as a result of Windows 11's ability to automatically install drivers and replace newer drivers with outdated versions.
Emails, forum posts, and phone calls have all informed us that Reddit It appears that AMD drivers in Windows 11 are being replaced by accident when using Windows Update.
Because of this problem, users may see a message reading "Windows Update may have automatically replaced your AMD Graphics driver" and titled "AMD Software: Adrenalin Edition Warning." Therefore, the AMD Software you have launched is incompatible with the AMD Graphics driver you have installed.
" data-sizes="(max-width: 627px) 100vw, 627px" />
In a proof of concept Unfortunately, the Universal Windows Platform (UWP) driver for Radeon GPU hardware that was installed by Windows Update is incompatible with the version of AMD Software that was previously installed.
It's possible that the manufact...
Microsoft is preparing to launch Windows 12 in the fall of 2024, with a wider rollout in 2025, and it is internally experimenting with several new design ideas, including a new desktop experience with a ‘floating’ taskbar. Microsoft wants to create a floating effect for the taskbar by separating it from the desktop and rounding off the edges.
Microsoft has yet to confirm the existence of Windows 12, but we know it is coming soon; at least, this appears to be the company’s current plan. Microsoft sticks to this new engineering process, we might get Windows 13 in 2027 or later, but the tech giant’s plans are always subject to change as they have in the past.
At the Build 2023 developer conference, Microsoft announced several exciting updates for Windows 11, such as Windows Copilot and AI integration in the desktop operating system. During the event, Microsoft also dropped a hint that it is working on a “next-gen Windows”, which seems to imply Microsoft plans to launch a ne...


Nhận xét
Đăng nhận xét