Exodus is the third installment of the Metro series. This is a great game, but it has some technical issues on Windows. Since its release, gamers have posted on support forums about bugs that caused Metro Exodus to crash. Many of them need to fix the occasional crash in the Caspian Sea section of Metro Exodus.
When Exodus crashes, the game completely freezes, forcing you to restart your PC. And if these frequent random crashes get worse, they can make Exodus unplayable. These are some of the best ways to fix repeated Metro Exodus crashes in Windows 10.
1. Lower graphics settings in Metro Exodus
Try lowering the graphics settings in Metro Exodus first. If you're playing Metro Exodus on a PC that barely meets the minimum system requirements, the cause of the error could be that you've configured the graphics settings a bit too high.
Additionally, your PC's graphics card may not be compatible with some of the game's fancy high-graphics effects, such as Ray Tracing and Hairworks.
Furthermore, DirectX 12 mode may cause Exodus to crash on some PCs. Players have confirmed that switching to DirectX 11 can fix the problem. So try lowering the graphics settings and choosing DX 11 in Metro Exodus as follows:
Step 1: Launch the game Metro Exodus as usual.
Step 2: Select Options on the game's title screen.
Step 3: Then select the Video category to show the options in the screenshot directly below.
Metro Exodus Graphics SettingsStep 4: Select the lower Quality preset option currently.
Step 5: Change DirectX preferences to DX11.
Step 6: You should also disable the Hairworks and V-Sync settings if they are checked.
Step 7: Press Esc and Enter to apply the setting.
Step 8: Once done, restart the game.
2. Turn off fullscreen optimization and run Metro Exodus with admin rights
Some players said they were able to fix frequent Metro Exodus issues by turning off full-screen optimization. The Compatibility tab on the game's properties window includes an option to Disable full-screen optimizations. Furthermore, you can choose to run Exodus as an administrator from the same tab, which can also be useful. Here's how you can choose those settings for Metro Exodus:
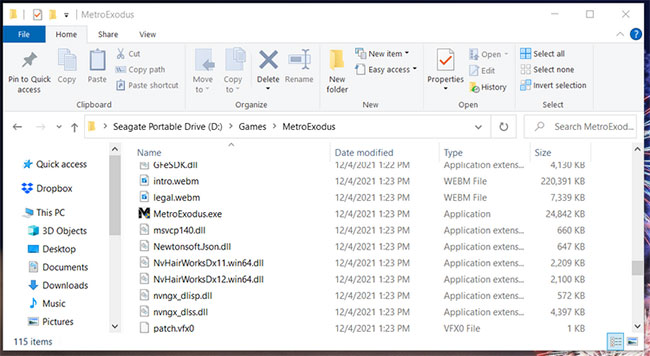
Step 1: Press the Win + E keyboard shortcut to open File Explorer.
Step 2: Open the Metro Exodus installation folder containing the game's MetroExodus.exe file.
Metro Exodus game directoryStep 3: Right-click MetroExodus.exe to select Properties.
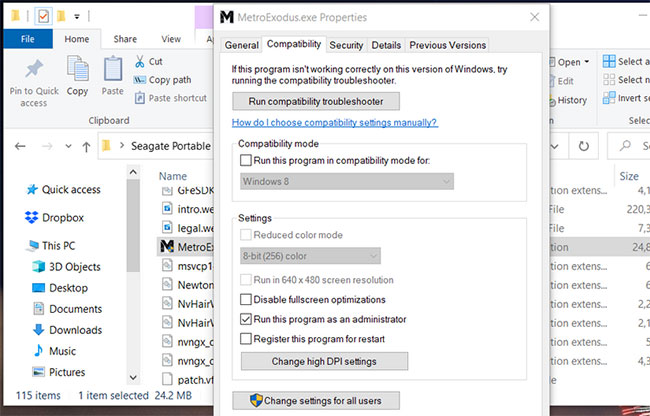
Step 4: Select Compatibility on the MetroExodus.exe Properties window.
Step 5: Then click the Disable full-screen optimizations and Run this program as administrator checkboxes to select those options.
Tab CompatibilityStep 6: Click the Apply button to save those settings.
Step 7: Click OK to exit the game properties window.
3. Assign a higher priority to Metro Exodus
Metro Exodus is a game that is heavy on system resources. It's less likely to crash when you assign a higher processing priority to that game. By doing so, you are allocating more processor power to Exodus than to services and programs running in the background. You can assign a higher priority to Exodus through the Task Manager like this:
Step 1: First, open the game Metro Exodus.
Step 2: When you are at the game title screen, press Ctrl + Alt + Delete.Step 3: Select Task Manager on the small menu.
Step 4: Right-click the taskbar on the desktop and choose Task Manager.
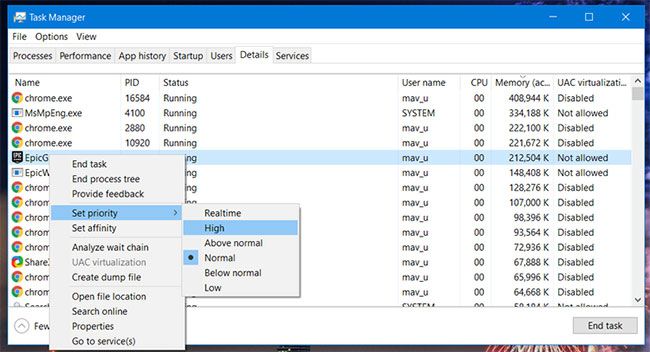
Step 5: Select the Details tab shown directly below.
Details tab in Task ManagerStep 6: Right-click the Metro Exodus process on the Details tab and select Set priority.
High priority optionStep 7: Then, on the submenu, select the High option.
Step 8: Click the Change priority button on the dialog box that appears.
Sau đó, quay lại và mở game Metro Exodus. Lưu ý rằng bạn sẽ cần chỉ định mức độ ưu tiên cao hơn cho Exodus mỗi khi khởi chạy game vì đó không phải là tùy chọn vĩnh viễn.
4. Stop overclocking the CPU
Have you ever boosted your PC's processor speed with any kind of overclocking software? If so, that might be the reason why you need to fix the crashing Metro Exodus game.
Undo any overclock you've applied by restoring the CPU (and any other overclocked hardware) to its default settings. If you're using overclocking software like MSI Afterburner, there may be a reset option to restore system defaults.
5. Update your graphics card driver
Outdated graphics card drivers are one of the most frequent causes of problems when playing games, be it Metro Exodus or any other title. If your PC's graphics card has outdated drivers, updating these drivers will definitely improve gaming performance. So install the latest driver available for your PC's GPU (graphics processor).
The Windows built-in driver updater utility is no longer enough to update device drivers because it doesn't search online. To make sure your graphics card has the latest drivers available, download its driver package from the NVIDIA or AMD websites.
You need to be clear about which graphics card to look for on the manufacturer's website. This is how you can check your PC's GPU details in Windows.
Update your graphics card driver
6. Verify game files
Metro Exodus may experience problems due to corrupted or missing game files. However, that doesn't necessarily mean you have to reinstall the game. Instead, try verifying the game's files. Exodus can be verified in Epic Games as follows:
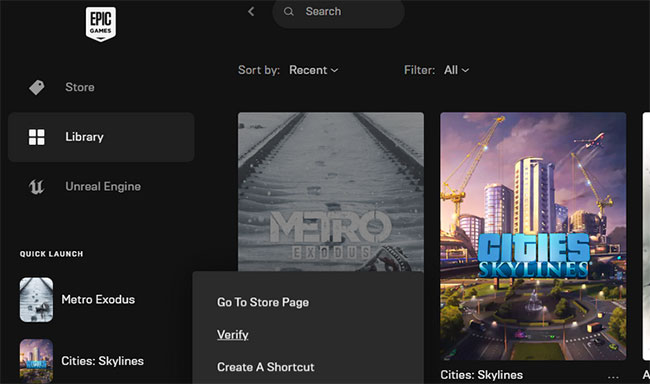
Step 1: Open Epic Games launcher.Step 2: Select Library tab.
Step 3: Click the three-dot button for Metro Exodus.
Verify game filesStep 4: Then select the Verify option.
You can also verify game files on Steam in a similar way. To do so, right-click Metro Exodus on Steam's Library tab and select Properties. Then click Verify Integrity of Game Files on the Local Files tab.
7. Uninstall the GeForce Experience
Koch Media has confirmed the GeForce Experience "In Game Overlay" feature can create Metro Exodus issues. Exodus does not mix well with programs that use overlay features.
To check if Geforce Experience is causing you problems, it is best to uninstall it and see if the problem persists.
Step 1: Press Win + R to open Run.Step 2: Type appwiz.cpl into Open box.
Step 3: Click OK to open Programs and Features.
Open Programs and FeaturesStep 4: Select GeForce Experience there and click the Uninstall option to uninstall it.
Step 5: Restart Windows 10 once you have uninstalled GeForce Experience.
If you want to keep the GeForce Experience, you can always reinstall it when you finish playing Exodus. To reinstall that software, you can download the latest version of GeForce Experience from the NVIDIA website.
One of the "worst" problems that users often encounter on Windows 10 is the black screen error.
The black screen error can occur in some situations on Windows 10, stemming from problems related to the graphics card, the connection error between the computer and your monitor, the error occurring during the installation of the operating system, updating to new versions, etc., or simply happening randomly at any time.
In the article below, the administrator will guide you with some solutions to fix the black Windows 10 screen error.
In addition, if you encounter a black screen error on Windows 7, 8, or 8.1 computers, readers can refer to the steps to fix the error here.
Steps to fix a basic black Windows 10 computer screen
1. Black screen error during installation
Once there, try turning off the computer by pressing and holding the power button for a few seconds. If using a laptop, you can unplug the charger and remove the battery.
Unplug all unnecessa...
Problems with certain programs may arise as a result of Windows 11's ability to automatically install drivers and replace newer drivers with outdated versions.
Emails, forum posts, and phone calls have all informed us that Reddit It appears that AMD drivers in Windows 11 are being replaced by accident when using Windows Update.
Because of this problem, users may see a message reading "Windows Update may have automatically replaced your AMD Graphics driver" and titled "AMD Software: Adrenalin Edition Warning." Therefore, the AMD Software you have launched is incompatible with the AMD Graphics driver you have installed.
" data-sizes="(max-width: 627px) 100vw, 627px" />
In a proof of concept Unfortunately, the Universal Windows Platform (UWP) driver for Radeon GPU hardware that was installed by Windows Update is incompatible with the version of AMD Software that was previously installed.
It's possible that the manufact...
Microsoft is preparing to launch Windows 12 in the fall of 2024, with a wider rollout in 2025, and it is internally experimenting with several new design ideas, including a new desktop experience with a ‘floating’ taskbar. Microsoft wants to create a floating effect for the taskbar by separating it from the desktop and rounding off the edges.
Microsoft has yet to confirm the existence of Windows 12, but we know it is coming soon; at least, this appears to be the company’s current plan. Microsoft sticks to this new engineering process, we might get Windows 13 in 2027 or later, but the tech giant’s plans are always subject to change as they have in the past.
At the Build 2023 developer conference, Microsoft announced several exciting updates for Windows 11, such as Windows Copilot and AI integration in the desktop operating system. During the event, Microsoft also dropped a hint that it is working on a “next-gen Windows”, which seems to imply Microsoft plans to launch a ne...


Nhận xét
Đăng nhận xét