How to fix "The File or Directory is Corrupted and Unreadable" error
Nhận đường liên kết
Facebook
X
Pinterest
Email
Ứng dụng khác
This is a common error commonly encountered on Windows computers when the operating system cannot access data on the external hard drive:
E: is not accessible. The file or directory is corrupted and unreadable.
You may get this error after trying to open something from a USB. Or, depending on how your computer is set up, the error may appear immediately after inserting the hard drive into the computer.
This "not accessible" error can happen at any time, even if you have just used the drive recently. The beginning of the error message is the unreadable location of the data, so it could be E:, H:, K:, etc.
Error message "The File or Directory is Corrupted and Unreadable"
Error message "The File or Directory is Corrupted and Unreadable"
There are several reasons why you might get this error:
The drive is safely removed without being disconnected.
Malware has infected the drive: It's no surprise that you can infect your computer with viruses or malware when you download something from unofficial sources. This can lead to damage to connected external devices and prevent you from accessing your files.
Physically damaged external hard drive: If the storage device is permanently damaged, you cannot access the stored information. Also, check the integrity of the hardware connection by looking for any damaged USB ports or cables.
Corrupt MFT or FAT: The MFT (Master File Table) contains, among other information, the file or directory type, size, and creation or modification time. So you won't be able to access your files if the MFT is damaged or has problems. FAT (File Allocation Table) is a system similar to MFT, and it is designed for hard drives. If the FAT is malfunctioning, it can also lead to the same error.
This error can occur on any Windows operating system. The steps below apply to Windows 10 and earlier.
How to fix “The File or Directory is Corrupted and Unreadable” error
The best way to fix the “The File or Directory is Corrupted and Unreadable” error is to perform these troubleshooting steps, in order:
1. Restart the computer
If you are in the habit of putting your computer to Sleep instead of shutting it down, you may encounter various problems and issues. So there's a chance that the "File or directory is corrupted and unreadable" error is just a temporary glitch that will go away after you restart your computer.
If you still get the same error after rebooting, move on to the next solution.
2. Run the chkdsk command on the hard drive
Open Command Prompt with administrative privileges and type the following command, replacing the last character with the letter of the drive displaying the error:
chkdsk /r e:
Note: Running the chkdsk command is the most likely successful fix for this error. If you skip this step, maybe the next two suggestions below will not work because the drive is still unreadable.
3. Scan your hard drive with a malware removal program
If malware is the cause of the error, removing it can restore access to the drive. Refer: Completely remove malware (malware) on Windows 10 computers for more details.
4. Change the location of the file
In case you get an error when trying to open a particular folder or file, try changing its location. So if you want to open a file or folder from the external hard drive, copy it to the internal hard drive and try to access it from there.
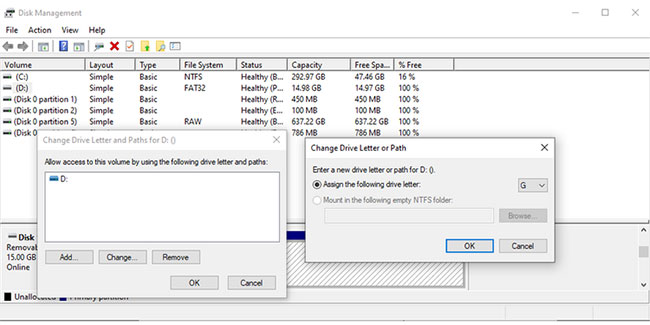
5. Set a new drive letter
Although this is an odd trick, it can help you solve the "The File or Directory is Corrupted and Unreadable" error on your Windows computer. Follow these steps to change the drive letter:
Step 1: To open the Run dialog box, press Win + R.
Step 2: Type diskmgmt.msc and click OK.
Step 3: In the Disk Management window, right-click the external hard drive and select Change Drive Letter and Paths.
Step 4: Click the Change button after selecting the drive letter.
Step 5: In the Change Drive Letter or Path window, select Assign the following drive letter and select a new character from the drop-down menu.
Step 6: Confirm action.
Change the drive letter in Windows 10
Your external hard drive now has a new character, and you can open it. If you're using a script to open files from the drive, you'll need to modify that script as well.
6. Launch the Windows Memory Diagnostic utility
There is a possibility that you may not be able to access certain files or folders due to memory-related issues. To fix it, you should use the Windows Memory Diagnostic tool. The easiest way to launch the tool is to type Windows Memory Diagnostic in the Start menu search bar and select the best match. Then select Restart now to troubleshoot the issue.
Run the Windows Memory Diagnostic tool in Windows 10Note: Before starting the scan, save all your work and close any running applications.
7. Format the drive
If the drive is unreadable, it doesn't seem possible that you can format it, but give it a try anyway.
You can try to format the drive to fix the problemNote: Formatting will erase everything from the drive! Before you complete this step, try recovering files from the drive using a file recovery program.
If the reason for the “The file or directory is corrupted and unreadable” error is because the drive is physically damaged, repairing the drive is not enough to recover data and prevent errors. In this case, you will need to replace the drive.
For recommendations, see Thewindowsfan.com's list of the best USB and external hard drives.
Reference:
What is error 0x80070570? How do I fix this error?
One of the "worst" problems that users often encounter on Windows 10 is the black screen error.
The black screen error can occur in some situations on Windows 10, stemming from problems related to the graphics card, the connection error between the computer and your monitor, the error occurring during the installation of the operating system, updating to new versions, etc., or simply happening randomly at any time.
In the article below, the administrator will guide you with some solutions to fix the black Windows 10 screen error.
In addition, if you encounter a black screen error on Windows 7, 8, or 8.1 computers, readers can refer to the steps to fix the error here.
Steps to fix a basic black Windows 10 computer screen
1. Black screen error during installation
Once there, try turning off the computer by pressing and holding the power button for a few seconds. If using a laptop, you can unplug the charger and remove the battery.
Unplug all unnecessa...
Problems with certain programs may arise as a result of Windows 11's ability to automatically install drivers and replace newer drivers with outdated versions.
Emails, forum posts, and phone calls have all informed us that Reddit It appears that AMD drivers in Windows 11 are being replaced by accident when using Windows Update.
Because of this problem, users may see a message reading "Windows Update may have automatically replaced your AMD Graphics driver" and titled "AMD Software: Adrenalin Edition Warning." Therefore, the AMD Software you have launched is incompatible with the AMD Graphics driver you have installed.
" data-sizes="(max-width: 627px) 100vw, 627px" />
In a proof of concept Unfortunately, the Universal Windows Platform (UWP) driver for Radeon GPU hardware that was installed by Windows Update is incompatible with the version of AMD Software that was previously installed.
It's possible that the manufact...
Microsoft is preparing to launch Windows 12 in the fall of 2024, with a wider rollout in 2025, and it is internally experimenting with several new design ideas, including a new desktop experience with a ‘floating’ taskbar. Microsoft wants to create a floating effect for the taskbar by separating it from the desktop and rounding off the edges.
Microsoft has yet to confirm the existence of Windows 12, but we know it is coming soon; at least, this appears to be the company’s current plan. Microsoft sticks to this new engineering process, we might get Windows 13 in 2027 or later, but the tech giant’s plans are always subject to change as they have in the past.
At the Build 2023 developer conference, Microsoft announced several exciting updates for Windows 11, such as Windows Copilot and AI integration in the desktop operating system. During the event, Microsoft also dropped a hint that it is working on a “next-gen Windows”, which seems to imply Microsoft plans to launch a ne...


Nhận xét
Đăng nhận xét