The BOOTMGR error is missing, which is one of the common errors that users often encounter during Windows startup. So, how do we correct this error? Please see the article below from Thewindowsfan.com.
What is BOOTMGR?
BOOTMGR, also known as Windows Boot Manager, is used to control the boot process of Windows. BOOTMGR helps launch winload.exe when you start your computer to load the Windows operating system.
The error BOOTMGR is missing only occurs on Windows Vista, Windows 7, Windows 8, 8.1, and Windows 10. On Windows XP, this error does not occur.
When the error BOOTMGR is missing, some messages appear, such as:
"BOOTMGR is missing – Press any key to restart."
"BOOTMGR is missing – Press Ctrl + Alt + Del to restart."
"Couldn't find BOOTMGR."
The cause of the BOOTMGR
There are many causes of BOOT MGR errors, such as corrupted boot files, wrong files, hard drive errors, operating system upgrade errors, outdated BIOS errors, faulty hard drive sectors, and broken cables.
Also, if the BCD (Boot Configuration Data) fails, Windows cannot boot either. At this time, the screen also displays the error message BOOTMGR is missing.
Fix the error BOOTMGR is missing on Windows
Solution 1: Restart your computer
When Windows displays the message BOOTMGR is missing, please try to restart your PC by pressing Ctrl+Alt+Del. Preferably, start with the suggested error message solution.
However, sometimes rebooting can't solve the BOOTMGR problem either. Therefore, try the following other solution if restarting doesn't work:
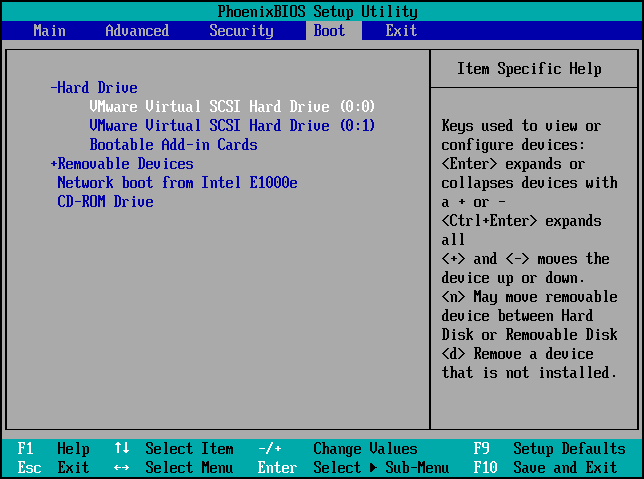
Solution 2: Alter the boot order in the BIOS
The BOOTMGR error can be caused by the boot sequence in the BIOS. In this case, you should change the boot order.
Step 1: Restart your computer.
Step 2: Then press a key to go to the main BIOS interface.
Note: This key varies depending on the type of computer and the Windows operating system you use. It can be F2, F8, F10, F12, Esc, or Del, etc.
Step 3: Then, under the Boot tab, modify the boot order, setting the hard drive as the first boot device.
Set the hard drive as the first boot device
After restarting the PC, if the error Boot Manager is missing still occurs, try to find the next way.
Solution 3: Use Windows Startup Repair
Step 1: Restart your computer and press the F8 key or the F12 key to activate Boot Settings.
Step 2: On the next screen, you choose whether to start the computer from the drive or a USB drive.
Step 3: After the boot process finishes, the Install Windows interface will be displayed on the screen. Choose Language, Time and Currency, and Keyboard, then click Next.
Step 4: TOn the next interface, select Repair your computer, then select your operating system version and click Next.
Windows 7: On the System Recovery Options window, select Startup Repair to automatically scan and fix Windows errors.
Windows 8, 8.1, and 10: After clicking Repair your computer, select Troubleshoot and then select Advanced options.
Next, select Automatic Repair (Windows 8 and 8.1) or Startup Repair (Windows 10) to start fixing your Windows computer.
Step 5: Once the process is complete, you will be asked to restart your Windows computer. Your task is to restart the computer, and you're done.
Solution 4: On Windows 7, 8, 8.1, and 10, write a new boot sector partition.
If the "Boot Sector" partition is wrong or corrupted, your Windows computer will not boot properly and will display the error BOOTMGR is missing during the boot process. In this case, you can fix the error by writing a new Boot Sector partition.
Step 1: In the Boot Settings, select Command Prompt.
On Windows 7: access System Recovery Options (follow steps 1 to 4, method 1), and then select Command prompt.
On Windows 8, 8.1, and 10: From the Repair your computer window (follow steps 1 to 4, method 1), select Troubleshoot > Advanced options > Command Prompt.
Step 2: Enterbootrec /fixboot into the Command Prompt window and press Enter.
Now on the screen you will see the message The operation was completed successfully.
Step 3: Next, restart your computer by pressing Ctrl+Alt+Del.
Solution 5: Restore your Windows computer to fix the BOOTMGR Error
Corrupt Windows system files can cause many different errors, one of which is the error BOOTMGR is missing. In most cases, when the Windows operating system fails, it will display a blue screen of death.
To fix this error, you can restore your computer from an Image backup.
Note: Without Image backup, you cannot use this method.
Solution 6: Reselect the active partition
The computer will fail to boot and display the error message BOOTMGR if you choose the wrong active partition.
In this case, to solve the problem, you need to repartition the working system.
Please use MiniTool Partition Wizard Professional Edition to restart your computer and then perform the following steps:
Step 1: Select the wrong active partition. You can see there are many partition functions in the left pane; select Set Inactive.
Step 2: Select the correct partition, and then click Set Active from the Partition Management menu.
Reselect the active partition to fix the BOOTMGR errorStep 3: Finally, return to the main interface of MiniTool Partition Wizard and click Apply to make these changes.
Click Apply to make the partition changes
Solution 7: Update BIOS
If the BIOS on your motherboard is out of date, this could also be the cause of the BOOTMGR error. In these cases, you can upgrade to the latest BIOS version to fix the error.
Refer to the article: BIOS upgrade guide.
Solution 8: Change the hard drive
If you're still getting the BOOTMGR error message after trying all the above solutions, it's a good idea to have your hard drive re-examined as there's most likely a problem. The only solution to this situation is to replace the dead, damaged hard drive with a new one and reinstall it.
By now, you probably know more about BOOTMGR and how to solve problems with it. Please share with Thewindowsfan.com by commenting below the article if you have an easier way to fix it.
Good luck!
Check out some more articles below:
Instructions for 3 ways to install Windows 7 on Netbook
What is the difference between Private Network and Public Network on Windows?
How do I share printers between Windows 7 computers that are not in the same Homegroup?
One of the "worst" problems that users often encounter on Windows 10 is the black screen error.
The black screen error can occur in some situations on Windows 10, stemming from problems related to the graphics card, the connection error between the computer and your monitor, the error occurring during the installation of the operating system, updating to new versions, etc., or simply happening randomly at any time.
In the article below, the administrator will guide you with some solutions to fix the black Windows 10 screen error.
In addition, if you encounter a black screen error on Windows 7, 8, or 8.1 computers, readers can refer to the steps to fix the error here.
Steps to fix a basic black Windows 10 computer screen
1. Black screen error during installation
Once there, try turning off the computer by pressing and holding the power button for a few seconds. If using a laptop, you can unplug the charger and remove the battery.
Unplug all unnecessa...
Problems with certain programs may arise as a result of Windows 11's ability to automatically install drivers and replace newer drivers with outdated versions.
Emails, forum posts, and phone calls have all informed us that Reddit It appears that AMD drivers in Windows 11 are being replaced by accident when using Windows Update.
Because of this problem, users may see a message reading "Windows Update may have automatically replaced your AMD Graphics driver" and titled "AMD Software: Adrenalin Edition Warning." Therefore, the AMD Software you have launched is incompatible with the AMD Graphics driver you have installed.
" data-sizes="(max-width: 627px) 100vw, 627px" />
In a proof of concept Unfortunately, the Universal Windows Platform (UWP) driver for Radeon GPU hardware that was installed by Windows Update is incompatible with the version of AMD Software that was previously installed.
It's possible that the manufact...
Microsoft is preparing to launch Windows 12 in the fall of 2024, with a wider rollout in 2025, and it is internally experimenting with several new design ideas, including a new desktop experience with a ‘floating’ taskbar. Microsoft wants to create a floating effect for the taskbar by separating it from the desktop and rounding off the edges.
Microsoft has yet to confirm the existence of Windows 12, but we know it is coming soon; at least, this appears to be the company’s current plan. Microsoft sticks to this new engineering process, we might get Windows 13 in 2027 or later, but the tech giant’s plans are always subject to change as they have in the past.
At the Build 2023 developer conference, Microsoft announced several exciting updates for Windows 11, such as Windows Copilot and AI integration in the desktop operating system. During the event, Microsoft also dropped a hint that it is working on a “next-gen Windows”, which seems to imply Microsoft plans to launch a ne...

 There are many causes of BOOT MGR errors, such as corrupted boot files, wrong files, hard drive errors, operating system upgrade errors, outdated BIOS errors, faulty hard drive sectors, and broken cables.
Also, if the BCD (Boot Configuration Data) fails, Windows cannot boot either. At this time, the screen also displays the error message BOOTMGR is missing.
There are many causes of BOOT MGR errors, such as corrupted boot files, wrong files, hard drive errors, operating system upgrade errors, outdated BIOS errors, faulty hard drive sectors, and broken cables.
Also, if the BCD (Boot Configuration Data) fails, Windows cannot boot either. At this time, the screen also displays the error message BOOTMGR is missing.
 Step 4: TOn the next interface, select Repair your computer, then select your operating system version and click Next.
 Windows 7: On the System Recovery Options window, select Startup Repair to automatically scan and fix Windows errors.
 Windows 8, 8.1, and 10: After clicking Repair your computer, select Troubleshoot and then select Advanced options.
 Next, select Automatic Repair (Windows 8 and 8.1) or Startup Repair (Windows 10) to start fixing your Windows computer.
Step 5: Once the process is complete, you will be asked to restart your Windows computer. Your task is to restart the computer, and you're done.
Next, select Automatic Repair (Windows 8 and 8.1) or Startup Repair (Windows 10) to start fixing your Windows computer.
Step 5: Once the process is complete, you will be asked to restart your Windows computer. Your task is to restart the computer, and you're done.
 Step 3: Next, restart your computer by pressing


Nhận xét
Đăng nhận xét