How to convert files and folders to ISO on Windows
Nhận đường liên kết
Facebook
X
Pinterest
Email
Ứng dụng khác
You can convert files and folders to ISO images using third-party ISO management utilities. These are useful when you want to create backups of files and folders in ISO format. You can also use it to add new files to an existing ISO image and recreate the package.
By default, Windows does not provide the option to convert files and folders to ISO images. But there are third-party Windows programs that can help you with this task. In today's article, Thewindowsfan.com will show you the best applications to create ISO files from files and folders.
1. AnyToISO
AnyToISO
If you are looking for a free utility to create ISO images, which are more compact than a regular CD, the AnyToISO Lite version is a great utility. The program is very easy to use and does not have many options.
AnyToISO also supports the Windows Explorer shell extension. When enabled, it will add the option to create an ISO in the context menu of Windows Explorer.
To convert a folder to an ISO image using AnyToISO:
Step 1: Launch AnyToISO and open the Folder to ISO tab.
Step 2: Next, click Browse for Folder and select the folder you want to convert to an ISO image.
Step 3: Next, click Choose ISO and choose the location to save the ISO file.
Step 4: You can change the volume label name or leave the default option.
Step 5: Click Options to customize File System and ISO Settings.
Step 6: Next, click the Make ISO button to start the process. Depending on the size of the folder, the ISO burning process may take some time.
Step 7: Once done, you will have a new ISO file created from the selected folder.
You can also right-click on any folder in File Explorer and select the Create ISO option to launch the application and convert the folder to an ISO image. However, you need to access the classic context menu first to see the AnyToISO option if you are using Windows 11.
If you want to create ISO images with large folders (over 870 MB), you need to upgrade to the Pro version for $22.95.
2. AnyBurn
http://www.anyburn.com/download.php
AnyBurn is an official CD burning utility that is free to use for both personal and commercial purposes. In addition to creating images from files and folders, you can use it to create bootable USB drives, perform surface tests, edit image files, and burn image files to disk.
Follow these steps to create image files from files and folders using AnyBurn:
Step 1: Launch AnyBurn and click Create image file from files/folders.
Step 2: In the new dialog, click the Add + button on the toolbar.
Click the Add + buttonStep 3: Navigate to the location, select the file or folder to convert, and click Add.
Step 4: Next, click the Properties button. Here you can change the label name, file system, choose the compression level, add comments, and modify the date and time. Click OK to save the changes.
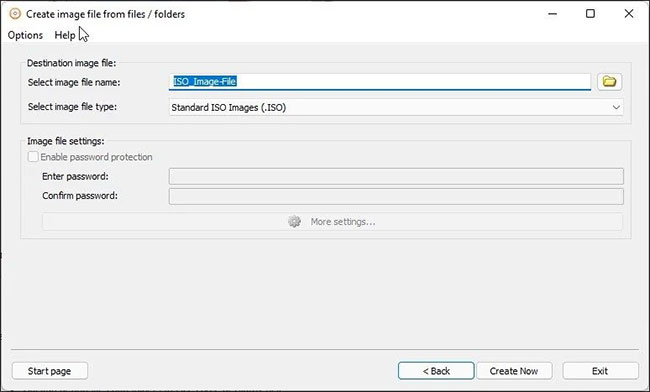
Step 5: Click Next.Step 6: Enter a name for the new ISO image and select the image file type.
Step 7: Click Create Now to begin the process.
Click Create Now
AnyBurn will optimize the file layout and then quickly burn the image. A green progress bar indicates that the process has been completed successfully.
3. WinCDEmuI
WinCDEmu
WinCDEmu is a simple yet effective utility for Windows. You can mount optical disc images or create ISO images from folders.
WinCDEmu is also available in a special portable version. However, with the portable version, you don't have to right-click to create the ISO image option.
To convert a folder to an ISO image using WinCDEmu:
Step 1: Download the app and complete the installation.
Step 2: Once installed, open File Explorer and navigate to the folder you want to convert to an image.
Step 3: Right-click on the folder and select Build an ISO Image. On Windows 11, you need to click Show more options to see the classic context menu.
Step 4: Enter a name for the ISO image and click Save.
WinCDEmu will start the image burning process. Depending on the folder size, this can take anywhere from a few seconds to a few minutes.
4. ImgBurn
ImgBurn is another popular Windows utility for creating ISO images from files and folders. This is a feature-rich burning utility with options to burn image files to disc, create image files from discs, and verify discs.
Unlike WinCDEmu and AnyBurn, ImgBurn supports creating ISO images from both files and folders. Here's how you can use it to create ISO images from files:
Step 1: Download and install the app on your PC.
Step 2: Next, launch ImgBurn. If you can't find the icon on the desktop or it doesn't appear in Windows search, navigate to the following location to launch the tool:
C:Program Files (x86)ImgBurn
Step 3: On the main screen, click Create image file from files/folders.
Click Create image file from files/foldersStep 4: Next, you can browse files and folders or drag and drop content onto ImgBurn to add files.
Step 5: Next, click the Calculator icon on the right side to calculate the file size and view other information.
Step 6: Next, open the Options tab to customize the image options and add hidden system files and other properties.
Open Options tabStep 7: Next, open the Labels tab and provide a volume label for the file. If you skip this step, ImgBurn will automatically add the label during image burning.
Step 8: Click the Folder to Disc icon, enter the ISO image name, and select the destination folder.
Step 9: Click Save to begin the process. Follow any on-screen instructions, if necessary, to complete the process.
5. ISO Workshop
ISO Workshop is a premium ISO image management application. It has a modern interface and offers many disk management options. You can use it to create ISO, burn ISO, convert ISO, and extract files from images.
Here's how to use ISO Workshop to create ISO images from files and folders.
Step 1: Download and complete the installation. Once installed, launch ISO Workshop.
Step 2: In the main interface, click Make ISO.
Click Make ISOStep 3: Next, enter a name for the new ISO image and click OK.
Step 4: Click the + icon, then select files and folders to add. You can also drag and drop all the files and folders into the app to add them.
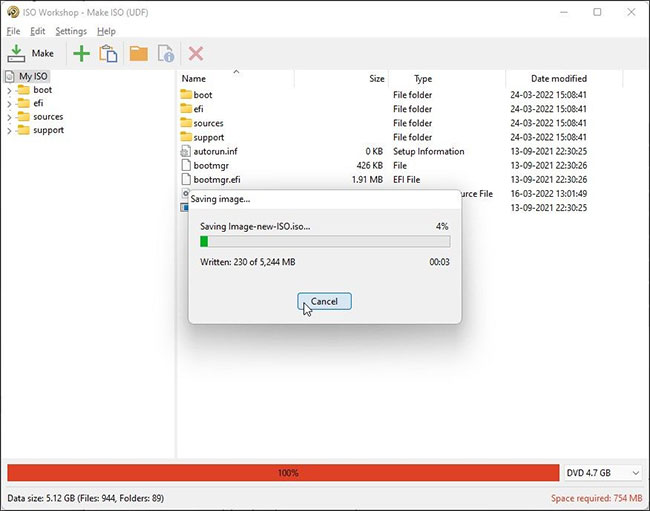
Step 5: Click Make, enter a name for the file, and click Save.
Click MakeStep 6: ISO Workshop will start burning the image files. Once done, you can burn the ISO image to a disc or mount it on your PC.
ISO Workshop is a premium utility and comes with a 10-day free trial. After the trial period ends, you need to purchase one of the licenses to continue using it.
If you regularly convert files and folders to ISO images, a tool like AnyToISO and WinCDemu will be more beneficial due to shell application support for File Explorer context menus. If you need advanced ISO image options, choose AnyBurn or ImgBurn. However, if used infrequently, any of these utilities can help you convert your files and folders to ISO images in no time.
One of the "worst" problems that users often encounter on Windows 10 is the black screen error.
The black screen error can occur in some situations on Windows 10, stemming from problems related to the graphics card, the connection error between the computer and your monitor, the error occurring during the installation of the operating system, updating to new versions, etc., or simply happening randomly at any time.
In the article below, the administrator will guide you with some solutions to fix the black Windows 10 screen error.
In addition, if you encounter a black screen error on Windows 7, 8, or 8.1 computers, readers can refer to the steps to fix the error here.
Steps to fix a basic black Windows 10 computer screen
1. Black screen error during installation
Once there, try turning off the computer by pressing and holding the power button for a few seconds. If using a laptop, you can unplug the charger and remove the battery.
Unplug all unnecessa...
Problems with certain programs may arise as a result of Windows 11's ability to automatically install drivers and replace newer drivers with outdated versions.
Emails, forum posts, and phone calls have all informed us that Reddit It appears that AMD drivers in Windows 11 are being replaced by accident when using Windows Update.
Because of this problem, users may see a message reading "Windows Update may have automatically replaced your AMD Graphics driver" and titled "AMD Software: Adrenalin Edition Warning." Therefore, the AMD Software you have launched is incompatible with the AMD Graphics driver you have installed.
" data-sizes="(max-width: 627px) 100vw, 627px" />
In a proof of concept Unfortunately, the Universal Windows Platform (UWP) driver for Radeon GPU hardware that was installed by Windows Update is incompatible with the version of AMD Software that was previously installed.
It's possible that the manufact...
Microsoft is preparing to launch Windows 12 in the fall of 2024, with a wider rollout in 2025, and it is internally experimenting with several new design ideas, including a new desktop experience with a ‘floating’ taskbar. Microsoft wants to create a floating effect for the taskbar by separating it from the desktop and rounding off the edges.
Microsoft has yet to confirm the existence of Windows 12, but we know it is coming soon; at least, this appears to be the company’s current plan. Microsoft sticks to this new engineering process, we might get Windows 13 in 2027 or later, but the tech giant’s plans are always subject to change as they have in the past.
At the Build 2023 developer conference, Microsoft announced several exciting updates for Windows 11, such as Windows Copilot and AI integration in the desktop operating system. During the event, Microsoft also dropped a hint that it is working on a “next-gen Windows”, which seems to imply Microsoft plans to launch a ne...


Nhận xét
Đăng nhận xét