BSOD errors are never welcome in Windows. One particularly well-known blue screen of death issue is the dxgmms2.sys error, which often occurs while gaming. When accompanied by a message like SYSTEM_THREAD_EXCEPTION_NOT_HANDLED or DRIVER_IRQL_NOT_LESS_OR_EQUAL, the error is mostly due to a graphics driver or hardware malfunction.
However, this problem can also be caused by other underlying issues. Thankfully, you can fix the error at home using the fixes listed below.
1. Change the graphics driver
The first action you should take when dealing with the dxgmms2.sys blue screen error is to make changes to the graphics driver. If you don't remember when your display drivers were last updated, update them. The error can also appear after installing a new driver update recently. In that case, you should try rolling them back to a previous update.
There are two main ways to change your graphics driver. If you use a dedicated graphics card, we recommend using companion software such as NVIDIA GeForce Experience or AMD Radeon Software. You can also manage all your drivers using Device Manager in Windows.
2. Disable Hardware Acceleration
Another common reason for the dxgmms2.sys error is the Hardware Acceleration feature in Windows 10 and 11. Hardware Acceleration feature helps to improve computer performance, but you can disable this feature to see the dxgmms2.sys error still appear.
You will have to edit the Registry settings to disable Hardware Acceleration, so make sure you create a system restore point before continuing.
Registry Editor in Windows 11Step 1: To open the Run application, press Win + R.
Step 2: Type regedit in the text box and press Enter. You will need administrator rights to make changes to the Windows Registry.
Step 3: In the Registry, navigate to HKEY_CURRENT_USER > Software > Microsoft > Avalon.Graphics using the navigation pane on the left.
Step 4: Here, right-click an empty space in the right pane and go to New > DWORD (32-bit) Value.
Step 5: Name the entry DisableHWAcceleration.
Step 6: Now double-click the newly created entry, and in Value data, enter 1.
Step 7: Click OK.Step 8: Restart the computer after exiting Registry Editor.
If you are still getting the blue screen error after trying this method, make sure to re-enable Hardware Acceleration by changing the value data in the DisableHWAcceleration entry to 0.
3. Run the DirectX Diagnostic Tool
The dxgmms2.sys error is directly related to DirectX on Windows. In fact, the filename itself is a shortened form of DirectX Graphics MMS.
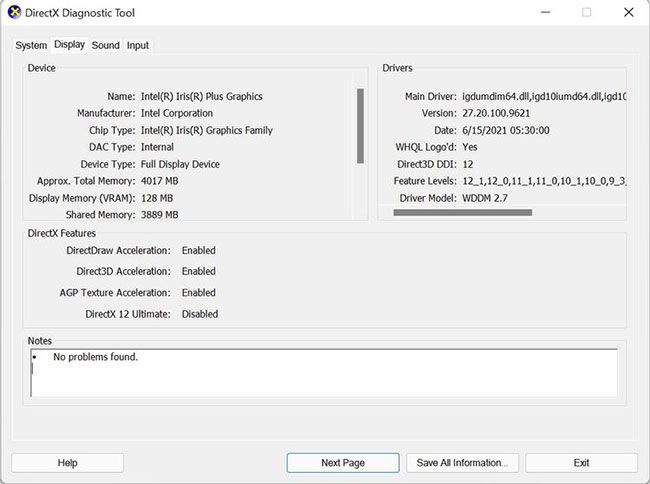
Therefore, one of the best ways to effectively diagnose the problem is to open the built-in DirectX Diagnostic Tool in Windows:
DirectX Diagnostic Tool window in Windows 11Step 1: Using the Windows + R keyboard shortcut, launch the Run command.
Step 2: Type dxdiag into the dialog box and press Enter. This will open the DirectX Diagnostic utility.
Step 3: Wait for the DirectX Diagnostic Tool to complete the troubleshooting.
Step 4: Now, click on the Display tab in the window.
Step 5: Check the Notes section for any errors or conflicts.
Step 6: If you see an error in this section, download the DirectX Web Installer to reinstall the necessary components.
This should resolve the dxgmms2.sys error for many users. If not, move on to the next step.
4. Run the Windows Memory Diagnostic utility
In rare cases, malfunctioning or faulty memory can also lead to the dxgmms2.sys blue screen error. In this case, Windows also has a built-in utility that can effectively diagnose and fix the problem. This tool is called Windows Memory Diagnostic.
Windows Memory Diagnostic Tool in Windows 11Step 1: In the Start menu search bar, search for Windows Memory Diagnostic.
Step 2: A reminder will be displayed.
Step 3: Click the Restart now and check for problems option to restart your computer immediately.
Step 4: You can also select the option Check for problems the next time I start my computer, if you have unsaved work open on your computer.
Step 5: Windows will scan for memory problems when the computer starts.
5. Update BIOS
Outdated BIOS can lead to many errors on PCs, one of which is the dxgmms2.sys BSOD. You should always update the BIOS to the latest version.
Although the methods for updating the PC's BIOS may vary from manufacturer to manufacturer, the general procedure should be the same as in the article: BIOS Upgrade Guide.
The methods listed above should resolve the dxgmms2.sys error for most users. However, problems with the hardware can also cause errors, in which case you will have to replace your GPU or RAM. There are many other signs that can tell you if it's time to upgrade your GPU.
One of the "worst" problems that users often encounter on Windows 10 is the black screen error.
The black screen error can occur in some situations on Windows 10, stemming from problems related to the graphics card, the connection error between the computer and your monitor, the error occurring during the installation of the operating system, updating to new versions, etc., or simply happening randomly at any time.
In the article below, the administrator will guide you with some solutions to fix the black Windows 10 screen error.
In addition, if you encounter a black screen error on Windows 7, 8, or 8.1 computers, readers can refer to the steps to fix the error here.
Steps to fix a basic black Windows 10 computer screen
1. Black screen error during installation
Once there, try turning off the computer by pressing and holding the power button for a few seconds. If using a laptop, you can unplug the charger and remove the battery.
Unplug all unnecessa...
Problems with certain programs may arise as a result of Windows 11's ability to automatically install drivers and replace newer drivers with outdated versions.
Emails, forum posts, and phone calls have all informed us that Reddit It appears that AMD drivers in Windows 11 are being replaced by accident when using Windows Update.
Because of this problem, users may see a message reading "Windows Update may have automatically replaced your AMD Graphics driver" and titled "AMD Software: Adrenalin Edition Warning." Therefore, the AMD Software you have launched is incompatible with the AMD Graphics driver you have installed.
" data-sizes="(max-width: 627px) 100vw, 627px" />
In a proof of concept Unfortunately, the Universal Windows Platform (UWP) driver for Radeon GPU hardware that was installed by Windows Update is incompatible with the version of AMD Software that was previously installed.
It's possible that the manufact...
Microsoft is preparing to launch Windows 12 in the fall of 2024, with a wider rollout in 2025, and it is internally experimenting with several new design ideas, including a new desktop experience with a ‘floating’ taskbar. Microsoft wants to create a floating effect for the taskbar by separating it from the desktop and rounding off the edges.
Microsoft has yet to confirm the existence of Windows 12, but we know it is coming soon; at least, this appears to be the company’s current plan. Microsoft sticks to this new engineering process, we might get Windows 13 in 2027 or later, but the tech giant’s plans are always subject to change as they have in the past.
At the Build 2023 developer conference, Microsoft announced several exciting updates for Windows 11, such as Windows Copilot and AI integration in the desktop operating system. During the event, Microsoft also dropped a hint that it is working on a “next-gen Windows”, which seems to imply Microsoft plans to launch a ne...


Nhận xét
Đăng nhận xét