Use the SFC scannow command to repair system files in Windows 10
Nhận đường liên kết
Facebook
X
Pinterest
Email
Ứng dụng khác
If you find that your computer frequently crashes or crashes during startup, etc., then the most likely cause is that Windows system files are corrupted, lost, or even changed when you install a program or certain software on your computer.
While Windows 10 protects the system files needed for your computer to function properly, application files, drivers, and even Windows Update are pretty good. However, in some cases, errors can still occur.
It is also integrated with System File Checker (SFC) in Windows 10, as it was in previous versions of Windows.This utility will scan, verify, and repair any corrupted files on your system.
1. How to use SFC/scannow on Windows 10
1. Press the Windows + X key combination to open the Power User Menu and then select Command Prompt (Admin). The reason is that you have to run the SFC command under Admin rights.
2. In the Command Prompt window, enter the following command and press Enter:
sfc /scannow
3. After the scan is complete, you will see one of the following messages on the screen:
• Windows Resource Protection did not find any integrity violations: There are no lost or corrupted files on your system.
• Windows Resource Protection could not perform the requested operation: If this message appears, it means that there is a problem during the scanning process and requires offline scanning.
• Windows Resource Protection found corrupt files and successfully repaired them. Details are included in the CBS.Log %WinDir%LogsCBSCBS.log: You'll receive this message if SFC is able to fix the problem you're having. You can now scroll through or view detailed information.
• Windows Resource Protection found corrupt files but was unable to fix some of them: Trong trường hợp này bạn phải khắc phục các file bị lỗi bằng tay.
2. Run SFC/Scannow on other drives
SFC/Scannow can also be used to check and repair non-system files on other drives, such as D: or an external hard drive, USB, SD card, or other storage media. To run a scan on such drives, you need to slightly modify the command as shown below. The rest of the process is the same as above.
To view the details of a System File Checker stored in the CBS.Log file, you must copy a readable copy to the Desktop:
1. Press Windows + X to open Menu Power User and select Command Prompt.
2. On Command Prompt window, type below command and press Enter:
3.Open sfclogs.txt on the Desktop with Notepad. This file will contain all the details of the scanned system files and information about the files that cannot be repaired.
Note: SFC scan details are only available when scanning in Windows; they are not available when scanning offline in a command prompt.
If you must know what the SFC file cannot repair, use the Find function in the text application with the phrase "can not repair". You can also use "repair" and "repaired" to see any files that have been repaired.
Use "repair" and "repaired" to see any files that have been repaired
Use "corrupt" to detect damage (corruption) in different applications. If the file cannot be repaired easily, then you need to replace and remove it. This was displayed in the final status message: "Windows Resource Protection found corrupt files but was unable to fix some of them".
Use "corrupt" to detect damage (corruption) in different applications
4. Run SFC scan in Safe Mode
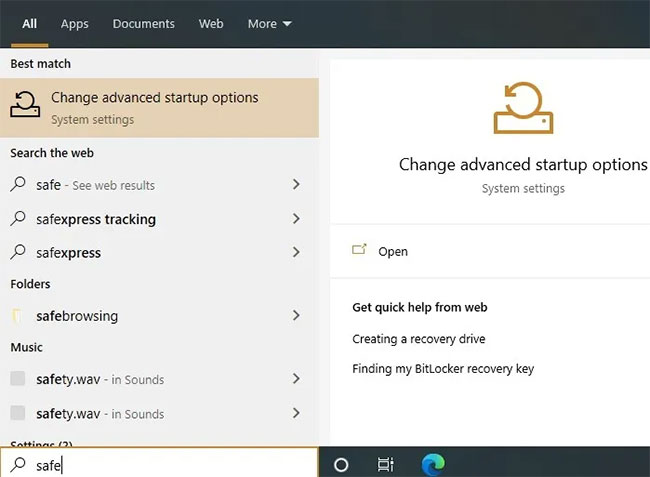
If you see the second status message during the system scan: “Windows Resource Protection could not perform the request’ted operation” then the SFC scan must be performed in Safe Mode. To access it, select “Change advanced startup options” from the Start menu.
Select “Change advanced startup options” from the Start menu
Select “Restart now” to start Windows 10 in Safe Mode.
A blue screen will appear. Using your keyboard's arrow keys, select Troubleshoot > Advanced options, which will lead to the next screen below.
Select “Command Prompt” from the available options.
Sign in with your Windows user ID and password. It is better to use the Enter key to quickly navigate these screens.
Now, the Command Prompt screen displays against a blue background in Safe Mode. You can scan your system much faster here, and status verification and alerts don't take long.
The Command Prompt screen displays against a blue background in Safe Mode
5. Offline system file scanning and repair on Windows 10
1. Press the Windows + I key combination to open the Settings application.
2. On the Settings interface, click Update & security.
3. Next, click on Recovery.
4. Under Advanced startup, click Restart now.
5. Click Troubleshoot.
6. Click Advanced options.
7. Click Command Prompt to boot your computer by using Command Prompt.
8. During the reboot, you will receive a prompt to enter your username and password to continue.
9. Whenever you need to run SFC outside of Windows, you must tell the utility exactly where the Windows installation files are.
In the Command Prompt window, enter the command below to let the utility understand the location of the Windows and System Reserved partitions:
wmic logicaldisk get deviceid, volumename, description
10. Enter the following command in the Command Prompt window and press Enter:
sfc /scannow /offbootdir=C: /offwindir=D:Windows
Note:
In the treen command, use /offboodir to convert the specific drive name of the System Reserved partition, in this case C, and /offwindir to convert the specific location of Windows files, in this case D:Windows.
11. After the scan is finished, close the Command Prompt window.
12. Click Continue to exit and return to Windows 10.
6. Fix system files on Windows 10 manually
If the System File Checker cannot fix one or more errors, you will have to manually fix these files.
Open the file sfclogs.txt to see which files are corrupted. Search for the location of the files and follow the steps below:
1. Press the Windows + X key combination to open the Power User Menu. Next, select Command Prompt (Admin).
2. In the Command Prompt window, enter the following command and press Enter:
takeown /f C:Path-and-File-Name
Note:
Replace C:Path-and-File-Name with the corrupted path and filename. For example, C:WindowsSystem32appraiser.dll.
3. Allow access to corrupted files under Admin by entering the following command into the Command Prompt and then pressing Enter:
Note:
In the above statement, replace C:Path-SOURCE-and-File-Name with the good path and filename, and replace C:Path-DESTINATION-and-File-Name with the destination path and name of the corrupted files.
Such as:
5. Type Yes and press Enter to override to verify.
After replacing the files, you can enter the SFC/verifyonly command into the Command Prompt window and then press Enter to check the integrity of all files and identify which files are corrupted to fix.
Also, if you only want to fix certain files, you can check the integrity of each file by using the command:
sfc /VERIFYFILE=C:Path-and-File-Name
For example:
sfc /VERIFYFILE=C:WindowsSystem32kernel32.dll
Check out some more articles below:
Your Windows 10 computer is slow to connect to the Internet, here's how to fix it
Enable Credential Guard to enhance Windows 10 security
Clear the cache in Windows 10 to free up memory space
One of the "worst" problems that users often encounter on Windows 10 is the black screen error.
The black screen error can occur in some situations on Windows 10, stemming from problems related to the graphics card, the connection error between the computer and your monitor, the error occurring during the installation of the operating system, updating to new versions, etc., or simply happening randomly at any time.
In the article below, the administrator will guide you with some solutions to fix the black Windows 10 screen error.
In addition, if you encounter a black screen error on Windows 7, 8, or 8.1 computers, readers can refer to the steps to fix the error here.
Steps to fix a basic black Windows 10 computer screen
1. Black screen error during installation
Once there, try turning off the computer by pressing and holding the power button for a few seconds. If using a laptop, you can unplug the charger and remove the battery.
Unplug all unnecessa...
Problems with certain programs may arise as a result of Windows 11's ability to automatically install drivers and replace newer drivers with outdated versions.
Emails, forum posts, and phone calls have all informed us that Reddit It appears that AMD drivers in Windows 11 are being replaced by accident when using Windows Update.
Because of this problem, users may see a message reading "Windows Update may have automatically replaced your AMD Graphics driver" and titled "AMD Software: Adrenalin Edition Warning." Therefore, the AMD Software you have launched is incompatible with the AMD Graphics driver you have installed.
" data-sizes="(max-width: 627px) 100vw, 627px" />
In a proof of concept Unfortunately, the Universal Windows Platform (UWP) driver for Radeon GPU hardware that was installed by Windows Update is incompatible with the version of AMD Software that was previously installed.
It's possible that the manufact...
Microsoft is preparing to launch Windows 12 in the fall of 2024, with a wider rollout in 2025, and it is internally experimenting with several new design ideas, including a new desktop experience with a ‘floating’ taskbar. Microsoft wants to create a floating effect for the taskbar by separating it from the desktop and rounding off the edges.
Microsoft has yet to confirm the existence of Windows 12, but we know it is coming soon; at least, this appears to be the company’s current plan. Microsoft sticks to this new engineering process, we might get Windows 13 in 2027 or later, but the tech giant’s plans are always subject to change as they have in the past.
At the Build 2023 developer conference, Microsoft announced several exciting updates for Windows 11, such as Windows Copilot and AI integration in the desktop operating system. During the event, Microsoft also dropped a hint that it is working on a “next-gen Windows”, which seems to imply Microsoft plans to launch a ne...

")
 3. After the scan is complete, you will see one of the following messages on the screen:
• Windows Resource Protection did not find any integrity violations: There are no lost or corrupted files on your system.
• Windows Resource Protection could not perform the requested operation: If this message appears, it means that there is a problem during the scanning process and requires offline scanning.
• Windows Resource Protection found corrupt files and successfully repaired them. Details are included in the CBS.Log %WinDir%LogsCBSCBS.log: You'll receive this message if SFC is able to fix the problem you're having. You can now scroll through or view detailed information.
• Windows Resource Protection found corrupt files but was unable to fix some of them: Trong trường hợp này bạn phải khắc phục các file bị lỗi bằng tay.
3. After the scan is complete, you will see one of the following messages on the screen:
• Windows Resource Protection did not find any integrity violations: There are no lost or corrupted files on your system.
• Windows Resource Protection could not perform the requested operation: If this message appears, it means that there is a problem during the scanning process and requires offline scanning.
• Windows Resource Protection found corrupt files and successfully repaired them. Details are included in the CBS.Log %WinDir%LogsCBSCBS.log: You'll receive this message if SFC is able to fix the problem you're having. You can now scroll through or view detailed information.
• Windows Resource Protection found corrupt files but was unable to fix some of them: Trong trường hợp này bạn phải khắc phục các file bị lỗi bằng tay.

 3.Open sfclogs.txt on the Desktop with Notepad. This file will contain all the details of the scanned system files and information about the files that cannot be repaired.
 Note: SFC scan details are only available when scanning in Windows; they are not available when scanning offline in a command prompt.
If you must know what the SFC file cannot repair, use the Find function in the text application with the phrase "can not repair". You can also use "repair" and "repaired" to see any files that have been repaired.
Note: SFC scan details are only available when scanning in Windows; they are not available when scanning offline in a command prompt.
If you must know what the SFC file cannot repair, use the Find function in the text application with the phrase "can not repair". You can also use "repair" and "repaired" to see any files that have been repaired.


 5. Click Troubleshoot.
6. Click Advanced options.
7. Click Command Prompt to boot your computer by using Command Prompt.
5. Click Troubleshoot.
6. Click Advanced options.
7. Click Command Prompt to boot your computer by using Command Prompt.
 8. During the reboot, you will receive a prompt to enter your username and password to continue.
9. Whenever you need to run SFC outside of Windows, you must tell the utility exactly where the Windows installation files are.
In the Command Prompt window, enter the command below to let the utility understand the location of the Windows and System Reserved partitions:
8. During the reboot, you will receive a prompt to enter your username and password to continue.
9. Whenever you need to run SFC outside of Windows, you must tell the utility exactly where the Windows installation files are.
In the Command Prompt window, enter the command below to let the utility understand the location of the Windows and System Reserved partitions:
 10. Enter the following command in the Command Prompt window and press Enter:
 Note:
In the treen command, use /offboodir to convert the specific drive name of the System Reserved partition, in this case C, and /offwindir to convert the specific location of Windows files, in this case D:Windows.
11. After the scan is finished, close the Command Prompt window.
12. Click Continue to exit and return to Windows 10.
Note:
In the treen command, use /offboodir to convert the specific drive name of the System Reserved partition, in this case C, and /offwindir to convert the specific location of Windows files, in this case D:Windows.
11. After the scan is finished, close the Command Prompt window.
12. Click Continue to exit and return to Windows 10.
 After replacing the files, you can enter the SFC/verifyonly command into the Command Prompt window and then press Enter to check the integrity of all files and identify which files are corrupted to fix.
Also, if you only want to fix certain files, you can check the integrity of each file by using the command:
After replacing the files, you can enter the SFC/verifyonly command into the Command Prompt window and then press Enter to check the integrity of all files and identify which files are corrupted to fix.
Also, if you only want to fix certain files, you can check the integrity of each file by using the command:


Nhận xét
Đăng nhận xét