How to fix BackgroundTaskHost.exe error on Windows 11
Nhận đường liên kết
Facebook
X
Pinterest
Email
Ứng dụng khác
Backgroundtaskhost.exe is a valid process and is part of the Microsoft Windows operating system. However, when working on your computer or launching an application, you may get a BackgroundTaskHost.exe error.
This is a system error, and the error message may vary depending on the user. Therefore, it is difficult to determine the cause of the error. Here, Thewindowsfan.com will show you some steps to fix this problem in Windows 11.
What causes the BackgroundTaskHost.exe error?
When this error occurs, you may see one of the following error messages:
BackgroundTaskHost.exe - System Failure
BackgroundTaskHost.exe – Application Error
These errors can occur due to incorrect registry modifications, third-party application conflicts, and file system errors. Unfortunately, there is no comprehensive solution to fix this problem.
How to fix BackgroundTaskHost.exe error on Windows 11
This article has listed some system troubleshooting steps to help you solve this error on your Windows 11 computer.
1. Perform Clean Boot
Perform Clean Boot
To see if a third-party application conflict is the root of the BackgroundTaskHost.exe error in Windows 11, run Windows in Clean Boot mode with the fewest drivers and starting apps possible.
You can perform Clean Boot Windows 11 from System Configuration. After rebooting, Windows will launch in the Clean Boot environment. Continue using the system and check if the error occurs. If so, proceed to the next troubleshooting method.
If not, look for newly installed apps on your machine. Go to Settings > Apps > Apps & features to accomplish this. Install date can be found by selecting Sort by in the drop-down menu. Restart the computer after uninstalling any recently installed programs like Dell Assistant that can be the source of this issue.
Also, check the update history of Windows 11 on your computer. Invalid Windows updates can often cause the system to function incorrectly. If you identify an update that's causing the problem, you can uninstall Windows updates to fix the problem.
2. Run the System File Checker and DISM tools
Run the System File Checker and DISM tools
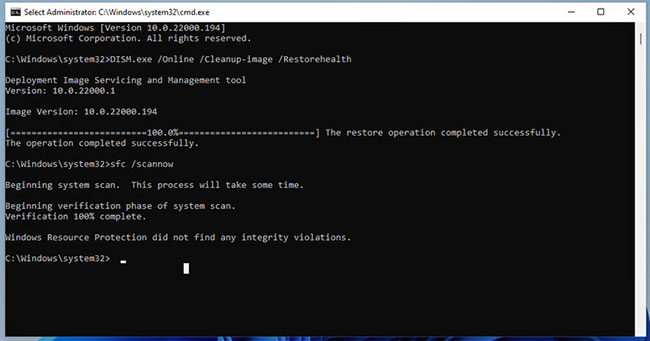
The System File Checker tool is a built-in Command Prompt utility. It allows you to scan Windows for system file errors and replace them with new files stored on the system.
Deployment Image Servicing and Management (DISM) is another command-line utility that you can run to repair Windows Image.
3. Perform a system restore
Windows 11, like its predecessor, creates a new restore point whenever you make a significant change to your system. Restore points allow you to undo your most recent changes and restore your PC to a time when it was error-free before.
This is a great recovery option when you encounter an error after making system modifications that may have damaged system files.
Keep in mind that not all systems have restore points enabled by default. There is therefore extremely little possibility that you have a restore point if you haven't manually activated it.
Step 1: Press the Win key, type system restore in the Windows search, and click Create a Restore Point.
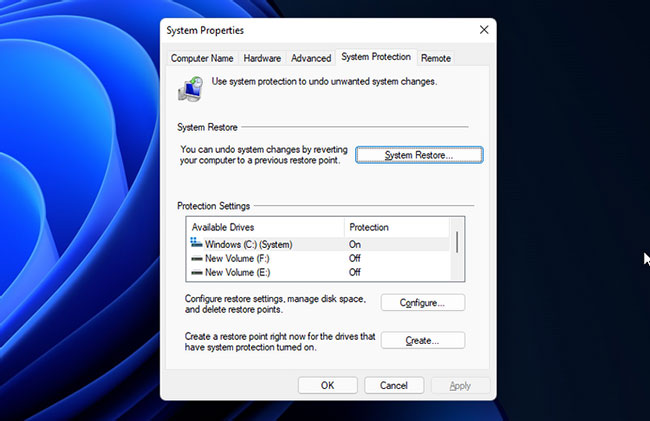
Step 2: In System Properties window, Click on System Restore button.
Click on System Restore buttonStep 3: If there is a suggested restore point, select it and click Next. Otherwise, select Choose a different restore point and click Next.
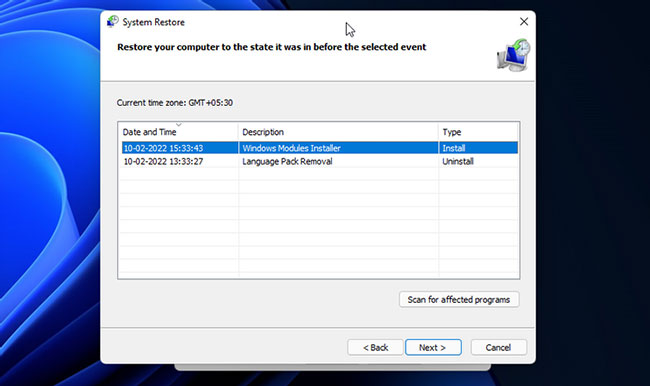
Step 4: System Restore will display all available restore points. Select the latest one and click Next.
System Restore will display all available restore pointsStep 5: Click Scan for affected programs to see the programs and drivers that can be removed and restored in the process.
Step 6: Read the description showing the status, which will restore your computer. Click Finish to begin the system restore process.
This process will take some time, so wait until it's completed. Your PC will reboot once the process is complete.
Once done, you will be greeted with a success message, confirming the system restore went well. If the error persists, try other restore points available to fix the problem.
4. Perform In-place Repair Upgrade
Fatal system errors often require a clean install to fix the problem. However, performing a new install is complicated because it will delete all files and applications and force you to start from scratch.
This is where Windows Repair comes into play. You can perform an In-place Repair Upgrade to reinstall Windows 11 without removing the application. This is a handy solution to many serious Windows problems that require reinstallation.
5. Windows 11 computer reset
If the reinstall doesn't work, you can reset your Windows 11 computer to set up default settings to fix the error.
Reset This PC is a recovery option available on the Windows operating system. It allows you to reset your PC to defaults by removing third-party applications without affecting your personal files and folders.
The PC may reboot a few times during this process, so leave it idle. After that, you can set up your Windows 11 PC with a local user account or a Microsoft account.
One of the "worst" problems that users often encounter on Windows 10 is the black screen error.
The black screen error can occur in some situations on Windows 10, stemming from problems related to the graphics card, the connection error between the computer and your monitor, the error occurring during the installation of the operating system, updating to new versions, etc., or simply happening randomly at any time.
In the article below, the administrator will guide you with some solutions to fix the black Windows 10 screen error.
In addition, if you encounter a black screen error on Windows 7, 8, or 8.1 computers, readers can refer to the steps to fix the error here.
Steps to fix a basic black Windows 10 computer screen
1. Black screen error during installation
Once there, try turning off the computer by pressing and holding the power button for a few seconds. If using a laptop, you can unplug the charger and remove the battery.
Unplug all unnecessa...
Microsoft is currently A/B testing a native dark style for the ChatGPT-powered Bing.com, and it has finally begun distributing out Bing.com to Google Chrome and Safari. On Windows 10 and 11, we got a pop-up that allowed Bing AI access through Google Chrome. It appears that certain people can also access Bing AI through Safari.
One of the most cutting-edge and effective language models for users is Bing AI, which is powered on ChatGPT-4. Since late February, Bing.com AI support has been accessible to Microsoft Edge users. Now, Microsoft is beginning to expand its support to all browsers, including Google Chrome and Apple Safari.
Bing AI pop-up in Chrome | Image Courtesy: Thewindowsfan.com
Anyone may now test Bing AI in Chrome thanks to a new pop-up that has begun to show in the taskbar of Windows 10 or 11. In our experiments, Google Chrome's native dark mode support allowed us to access Bing AI. The screenshot below illustrates how the white background changes to a black...
I could write a whole novel about the peculiar dilemma of maintaining visual coherence in Windows 11. A presentation and summary could be made with the help of Microsoft's Copilot, but guess what? The issue would linger, waiting for the next act.
Despite being the best operating system for productivity and gaming, Windows 11 is still not a unified system. Windows 11 may have a newer look and feel, but it still has some vestiges of older versions.
When users attempt to switch from a Microsoft account to a local one, Windows 11 still refers to the Windows 8 "Search Charm," a bizarre case of inconsistent design. When users try to switch to a local account while device encryption is enabled, they are met with the screen shown below.
" data-sizes="(max-width: 1621px) 100vw, 1621px" /> Charm Bar is mentioned in Windows 11
Windows 8's specialized 'Search Charm' has been removed from later builds of the operating system. Users are st...




Nhận xét
Đăng nhận xét