Disable UAC in Windows 7
As you know, UAC is a feature available in Windows to prevent unwanted changes on the computer, helping to better protect the computer. However, sometimes the annoyance caused by it makes users frustrated, and they just want to get rid of it.
>>> Disable UAC in Windows Vista >>> Exploring Windows 7's UAC
 In Windows 7, UAC settings are divided into several levels, allowing you to have more security options for your computer:
Always notify: With this option, you will receive notifications before programs make any changes or when Windows settings need administrator privileges to be confirmed. Upon receiving this setup message, the desktop will be disabled until you confirm or do not confirm the UAC dialog box.
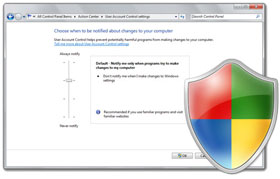
Notify me only when programs try to make changes to my computer: You'll be notified before programs make changes to your computer that require administrator privileges. With this setting, you will not receive notifications if changes to Windows settings require administrative rights. In addition, you will receive a notification if a program other than Windows tries to change Windows settings. This is the default level.
Notify me only when programs try to make changes to my computer (do not dim my desktop): Setting this level is the same as above, but it has one difference: the desktop is not disabled. Other programs can still work when the message dialog window appears. This is a poor security option if you're actually running a malicious program.
Never notify: You will not receive any notification before there is any activity that requires administrative rights on the computer at this setting level. If you are accessing with administrator rights, all operations can be performed, but if you are a normal user, some operations related to administrative rights will be denied. Selecting this setting in Windows 7 provides the same level of security as regular Windows XP, meaning this is the lowest level of security.
However, if you feel that your computer is completely safe and using UAC to protect it is not necessary, or if for some reason you want to get rid of this annoying feature, you can proceed to follow the steps below to disable it:
In Windows 7, UAC settings are divided into several levels, allowing you to have more security options for your computer:
Always notify: With this option, you will receive notifications before programs make any changes or when Windows settings need administrator privileges to be confirmed. Upon receiving this setup message, the desktop will be disabled until you confirm or do not confirm the UAC dialog box.
Notify me only when programs try to make changes to my computer: You'll be notified before programs make changes to your computer that require administrator privileges. With this setting, you will not receive notifications if changes to Windows settings require administrative rights. In addition, you will receive a notification if a program other than Windows tries to change Windows settings. This is the default level.
Notify me only when programs try to make changes to my computer (do not dim my desktop): Setting this level is the same as above, but it has one difference: the desktop is not disabled. Other programs can still work when the message dialog window appears. This is a poor security option if you're actually running a malicious program.
Never notify: You will not receive any notification before there is any activity that requires administrative rights on the computer at this setting level. If you are accessing with administrator rights, all operations can be performed, but if you are a normal user, some operations related to administrative rights will be denied. Selecting this setting in Windows 7 provides the same level of security as regular Windows XP, meaning this is the lowest level of security.
However, if you feel that your computer is completely safe and using UAC to protect it is not necessary, or if for some reason you want to get rid of this annoying feature, you can proceed to follow the steps below to disable it:
1. Disable UAC via the User Account Control Settings
This is a common method that users often use to disable UAC.- Open Control Panel
- Type in UAC in the address bar or in the System and Security section.
- Click Change User Account Control Settings.

Or you can enter the following command into the Run menu:
C:WindoOr you can enter the following command into the Run menu:wsSystem32UserAccountControlSettings.exeTo turn off UAC, drag the slider to the bottom selection Never notify and then click OK. If you receive a message to enter the admin account password, enter it as required.

To turn UAC back on, follow the steps above and select the required security level, then click OK.
2, Disable UAC via the Group Policy
This is the method that administrators often use to disable UAC on some computers on the network. You can do it through Local Group Policy or an Active Directory-based GPO If you are using Local Group Policy you need to open the Group Policy Editor (Start > Run > gpedit.msc). If using an AD-based GPO, open the Group Policy Management Console (Start > Run > gpmc.msc) from a Windows Vista/7/2008 computer in a domain. In the GPMC window, browse to the required GPO with an OU or domain connection, where you can edit or even create a new GPO.


- User Account Control: Behavior of the elevation prompt for administrators in Admin Approval Mode – set the value to Elevate without prompting.
- User Account Control: Detect application installations and prompt for elevation - set the value to Disabled.
- User Account Control: Only elevate UIAccess applications that are installed in secure locations - set the value to Disabled.
- User Account Control: Run all administrators in Admin Approval Mode - set the value to Disabled.

Restart your computer.
3. Disable UAC via the Registry
Note: Changing the registry can cause Windows to fail to start. So before making any changes, you must make sure to back up the registry. Go to Start, select Run, type regedit, and press Enter. If you receive a confirmation message from UAC, select Yes to continue. Navigate to the following path:HKEY_LOCAL_MACHINESOFTWAREMicrosoftWindows
CurrentVersionPoliciesSystemIn the details section on the right, find the EnableLUA key (type REG_DWORD).
On the Edit menu, click Modify. In the Value data dialog box, enter 0 and click OK.

Close the Registry Editor and restart your computer.


Nhận xét
Đăng nhận xét